| Section |
Page |
| Introduction |
10 |
| Operator’s manual |
11 |
| Where to find it |
16 |
| Instruments and controls |
21 |
| Door control panel |
23 |
| Overhead control panel |
24 |
| Dashboard |
25 |
| Center console |
27 |
| Operation |
31 |
| Electronic key |
32 |
| Start lock-out |
33 |
| General notes on the central locking system |
33 |
| Central locking system |
34 |
| Radio frequency and infrared remote control |
34 |
| Locking and unlocking |
36 |
| Choosing global or selective mode on remote control |
36 |
| Opening the trunk |
37 |
| Central locking system:Summer opening/convenience feature |
38 |
| Panic button |
39 |
| Central locking system:Mechanical keys |
39 |
| Doors |
40 |
| Central locking switch |
42 |
| Central locking system:Automatic central locking |
43 |
| Emergency unlocking in case of accident |
43 |
| Trunk |
44 |
| Trunk lid emergency release |
46 |
| Trunk lid emergency release |
47 |
| Trunk:Release switch |
48 |
| Trunk lamp |
48 |
| Antitheft alarm system |
49 |
| Tow-away alarm |
50 |
| Easy-entry/exit feature |
51 |
| Front seat adjustment |
52 |
| Manual seat |
55 |
| Removal and installation of front seat head restraints |
58 |
| Power seat |
58 |
| Manual seat |
59 |
| Multicontour seat |
60 |
| Heated seats |
61 |
| Head restraints:Rear seat |
63 |
| Place head restraints upright |
64 |
| Head restraint height |
65 |
| Restraint systems |
66 |
| Seat belts |
66 |
| Seat belt nonusage warning system |
67 |
| Seat belts:Fastening |
69 |
| Seat belts:Unfastening |
70 |
| BabySmartTM airbag deactivation system |
73 |
| Self-test BabySmart |
73 |
| Supplemental Restraint System (SRS) |
74 |
| Emergency tensioning retractor (ETR) |
75 |
| Airbags |
76 |
| Front airbags |
76 |
| Side impact airbags |
79 |
| Side impact airbags |
79 |
| Window curtain airbag |
79 |
| Safety guidelines for the seat belt, emergency tensioning retractor and airbag |
84 |
| Infant and child restraint systems |
86 |
| Infant and child restraint systems:Installation |
88 |
| Infant and child restraint systems:Child seat mounts |
89 |
| Steering wheel adjustment |
91 |
| Steering wheel adjustment |
92 |
| Rear view mirrors |
93 |
| Inside rear view mirror |
93 |
| Memory function |
98 |
| Storing positions into memory: |
99 |
| Recalling positions from memory: |
99 |
| Instrument cluster |
101 |
| Activating instrument cluster display |
103 |
| Instrument cluster illumination |
103 |
| Outside temperature indicator (17) |
104 |
| Trip odometer (13) |
104 |
| Tachometer (2) |
104 |
| Multifunction steering wheel |
105 |
| Trip and main odometer and sub menu |
109 |
| Audio systems |
111 |
| Audio systems:Radio |
111 |
| Audio systems:CD Player |
112 |
| Audio systems:Cassette player |
113 |
| Telephone |
114 |
| Telephone:Telephone book |
114 |
| Telephone:Redialing |
116 |
| Telephone:Incoming call |
118 |
| Navigation system |
119 |
| Trip computer |
120 |
| To reset the short |
121 |
| Malfunction/warning message memory |
122 |
| Individual settings |
124 |
| To return menu� |
126 |
| Individual settings:"INSTRUMENT CLUSTER" |
127 |
| To return menu� |
130 |
| Individual settings:"LIGHTING" |
131 |
| To return menu� |
133 |
| Individual settings:"VEHICLE" |
134 |
| To return menu� |
136 |
| Individual settings:"CONVENIENCE" (vehicles with memory function) |
137 |
| To return menu� |
139 |
| Setting the audio volume |
139 |
| Coolant temperature gauge |
140 |
| Flexible service system (FSS) |
141 |
| Engine oil level indicator |
144 |
| Engine oil consumption |
145 |
| Exterior lamp switch |
146 |
| Headlamp mode |
147 |
| Manual headlamp mode |
147 |
| Automatic headlamp mode |
147 |
| Exterior lamp switch:Daytime running lamp mode |
148 |
| Night security illumination |
149 |
| Locator lighting |
150 |
| Headlamp cleaning system |
150 |
| Combination switch |
151 |
| Blocked windshield wipers |
153 |
| Emergency operation of windshield wipers |
153 |
| Windshield wipers smear |
153 |
| Windshield and headlamp washer fluid mixing ratio |
153 |
| Hazard warning flasher |
154 |
| Climate control |
155 |
| Climate control:Display and controls |
157 |
| Climate control |
158 |
| Climate control:Dust filter |
158 |
| Climate control:Basic setting |
159 |
| Climate control:Special settings |
159 |
| Climate control:Defrosting |
160 |
| Climate control:Windows fogged up on the inside |
160 |
| Climate control:Windows fogged up on the outside |
160 |
| Climate control:Air recirculation |
161 |
| Climate control:Economy mode |
162 |
| Climate control - OFF/ON |
162 |
| Climate control:Residual engine heat utilization |
162 |
| Automatic climate control |
163 |
| Automatic climate control:Display and controls |
165 |
| Automatic climate control |
166 |
| Automatic climate control:Dust filter |
167 |
| Automatic climate control:Basic setting |
167 |
| Automatic climate control:Special settings |
168 |
| Automatic climate control:Defrosting |
169 |
| Automatic climate control:Windows fogged up on the outside |
169 |
| Automatic climate control:Windows fogged up on the outside |
169 |
| Automatic climate control:Air recirculation |
170 |
| Automatic climate control:Activated charcoal filter |
171 |
| Automatic climate control:Economy mode |
172 |
| Automatic climate control - OFF/ON |
172 |
| Automatic climate control:Residual engine heat utilization |
172 |
| Rear window defroster |
173 |
| Front center console storage compartment ventilation |
174 |
| Automatic climate control:Adjustable air outlets, rear passenger compartment |
175 |
| Operation Audio and telephone |
176 |
| Operating safety |
176 |
| Operating and display elements |
177 |
| Button and soft key operation |
179 |
| Operation |
179 |
| Switching on and off |
179 |
| Adjusting the volume |
180 |
| Audio functions |
180 |
| Bass |
180 |
| Treble |
180 |
| Fader |
181 |
| Balance |
181 |
| Centering all audio functions |
181 |
| Audio system tone level selection |
182 |
| Radio mode |
182 |
| Selecting radio mode |
182 |
| Selecting the band |
182 |
| Manual tuning |
183 |
| Seek tuning |
183 |
| Scan tuning |
183 |
| Weather Band |
184 |
| Station memory |
184 |
| Storing stations automatically (Autostore) |
184 |
| Storing stations |
185 |
| Retrieving a station from memory |
185 |
| Direct frequency input AM and FM only |
185 |
| Cassette mode |
185 |
| Playing cassettes |
185 |
| Cassette eject |
186 |
| Track selection |
187 |
| Track search forwards/backwards |
187 |
| Fast forward/reverse |
187 |
| Scanning |
188 |
| Scanning |
188 |
| Dolby�NR |
188 |
| CD mode |
189 |
| General notes on CD mode |
189 |
| CD changer |
190 |
| Loading/emptying the CD magazine |
190 |
| Playing CDs |
191 |
| Skipping tracks forward/backward |
191 |
| Fast forward/reverse |
192 |
| Scanning |
192 |
| Random play/repeat function |
192 |
| Direct track selection |
193 |
| Track and time display |
193 |
| Telephone operation |
193 |
| Switching the telephone on and off |
193 |
| Adjusting the volume |
194 |
| Entering telephone number and starting dialing process |
194 |
| Calling up the phone book |
194 |
| Switching between name search and number search |
194 |
| Searching and selecting telephone book entries by name |
195 |
| Searching and selecting phone book entries by number |
195 |
| Placing a call |
195 |
| Manual repeat dialing (redial) |
196 |
| Automatic repeat dialing (redial) |
196 |
| Abbreviated dialing from previously stored telephone numbers |
196 |
| Speed dialing |
196 |
| Turbo-dialing |
197 |
| Multi party call |
197 |
| Accepting incoming call in telephone mode |
197 |
| Accepting incoming call in tape, CD or radio mode |
197 |
| Terminating call |
198 |
| Muting a call |
198 |
| Component malfunctions |
198 |
| Emergency call |
199 |
| Power windows |
200 |
| Power windows:Express opening and closing |
201 |
| Power windows:Blocking of rear door window operation |
202 |
| Power windows:Synchronizing power windows |
202 |
| Sliding/pop-up roof |
203 |
| Opening or closing the sliding�/�pop-up roof automatically |
204 |
| Sliding/pop-up roof:Synchronizing |
205 |
| Interior lighting |
206 |
| Door entry lamps |
207 |
| Rear window sunshade |
208 |
| Sun visors |
209 |
| Vanity mirrors |
209 |
| Interior |
210 |
| Storage compartments and armrests |
210 |
| Glove box |
211 |
| Storage compartment in front of armrest |
212 |
| Storage compartment below the front armrest |
213 |
| Cup holder |
214 |
| Ashtrays |
216 |
| Rear seats |
217 |
| Lighter |
218 |
| Parcel net in front passenger footwell |
219 |
| Ski sack |
219 |
| Removal of ski sack |
223 |
| Enlarged cargo area |
224 |
| Split folding rear seat bench |
224 |
| Setting up rear seat bench |
225 |
| Loading instructions |
226 |
| Cellular telephone |
227 |
| Telephone, general |
228 |
| Garage door opener |
229 |
| Driving |
235 |
| COMAND, radio and telephone |
235 |
| Telephones and two-way radios |
235 |
| The first 1 000 miles (1 500 km) |
236 |
| Maintenance |
236 |
| Tele Aid |
237 |
| System self-check |
237 |
| Tele Aid:Emergency calls |
238 |
| Tele Aid:Initiating an emergency call |
240 |
| Initiating an emergency call manually |
240 |
| Tele Aid:Roadside Assistance |
241 |
| Tele Aid:Information |
242 |
| Remote door unlock |
245 |
| Stolen vehicle tracking services |
246 |
| Info Services |
246 |
| Catalytic converter |
247 |
| Emission control |
248 |
| Starter switch |
249 |
| Starting and turning off the engine |
251 |
| Before starting |
251 |
| Starting |
251 |
| Turning off |
251 |
| Manual transmission |
252 |
| Automatic transmission |
254 |
| Driving |
255 |
| Accelerator position |
255 |
| Stopping |
256 |
| Maneuvering |
256 |
| Selector lever position |
257 |
| Gear selection for special circumstances |
259 |
| Program mode selector switch |
261 |
| Emergency operation (Limp home mode) |
262 |
| Parking brake |
263 |
| Driving instructions |
264 |
| Drive sensibly - Save Fuel |
264 |
| Drinking and driving |
264 |
| Pedals |
264 |
| Power assistance |
265 |
| Brakes |
265 |
| Driving off |
266 |
| Parking |
267 |
| Tires |
268 |
| Snow chains |
270 |
| Winter driving instructions |
271 |
| Winter driving |
272 |
| Block heater |
273 |
| Deep water |
273 |
| Passenger compartment |
274 |
| Traveling abroad |
274 |
| Cruise control |
275 |
| Brake assist system (BAS) |
278 |
| Antilock brake system (ABS) |
279 |
| Electronic stability program (ESP) |
281 |
| Synchronizing ESP |
282 |
| ESP control switch |
283 |
| What you should know at the gas station |
285 |
| Check regularly and before a long trip |
287 |
| Instrument cluster display |
289 |
| On-board diagnostic system |
289 |
| Check engine malfunction indicator lamp |
289 |
| Brake warning lamp |
291 |
| Supplemental restraint system (SRS) indicator lamp |
292 |
| Fuel reserve warning |
293 |
| ABS malfunction indicator lamp |
294 |
| Electronic stability program (ESP) — warning lamp |
295 |
| Seat belts:Warning lamp |
295 |
| Malfunction and indicator lamp in the center console |
295 |
| AIRBAG OFF indicator lamp |
295 |
| Malfunction and warning messages |
296 |
| DISPLAY DEFECTIVE (engine control unit) |
298 |
| DISPLAY DEFECTIVE (several systems) |
298 |
| BATTERY/ALTERNATOR |
299 |
| ANTILOCK BRAKE SYSTEM |
300 |
| BRAKE ASSIST |
300 |
| BRAKE PAD WEAR |
301 |
| BRAKE FLUID |
301 |
| PARKING BRAKE |
302 |
| SEAT BELT SYSTEM |
302 |
| ELEC. STABIL. PROG. (Electronic stability program) |
303 |
| COOLANT (coolant level) |
304 |
| COOLANT (coolant temperature) |
305 |
| ENGINE OIL LEVEL |
306 |
| LIGHTING SYSTEM |
307 |
| LAMP SENSOR |
309 |
| DOOR |
309 |
| TRUNK OPEN |
310 |
| HOOD |
310 |
| TELEPHONE – FUNCTION |
311 |
| TELE AID |
311 |
| WASHER FLUID |
312 |
| RESTRAINT SYSTEM |
313 |
| KEY |
313 |
| FUEL RESERVE |
314 |
| UNDERVOLTAGE |
314 |
| STEERING WHEEL ADJUST |
315 |
| Practical hints |
317 |
| Stowing things in the vehicle |
317 |
| Fuses |
318 |
| Fuse box in the passenger compartment |
318 |
| Fuse box in engine compartment |
319 |
| Auxiliary fuse box in the trunk |
320 |
| Engine compartment |
321 |
| Adding engine oil |
324 |
| Automatic transmission fluid level |
325 |
| Coolant level |
325 |
| Adding coolant |
326 |
| Windshield washer system |
326 |
| Windshield and headlamp washer fluid mixing ratio |
327 |
| Spare wheel, vehicle tools, storage compartment |
328 |
| TIREFIT |
329 |
| Jack |
330 |
| Wheels |
331 |
| Tire replacement |
331 |
| Rotating wheels |
332 |
| Spare wheel |
333 |
| Spare wheel bolts |
333 |
| Changing wheels |
334 |
| TIREFIT:Sealing tire with TIREFIT |
341 |
| Tire inflation pressure |
344 |
| Battery |
345 |
| Battery recycling |
347 |
| Jump starting |
347 |
| Towing the vehicle |
350 |
| Transmission selector lever, manually unlocking |
353 |
| Exterior lamps |
354 |
| Headlamp adjustment |
354 |
| Replacing bulbs |
354 |
| Exterior lamps:Headlamp assembly |
355 |
| Exterior lamps:Bulbs for high and low beam |
356 |
| Exterior lamps:Turn signal lamp |
356 |
| Exterior lamps:Parking and standing lamp |
356 |
| Exterior lamps:Taillamp assemblies |
357 |
| Exterior lamps:License plate lamp |
358 |
| Exterior lamps:Side marker lamp, front |
358 |
| Exterior lamps:High mounted stop lamp |
359 |
| Standby bulb function |
359 |
| Electronic key:Changing batteries |
360 |
| Checking batteries |
360 |
| Changing batteries |
360 |
| Electronic main key:Synchronizing remote control |
362 |
| Emergency engine shut-down |
362 |
| Fuel filler flap, manual release |
363 |
| Emergency operation of sliding/pop-up roof |
363 |
| Replacing wiper blade insert |
365 |
| Roof rack |
366 |
| Vehicle care |
369 |
| Power washer |
370 |
| Tar stains |
370 |
| Paintwork, painted body components |
370 |
| Engine cleaning |
371 |
| Vehicle washing |
371 |
| Ornamental moldings |
372 |
| Headlamps, taillamps, turn signal lenses |
372 |
| Window cleaning |
372 |
| Wiper blade |
372 |
| Light alloy wheels |
373 |
| Instrument cluster |
373 |
| Steering wheel and gear selector lever |
373 |
| Cup holder |
373 |
| Seat belts |
374 |
| Headliner and shelf below rear window |
374 |
| Leather upholstery |
374 |
| Hard plastic trim items |
374 |
| Plastic and rubber parts |
374 |
| Technical data |
377 |
| Warranty coverage |
377 |
| Loss of Service and Warranty Information Booklet |
377 |
| Identification labels |
378 |
| Layout of poly-V-belt drive |
379 |
| Technical data |
380 |
| Rims — Tires |
381 |
| Electrical system |
382 |
| Weights |
382 |
| Main Dimensions |
383 |
| Fuels, coolants, lubricants etc. - capacities |
384 |
| Engine oils |
386 |
| Engine oil additives |
386 |
| Air conditioner refrigerant |
386 |
| Brake fluid |
386 |
| Premium unleaded gasoline |
387 |
| Fuel requirements |
387 |
| Gasoline additives |
388 |
| Coolants |
388 |
 1
1 2
2 3
3 4
4 5
5 6
6 7
7 8
8 9
9 10
10 11
11 12
12 13
13 14
14 15
15 16
16 17
17 18
18 19
19 20
20 21
21 22
22 23
23 24
24 25
25 26
26 27
27 28
28 29
29 30
30 31
31 32
32 33
33 34
34 35
35 36
36 37
37 38
38 39
39 40
40 41
41 42
42 43
43 44
44 45
45 46
46 47
47 48
48 49
49 50
50 51
51 52
52 53
53 54
54 55
55 56
56 57
57 58
58 59
59 60
60 61
61 62
62 63
63 64
64 65
65 66
66 67
67 68
68 69
69 70
70 71
71 72
72 73
73 74
74 75
75 76
76 77
77 78
78 79
79 80
80 81
81 82
82 83
83 84
84 85
85 86
86 87
87 88
88 89
89 90
90 91
91 92
92 93
93 94
94 95
95 96
96 97
97 98
98 99
99 100
100 101
101 102
102 103
103 104
104 105
105 106
106 107
107 108
108 109
109 110
110 111
111 112
112 113
113 114
114 115
115 116
116 117
117 118
118 119
119 120
120 121
121 122
122 123
123 124
124 125
125 126
126 127
127 128
128 129
129 130
130 131
131 132
132 133
133 134
134 135
135 136
136 137
137 138
138 139
139 140
140 141
141 142
142 143
143 144
144 145
145 146
146 147
147 148
148 149
149 150
150 151
151 152
152 153
153 154
154 155
155 156
156 157
157 158
158 159
159 160
160 161
161 162
162 163
163 164
164 165
165 166
166 167
167 168
168 169
169 170
170 171
171 172
172 173
173 174
174 175
175 176
176 177
177 178
178 179
179 180
180 181
181 182
182 183
183 184
184 185
185 186
186 187
187 188
188 189
189 190
190 191
191 192
192 193
193 194
194 195
195 196
196 197
197 198
198 199
199 200
200 201
201 202
202 203
203 204
204 205
205 206
206 207
207 208
208 209
209 210
210 211
211 212
212 213
213 214
214 215
215 216
216 217
217 218
218 219
219 220
220 221
221 222
222 223
223 224
224 225
225 226
226 227
227 228
228 229
229 230
230 231
231 232
232 233
233 234
234 235
235 236
236 237
237 238
238 239
239 240
240 241
241 242
242 243
243 244
244 245
245 246
246 247
247 248
248 249
249 250
250 251
251 252
252 253
253 254
254 255
255 256
256 257
257 258
258 259
259 260
260 261
261 262
262 263
263 264
264 265
265 266
266 267
267 268
268 269
269 270
270 271
271 272
272 273
273 274
274 275
275 276
276 277
277 278
278 279
279 280
280 281
281 282
282 283
283 284
284 285
285 286
286 287
287 288
288 289
289 290
290 291
291 292
292 293
293 294
294 295
295 296
296 297
297 298
298 299
299 300
300 301
301 302
302 303
303 304
304 305
305 306
306 307
307 308
308 309
309 310
310 311
311 312
312 313
313 314
314 315
315 316
316 317
317 318
318 319
319 320
320 321
321 322
322 323
323 324
324 325
325 326
326 327
327 328
328 329
329 330
330 331
331 332
332 333
333 334
334 335
335 336
336 337
337 338
338 339
339 340
340 341
341 342
342 343
343 344
344 345
345 346
346 347
347 348
348 349
349 350
350 351
351 352
352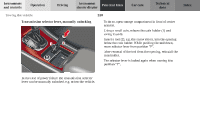 353
353 354
354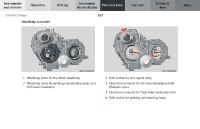 355
355 356
356 357
357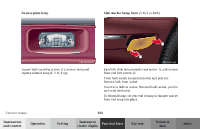 358
358 359
359 360
360 361
361 362
362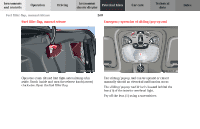 363
363 364
364 365
365 366
366 367
367 368
368 369
369 370
370 371
371 372
372 373
373 374
374 375
375 376
376 377
377 378
378 379
379 380
380 381
381 382
382 383
383 384
384 385
385 386
386 387
387 388
388 389
389 390
390 391
391 392
392 393
393 394
394 395
395 396
396 397
397 398
398 399
399 400
400 401
401 402
402 403
403 404
404 405
405 406
406


