2009 Mercedes G-Class Owner's Manual - Page 243
2009 Mercedes G-Class Manual
Page 243 highlights
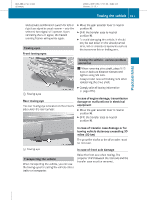
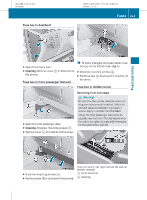
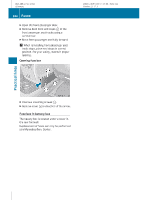
463_AKB; 2; 52, en-US d2ureepe, 2008-12-02T10:52:11+01:00 - Seite 241 Version: 2.11.7.1 Towing the vehicle and activate combination switch for left or right turn signal in usual manner - only the selected turn signal will operate. Upon canceling the turn signal, the hazard warning flasher will operate again. X 241 Towing eyes Front towing eyes Move the gear selector lever to neutral position N. X Shift the transfer case to neutral position N. X To avoid damaging the vehicle, it should only be tied down on the wheels/wheel rims, not on chassis components such as the transverse link or trailing arm. Towing the vehicle - various problem scenarios ! When removing drive shaft, place M10 nuts on bolts as distance sleeves and tighten using M8 nuts. Always install new self-locking nuts when reinstalling the drive shaft. X : Towing eyes Comply with all towing information (Y page 239). Rear towing eye The rear towing eye is located on the driver's side under the rear bumper. In case of engine damage, transmission damage or malfunctions in electrical equipment X Move the gear selector lever to neutral position N. X Shift the transfer case to neutral position N. In case of transfer case damage or for towing vehicle distances exceeding 30 miles (50 km) The propeller shafts to the drive axles must be removed. : Towing eye In case of front axle damage Raise the front axle when towing. The propeller shaft between the rear axle and the transfer case must be removed. Transporting the vehicle When transporting the vehicle, you can use the towing eyes for pulling the vehicle onto a trailer or transporter. Z Practical hints
-
 1
1 -
2
-
3
-
4
-
5
-
6
-
7
-
8
-
9
-
10
-
11
-
12
-
13
-
14
-
15
-
16
-
17
-
18
-
19
-
20
-
21
-
22
-
23
-
24
-
25
-
26
-
27
-
28
-
29
-
30
-
31
-
32
-
33
-
34
-
35
-
36
-
37
-
38
-
39
-
40
-
41
-
42
-
43
-
44
-
45
-
46
-
47
-
48
-
49
-
50
-
51
-
52
-
53
-
54
-
55
-
56
-
57
-
58
-
59
-
60
-
61
-
62
-
63
-
64
-
65
-
66
-
67
-
68
-
69
-
70
-
71
-
72
-
73
-
74
-
75
-
76
-
77
-
78
-
79
-
80
-
81
-
82
-
83
-
84
-
85
-
86
-
87
-
88
-
89
-
90
-
91
-
92
-
93
-
94
-
95
-
96
-
97
-
98
-
99
-
100
-
101
-
102
-
103
-
104
-
105
-
106
-
107
-
108
-
109
-
110
-
111
-
112
-
113
-
114
-
115
-
116
-
117
-
118
-
119
-
120
-
121
-
122
-
123
-
124
-
125
-
126
-
127
-
128
-
129
-
130
-
131
-
132
-
133
-
134
-
135
-
136
-
137
-
138
-
139
-
140
-
141
-
142
-
143
-
144
-
145
-
146
-
147
-
148
-
149
-
150
-
151
-
152
-
153
-
154
-
155
-
156
-
157
-
158
-
159
-
160
-
161
-
162
-
163
-
164
-
165
-
166
-
167
-
168
-
169
-
170
-
171
-
172
-
173
-
174
-
175
-
176
-
177
-
178
-
179
-
180
-
181
-
182
-
183
-
184
-
185
-
186
-
187
-
188
-
189
-
190
-
191
-
192
-
193
-
194
-
195
-
196
-
197
-
198
-
199
-
200
-
201
-
202
-
203
-
204
-
205
-
206
-
207
-
208
-
209
-
210
-
211
-
212
-
213
-
214
-
215
-
216
-
217
-
218
-
219
-
220
-
221
-
222
-
223
-
224
-
225
-
226
-
227
-
228
-
229
-
230
-
231
-
232
-
233
-
234
-
235
-
236
-
237
-
 238
238 -
 239
239 -
 240
240 -
 241
241 -
 242
242 -
 243
243 -
 244
244 -
 245
245 -
 246
246 -
 247
247 -
 248
248 -
249
-
250
-
251
-
252
-
253
-
254
-
255
-
256
-
257
-
258
-
259
-
260
-
261
-
262
-
263
-
264
 |
 |
