2011 Mercedes C-Class Owner's Manual - Page 117
2011 Mercedes C-Class Manual

Page 117 highlights
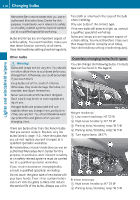
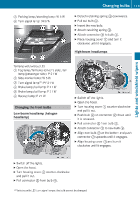
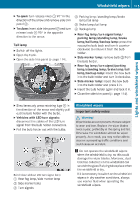
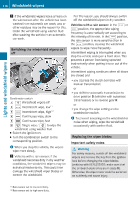
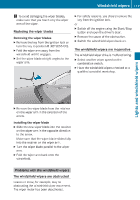
Windshield wipers X 115 To open: turn release knob : 90° in the direction of the arrow and remove side trim panel ;. X To close: insert side trim panel ; and turn release knob : 90° in the opposite direction to the arrow. ? Parking lamp/standing lamp/brake lamp/tail lamp A Brake lamp/tail lamp B Backup lamp X Tail lamp X X Switch off the lights. Open the trunk. X Open the side trim panel (Y page 114). X Simultaneously press retaining lugs : in the direction of the arrow and slightly pull out the bulb holder with the bulbs. X Vehicles with LED turn signals: disconnect the cables of the LED turn signal from the bulb holder connectors. X Pull the bulb holder out with the bulbs. Windshield wipers Important safety notes G Warning! Wiper blades are components that are subject to wear and tear. Replace the wiper blades twice a year, preferably in the spring and fall. Otherwise the windshield will not be wiped properly. As a result, you may not be able to observe surrounding traffic conditions and could cause an accident. Bulb holder without LED turn signal lamp : Rear fog lamp/side marker lamp ; Side marker lamp = Turn signals ! Do not operate the windshield wipers when the windshield is dry, as this could damage the wiper blades. Moreover, dust that has collected on the windshield can scratch the glass if wiping takes place when the windshield is dry. If it is necessary to switch on the windshield wipers in dry weather conditions, always use washer fluid when operating the windshield wipers. Z Lights and windshield wipers Rear fog lamp/turn signal lamp/ parking lamp/standing lamp/brake lamp/tail lamp/backup lamp: press the respective bulb back and turn it counterclockwise to remove it from the bulb holder. X Side marker lamp: remove bulb ; from the bulb holder. X Rear fog lamp/turn signal/parking lamp/standing lamp/brake lamp/tail lamp/backup lamp: insert the new bulb into the bulb holder and turn it clockwise. X Side marker lamp: insert the new bulb into the bulb holder and press it in. X Insert the bulb holder again and lock it in. X Close the side trim panel (Y page 114).
-
 1
1 -
2
-
3
-
4
-
5
-
6
-
7
-
8
-
9
-
10
-
11
-
12
-
13
-
14
-
15
-
16
-
17
-
18
-
19
-
20
-
21
-
22
-
23
-
24
-
25
-
26
-
27
-
28
-
29
-
30
-
31
-
32
-
33
-
34
-
35
-
36
-
37
-
38
-
39
-
40
-
41
-
42
-
43
-
44
-
45
-
46
-
47
-
48
-
49
-
50
-
51
-
52
-
53
-
54
-
55
-
56
-
57
-
58
-
59
-
60
-
61
-
62
-
63
-
64
-
65
-
66
-
67
-
68
-
69
-
70
-
71
-
72
-
73
-
74
-
75
-
76
-
77
-
78
-
79
-
80
-
81
-
82
-
83
-
84
-
85
-
86
-
87
-
88
-
89
-
90
-
91
-
92
-
93
-
94
-
95
-
96
-
97
-
98
-
99
-
100
-
101
-
102
-
103
-
104
-
105
-
106
-
107
-
108
-
109
-
110
-
111
-
 112
112 -
 113
113 -
 114
114 -
 115
115 -
 116
116 -
 117
117 -
 118
118 -
 119
119 -
 120
120 -
 121
121 -
 122
122 -
123
-
124
-
125
-
126
-
127
-
128
-
129
-
130
-
131
-
132
-
133
-
134
-
135
-
136
-
137
-
138
-
139
-
140
-
141
-
142
-
143
-
144
-
145
-
146
-
147
-
148
-
149
-
150
-
151
-
152
-
153
-
154
-
155
-
156
-
157
-
158
-
159
-
160
-
161
-
162
-
163
-
164
-
165
-
166
-
167
-
168
-
169
-
170
-
171
-
172
-
173
-
174
-
175
-
176
-
177
-
178
-
179
-
180
-
181
-
182
-
183
-
184
-
185
-
186
-
187
-
188
-
189
-
190
-
191
-
192
-
193
-
194
-
195
-
196
-
197
-
198
-
199
-
200
-
201
-
202
-
203
-
204
-
205
-
206
-
207
-
208
-
209
-
210
-
211
-
212
-
213
-
214
-
215
-
216
-
217
-
218
-
219
-
220
-
221
-
222
-
223
-
224
-
225
-
226
-
227
-
228
-
229
-
230
-
231
-
232
-
233
-
234
-
235
-
236
-
237
-
238
-
239
-
240
-
241
-
242
-
243
-
244
-
245
-
246
-
247
-
248
-
249
-
250
-
251
-
252
-
253
-
254
-
255
-
256
-
257
-
258
-
259
-
260
-
261
-
262
-
263
-
264
-
265
-
266
-
267
-
268
-
269
-
270
-
271
-
272
-
273
-
274
-
275
-
276
-
277
-
278
-
279
-
280
-
281
-
282
-
283
-
284
-
285
-
286
-
287
-
288
-
289
-
290
-
291
-
292
-
293
-
294
-
295
-
296
-
297
-
298
-
299
-
300
-
301
-
302
-
303
-
304
-
305
-
306
-
307
-
308
-
309
-
310
-
311
-
312
-
313
-
314
-
315
-
316
-
317
-
318
-
319
-
320
 |
 |
