1996 Nissan Altima Owner's Manual - Page 137
1996 Nissan Altima Manual

Page 137 highlights
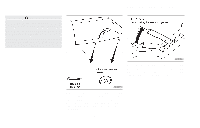
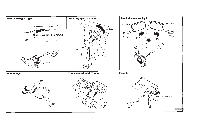
7. Remove the headlight bulb. Do not shake or rotate the bulb when removing it. 8. Install the new bulb in the reverse order of removal. ● Be sure the lip of the rubber cap contacts the headlight body. DO NOT TOUCH THE BULB. CAUTION ● Use the same number and wattage as originally installed: Wattage 60/55 Bulb No. HB2 ● Aiming is not necessary after replacing the bulb. ● Do not leave the bulb out of the headlight reflector for a long period of time as dust, moisture, and smoke may enter the headlight body and affect the performance of the headlight. ADI0085 ADI0526 HEADLIGHT AIMING ADJUSTMENT Before performing aiming adjustment, make sure of the following. a. Keep all tires inflated to correct pressure. b. Place vehicle on level ground. c. See that vehicle is unloaded (except for full levels of coolant, engine oil and fuel, and spare tire, jack, and tools). Have the driver or equivalent weight placed in driver's seat. 7-22 Low beam 1. Open the hood. 2. Adjust the vertical indicator by turning the adjusting screw with a Phillips screwdriver. The bubble in the gauge should be centered on the ''0'' mark.
-
 1
1 -
2
-
3
-
4
-
5
-
6
-
7
-
8
-
9
-
10
-
11
-
12
-
13
-
14
-
15
-
16
-
17
-
18
-
19
-
20
-
21
-
22
-
23
-
24
-
25
-
26
-
27
-
28
-
29
-
30
-
31
-
32
-
33
-
34
-
35
-
36
-
37
-
38
-
39
-
40
-
41
-
42
-
43
-
44
-
45
-
46
-
47
-
48
-
49
-
50
-
51
-
52
-
53
-
54
-
55
-
56
-
57
-
58
-
59
-
60
-
61
-
62
-
63
-
64
-
65
-
66
-
67
-
68
-
69
-
70
-
71
-
72
-
73
-
74
-
75
-
76
-
77
-
78
-
79
-
80
-
81
-
82
-
83
-
84
-
85
-
86
-
87
-
88
-
89
-
90
-
91
-
92
-
93
-
94
-
95
-
96
-
97
-
98
-
99
-
100
-
101
-
102
-
103
-
104
-
105
-
106
-
107
-
108
-
109
-
110
-
111
-
112
-
113
-
114
-
115
-
116
-
117
-
118
-
119
-
120
-
121
-
122
-
123
-
124
-
125
-
126
-
127
-
128
-
129
-
130
-
131
-
 132
132 -
 133
133 -
 134
134 -
 135
135 -
 136
136 -
 137
137 -
 138
138 -
 139
139 -
 140
140 -
 141
141 -
 142
142 -
143
-
144
-
145
-
146
-
147
-
148
-
149
-
150
-
151
-
152
-
153
-
154
-
155
-
156
-
157
-
158
-
159
-
160
-
161
-
162
-
163
-
164
-
165
-
166
-
167
-
168
-
169
-
170
-
171
-
172
-
173
-
174
-
175
-
176
-
177
-
178
-
179
-
180
-
181
-
182
-
183
 |
 |
