2009 Pontiac G8 Owner's Manual - Page 273
2009 Pontiac G8 Manual

Page 273 highlights
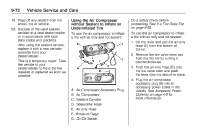
Vehicle Service and Care Do a safety check before proceeding. See If a Tire Goes Flat on page 9-66. Inspect the damaged tire. The sealant cannot seal sidewall damage, large punctures, or a tire that has unseated from the wheel. See Roadside Assistance Program on page 12-6. Do not remove any objects that have penetrated the tire. 1. Place the tire sealant and compressor kit on the ground and unwrap the sealant/air hose (E) from the side of the compressor. 2. Remove the air compressor accessory plug (B) from the unit. Do not plug the plug in yet. 3. Turn the tire valve stem cap counterclockwise to remove. 4. Attach the sealant/air hose (E) onto the tire valve stem. Turn it clockwise until tight. 5. Make sure the sealant and compressor kit on/off switch (A) is in the O (off) position. Plug the air compressor accessory plug (B) into an accessory power outlet in the vehicle. See Accessory Power Outlet(s) on page 4-9 for more information. Do not slam door or close window on the compressor accessory plug cord. 9-69 6. Start the vehicle. The vehicle must be running while using the air compressor. { CAUTION Overinflation could cause the tire to rupture, and you or others could be injured. Be sure to read the inflator instructions, and inflate the tire to its recommended pressure. Do not exceed 36 psi (248 kPa). 7. Push the On/Off switch (A) to the I (on) position. The kit will begin to inject sealant into the tire. Sealant could leak from the puncture hole until the vehicle is driven and the hole has sealed. { CAUTION Idling the engine in a closed-in place or with the climate control system off can cause deadly carbon monoxide (CO). See Engine Exhaust on page 8-14.
-
 1
1 -
2
-
3
-
4
-
5
-
6
-
7
-
8
-
9
-
10
-
11
-
12
-
13
-
14
-
15
-
16
-
17
-
18
-
19
-
20
-
21
-
22
-
23
-
24
-
25
-
26
-
27
-
28
-
29
-
30
-
31
-
32
-
33
-
34
-
35
-
36
-
37
-
38
-
39
-
40
-
41
-
42
-
43
-
44
-
45
-
46
-
47
-
48
-
49
-
50
-
51
-
52
-
53
-
54
-
55
-
56
-
57
-
58
-
59
-
60
-
61
-
62
-
63
-
64
-
65
-
66
-
67
-
68
-
69
-
70
-
71
-
72
-
73
-
74
-
75
-
76
-
77
-
78
-
79
-
80
-
81
-
82
-
83
-
84
-
85
-
86
-
87
-
88
-
89
-
90
-
91
-
92
-
93
-
94
-
95
-
96
-
97
-
98
-
99
-
100
-
101
-
102
-
103
-
104
-
105
-
106
-
107
-
108
-
109
-
110
-
111
-
112
-
113
-
114
-
115
-
116
-
117
-
118
-
119
-
120
-
121
-
122
-
123
-
124
-
125
-
126
-
127
-
128
-
129
-
130
-
131
-
132
-
133
-
134
-
135
-
136
-
137
-
138
-
139
-
140
-
141
-
142
-
143
-
144
-
145
-
146
-
147
-
148
-
149
-
150
-
151
-
152
-
153
-
154
-
155
-
156
-
157
-
158
-
159
-
160
-
161
-
162
-
163
-
164
-
165
-
166
-
167
-
168
-
169
-
170
-
171
-
172
-
173
-
174
-
175
-
176
-
177
-
178
-
179
-
180
-
181
-
182
-
183
-
184
-
185
-
186
-
187
-
188
-
189
-
190
-
191
-
192
-
193
-
194
-
195
-
196
-
197
-
198
-
199
-
200
-
201
-
202
-
203
-
204
-
205
-
206
-
207
-
208
-
209
-
210
-
211
-
212
-
213
-
214
-
215
-
216
-
217
-
218
-
219
-
220
-
221
-
222
-
223
-
224
-
225
-
226
-
227
-
228
-
229
-
230
-
231
-
232
-
233
-
234
-
235
-
236
-
237
-
238
-
239
-
240
-
241
-
242
-
243
-
244
-
245
-
246
-
247
-
248
-
249
-
250
-
251
-
252
-
253
-
254
-
255
-
256
-
257
-
258
-
259
-
260
-
261
-
262
-
263
-
264
-
265
-
266
-
267
-
 268
268 -
 269
269 -
 270
270 -
 271
271 -
 272
272 -
 273
273 -
 274
274 -
 275
275 -
 276
276 -
 277
277 -
 278
278 -
279
-
280
-
281
-
282
-
283
-
284
-
285
-
286
-
287
-
288
-
289
-
290
-
291
-
292
-
293
-
294
-
295
-
296
-
297
-
298
-
299
-
300
-
301
-
302
-
303
-
304
-
305
-
306
-
307
-
308
-
309
-
310
-
311
-
312
-
313
-
314
-
315
-
316
-
317
-
318
-
319
-
320
-
321
-
322
-
323
-
324
-
325
-
326
-
327
-
328
-
329
-
330
-
331
-
332
-
333
-
334
-
335
-
336
-
337
-
338
-
339
-
340
-
341
-
342
-
343
-
344
-
345
-
346
-
347
-
348
-
349
-
350
-
351
-
352
-
353
-
354
-
355
-
356
 |
 |
