2009 Yamaha Motorsports V Star 1300 Tourer Owners Manual - Page 52
2009 Yamaha Motorsports V Star 1300 Tourer Manual

Page 52 highlights
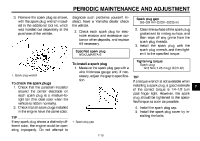
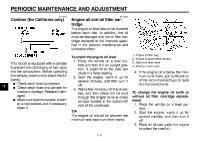
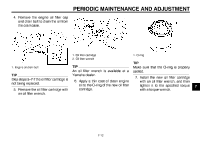
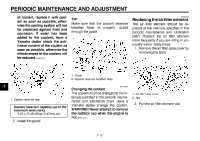
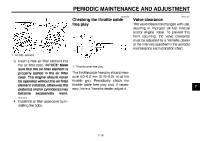
PERIODIC MAINTENANCE AND ADJUSTMENT EAU19681 EAU42596 Canister (for California only) Engine oil and oil filter cartridge The engine oil level should be checked before each ride. In addition, the oil must be changed and the oil filter cartridge replaced at the intervals specified in the periodic maintenance and lubrication chart. To check the engine oil level 1. Place the vehicle on a level surface and hold it in an upright position. A slight tilt to the side can result in a false reading. 2. Start the engine, warm it up for several minutes, and then turn it off. 3. Wait a few minutes until the oil settles, and then check the oil level through the engine oil level check window located at the bottom-left side of the crankcase. TIP The engine oil should be between the minimum and maximum level marks. 1. 2. 3. 4. Engine oil filler cap Engine oil level check window Maximum level mark Minimum level mark 7 This model is equipped with a canister to prevent the discharging of fuel vapor into the atmosphere. Before operating this vehicle, make sure to check the following: G Check each hose connection. G Check each hose and canister for cracks or damage. Replace if damaged. G Make sure that the canister breather is not blocked, and if necessary, clean it. 4. If the engine oil is below the minimum level mark, add sufficient oil of the recommended type to raise it to the correct level. To change the engine oil (with or without oil filter cartridge replacement) 1. Place the vehicle on a level surface. 2. Start the engine, warm it up for several minutes, and then turn it off. 3. Place an oil pan under the engine to collect the used oil. 7-11
-
 1
1 -
2
-
3
-
4
-
5
-
6
-
7
-
8
-
9
-
10
-
11
-
12
-
13
-
14
-
15
-
16
-
17
-
18
-
19
-
20
-
21
-
22
-
23
-
24
-
25
-
26
-
27
-
28
-
29
-
30
-
31
-
32
-
33
-
34
-
35
-
36
-
37
-
38
-
39
-
40
-
41
-
42
-
43
-
44
-
45
-
46
-
 47
47 -
 48
48 -
 49
49 -
 50
50 -
 51
51 -
 52
52 -
 53
53 -
 54
54 -
 55
55 -
 56
56 -
 57
57 -
58
-
59
-
60
-
61
-
62
-
63
-
64
-
65
-
66
-
67
-
68
-
69
-
70
-
71
-
72
-
73
-
74
-
75
-
76
-
77
-
78
-
79
-
80
-
81
-
82
-
83
-
84
-
85
-
86
-
87
-
88
-
89
-
90
-
91
-
92
-
93
-
94
-
95
-
96
-
97
-
98
-
99
-
100
 |
 |
