2009 Yamaha Motorsports V Star 1300 Tourer Owners Manual - Page 72
2009 Yamaha Motorsports V Star 1300 Tourer Manual

Page 72 highlights
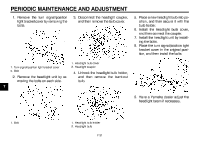
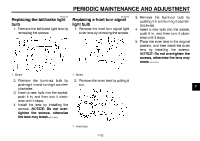
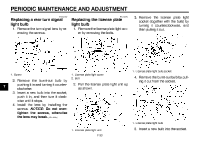
PERIODIC MAINTENANCE AND ADJUSTMENT 1. Remove the turn signal/position light bracket cover by removing the bolts. 3. Disconnect the headlight coupler, and then remove the bulb cover. 5. Place a new headlight bulb into position, and then secure it with the bulb holder. 6. Install the headlight bulb cover, and then connect the coupler. 7. Install the headlight unit by installing the bolts. 8. Place the turn signal/position light bracket cover in the original position, and then install the bolts. 1. Turn signal/position light bracket cover 2. Bolt 1. Headlight bulb cover 2. Headlight coupler 2. Remove the headlight unit by removing the bolts on each side. 7 4. Unhook the headlight bulb holder, and then remove the burnt-out bulb. 9. Have a Yamaha dealer adjust the headlight beam if necessary. 1. Bolt 1. Headlight bulb holder 2. Headlight bulb 7-31
-
 1
1 -
2
-
3
-
4
-
5
-
6
-
7
-
8
-
9
-
10
-
11
-
12
-
13
-
14
-
15
-
16
-
17
-
18
-
19
-
20
-
21
-
22
-
23
-
24
-
25
-
26
-
27
-
28
-
29
-
30
-
31
-
32
-
33
-
34
-
35
-
36
-
37
-
38
-
39
-
40
-
41
-
42
-
43
-
44
-
45
-
46
-
47
-
48
-
49
-
50
-
51
-
52
-
53
-
54
-
55
-
56
-
57
-
58
-
59
-
60
-
61
-
62
-
63
-
64
-
65
-
66
-
 67
67 -
 68
68 -
 69
69 -
 70
70 -
 71
71 -
 72
72 -
 73
73 -
 74
74 -
 75
75 -
 76
76 -
 77
77 -
78
-
79
-
80
-
81
-
82
-
83
-
84
-
85
-
86
-
87
-
88
-
89
-
90
-
91
-
92
-
93
-
94
-
95
-
96
-
97
-
98
-
99
-
100
 |
 |
