2009 Yamaha Motorsports V Star 1300 Tourer Owners Manual - Page 74
2009 Yamaha Motorsports V Star 1300 Tourer Manual

Page 74 highlights
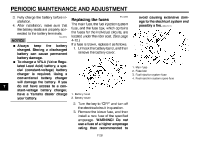
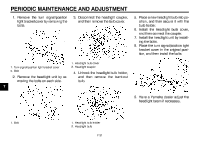
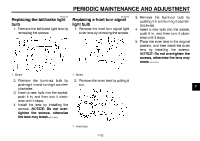
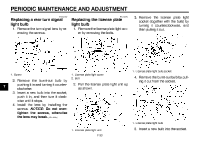
PERIODIC MAINTENANCE AND ADJUSTMENT EAU42452 EAU42484 Replacing a rear turn signal light bulb 1. Remove the turn signal lens by removing the screws. Replacing the license plate light bulb 1. Remove the license plate light cover by removing the bolts. 3. Remove the license plate light socket (together with the bulb) by turning it counterclockwise, and then pulling it out. 1. License plate light bulb socket 1. Screw 7 2. Remove the burnt-out bulb by pushing it in and turning it counterclockwise. 3. Insert a new bulb into the socket, push it in, and then turn it clockwise until it stops. 4. Install the lens by installing the screws. NOTICE: Do not overtighten the screws, otherwise the lens may break. [ECA10681] 1. License plate light cover 2. Bolt 2. Pull the license plate light unit up as shown. 4. Remove the burnt-out bulb by pulling it out from the socket. 1. License plate light bulb 1. License plate light unit 7-33 5. Insert a new bulb into the socket.
-
 1
1 -
2
-
3
-
4
-
5
-
6
-
7
-
8
-
9
-
10
-
11
-
12
-
13
-
14
-
15
-
16
-
17
-
18
-
19
-
20
-
21
-
22
-
23
-
24
-
25
-
26
-
27
-
28
-
29
-
30
-
31
-
32
-
33
-
34
-
35
-
36
-
37
-
38
-
39
-
40
-
41
-
42
-
43
-
44
-
45
-
46
-
47
-
48
-
49
-
50
-
51
-
52
-
53
-
54
-
55
-
56
-
57
-
58
-
59
-
60
-
61
-
62
-
63
-
64
-
65
-
66
-
67
-
68
-
 69
69 -
 70
70 -
 71
71 -
 72
72 -
 73
73 -
 74
74 -
 75
75 -
 76
76 -
 77
77 -
 78
78 -
 79
79 -
80
-
81
-
82
-
83
-
84
-
85
-
86
-
87
-
88
-
89
-
90
-
91
-
92
-
93
-
94
-
95
-
96
-
97
-
98
-
99
-
100
 |
 |