3Com 3CRWE454G75 Quick Start Guide - Page 8
Troubleshooting - operating modes
 |
UPC - 662705506654
View all 3Com 3CRWE454G75 manuals
Add to My Manuals
Save this manual to your list of manuals |
Page 8 highlights
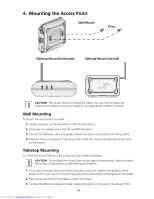
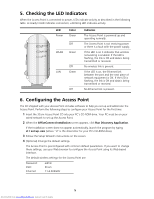
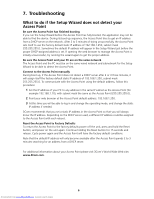
7. Troubleshooting What to do if the Setup Wizard does not detect your Access Point Be sure the Access Point has finished booting If you run the Setup Wizard before the Access Point has fully booted, the application may not be able to find the device. During its boot-up sequence, the Access Point tries to get an IP address from a DHCP server on the network. After 2 to 3 minutes of trying unsuccessfully, the Access Point sets itself to use the factory default static IP address of 192.168.1.250, subnet mask 255.255.255.0. Sometimes the default IP address will appear in the Setup Wizard just before the proper DHCP-assigned address is set. If opening the web browser to manage the Access Point is initially unsuccessful, try running the wizard again to get the proper address. Be sure the Access Point and your PC are on the same network The Access Point and the PC must be on the same wired network and subnetwork for the Setup Wizard to be able to detect the Access Point. Connect to the Access Point manually During boot up, if the Access Point does not detect a DHCP server after 2 or 3 three minutes, it will assign itself the factory default static IP address of 192.168.1.250, subnet mask 255.255.255.0. To communicate with the Access Point using the default address, follow this procedure: 1 Set the IP address of your PC to any address in the same IP subnet as the Access Point (for example 192.168.1.10), with subnet mask the same as the Access Point (255.255.255.0). 2 Point your web browser at the Access Point default address: 192.168.1.250. 3 At this time you will be able to log in and change the operating mode, and change the static IP address if needed. 3Com recommends that you set a static IP address in the Access Point so that you will always know the IP address. Depending on the DHCP server used, a different IP address could be assigned to the Access Point with each reboot. Reset the Access Point to Factory Defaults To return the Access Point to the factory defaults power off the unit, press and hold the Reset button, and power on the unit again. Continue holding the Reset button for 15 seconds and release. Cycle power again and the Access Point will have the factory default conditions. Note that the default IP address will only become available after the Access Point spends 2 to 3 minutes searching for an address from a DHCP server. For additional information about your Access Point please visit 3Com's World Wide Web site: www.3Com.com. 6 Downloaded from www.Manualslib.com manuals search engine
-
 1
1 -
2
-
 3
3 -
 4
4 -
 5
5 -
 6
6 -
 7
7 -
 8
8 -
 9
9 -
 10
10 -
 11
11 -
 12
12 -
 13
13 -
14
-
15
-
16
-
17
-
18
-
19
-
20
-
21
-
22
-
23
-
24
-
25
-
26
-
27
-
28
-
29
-
30
-
31
-
32
-
33
-
34
-
35
-
36
-
37
-
38
-
39
-
40
-
41
-
42
-
43
-
44
-
45
-
46
-
47
-
48
 |
 |