3Ware 9650SE-2LPB-10 User Guide - Page 133
Expanding Unit Capacity, To change the RAID level of a unit
 |
UPC - 693494601022
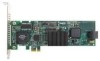
View all 3Ware 9650SE-2LPB-10 manuals
Add to My Manuals
Save this manual to your list of manuals |
Page 133 highlights
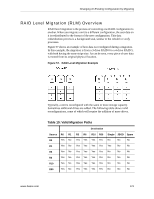
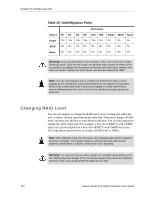
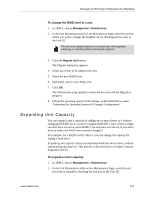
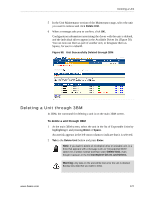
Changing An Existing Configuration by Migrating To change the RAID level of a unit 1 In 3DM 2, choose Management > Maintenance. 2 In the Unit Maintenance table on the Maintenance Page, select the unit for which you wish to change the RAID level, by checking the box next to the Unit ID. The unit to be migrated must be in a normal state (not degraded, initializing, or rebuilding) before starting the migration. 3 Click the Migrate Unit button. The Migrate dialog box appears. 4 Select any drives to be added to the unit. 5 Select the new RAID level. 6 Optionally, select a new Stripe size. 7 Click OK. The Maintenance page updates to show the new unit and the Migration progress. 8 Inform the operating system of the change, as described below under "Informing the Operating System of Changed Configuration". Expanding Unit Capacity You can expand a unit's capacity by adding one or more drives to it without changing the RAID level, except for singles and RAID 1 units. (Since a single can only have one drive, and a RAID 1 can only have two drives, if you add a drive to either, the RAID level must be changed.) For example, for a RAID 5 with 3 drives, you can change the capacity by adding a forth drive. Expanding unit capacity can be accomplished while the unit is online, without experiencing any data loss. This process is also referred to as Online Capacity Expansion (OCE). To expand a unit's capacity 1 In 3DM 2, choose Management > Maintenance. 2 In the Unit Maintenance table on the Maintenance Page, select the unit you wish to expand by checking the box next to the Unit ID. www.3ware.com 123
-
 1
1 -
2
-
3
-
4
-
5
-
6
-
7
-
8
-
9
-
10
-
11
-
12
-
13
-
14
-
15
-
16
-
17
-
18
-
19
-
20
-
21
-
22
-
23
-
24
-
25
-
26
-
27
-
28
-
29
-
30
-
31
-
32
-
33
-
34
-
35
-
36
-
37
-
38
-
39
-
40
-
41
-
42
-
43
-
44
-
45
-
46
-
47
-
48
-
49
-
50
-
51
-
52
-
53
-
54
-
55
-
56
-
57
-
58
-
59
-
60
-
61
-
62
-
63
-
64
-
65
-
66
-
67
-
68
-
69
-
70
-
71
-
72
-
73
-
74
-
75
-
76
-
77
-
78
-
79
-
80
-
81
-
82
-
83
-
84
-
85
-
86
-
87
-
88
-
89
-
90
-
91
-
92
-
93
-
94
-
95
-
96
-
97
-
98
-
99
-
100
-
101
-
102
-
103
-
104
-
105
-
106
-
107
-
108
-
109
-
110
-
111
-
112
-
113
-
114
-
115
-
116
-
117
-
118
-
119
-
120
-
121
-
122
-
123
-
124
-
125
-
126
-
127
-
 128
128 -
 129
129 -
 130
130 -
 131
131 -
 132
132 -
 133
133 -
 134
134 -
 135
135 -
 136
136 -
 137
137 -
 138
138 -
139
-
140
-
141
-
142
-
143
-
144
-
145
-
146
-
147
-
148
-
149
-
150
-
151
-
152
-
153
-
154
-
155
-
156
-
157
-
158
-
159
-
160
-
161
-
162
-
163
-
164
-
165
-
166
-
167
-
168
-
169
-
170
-
171
-
172
-
173
-
174
-
175
-
176
-
177
-
178
-
179
-
180
-
181
-
182
-
183
-
184
-
185
-
186
-
187
-
188
-
189
-
190
-
191
-
192
-
193
-
194
-
195
-
196
-
197
-
198
-
199
-
200
-
201
-
202
-
203
-
204
-
205
-
206
-
207
-
208
-
209
-
210
-
211
-
212
-
213
-
214
-
215
-
216
-
217
-
218
-
219
-
220
-
221
-
222
-
223
-
224
-
225
-
226
-
227
-
228
-
229
-
230
-
231
-
232
-
233
-
234
-
235
-
236
-
237
-
238
-
239
-
240
-
241
-
242
-
243
-
244
-
245
-
246
-
247
-
248
-
249
-
250
-
251
-
252
-
253
-
254
-
255
-
256
-
257
-
258
-
259
-
260
-
261
-
262
-
263
-
264
-
265
-
266
-
267
-
268
-
269
-
270
-
271
-
272
 |
 |