3Ware 9650SE-2LPB-10 User Guide - Page 166
Rebuilding a Unit Through 3DM
 |
UPC - 693494601022
View all 3Ware 9650SE-2LPB-10 manuals
Add to My Manuals
Save this manual to your list of manuals |
Page 166 highlights
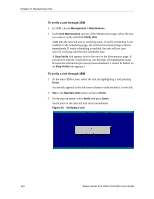
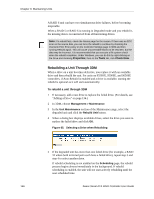
Chapter 9. Maintaining Units A RAID 6 unit can have two simultaneous drive failures, before becoming inoperable. When a RAID 5 or RAID 6 is running in Degraded mode and you rebuild it, the missing data is reconstructed from all functioning drives. Note: If a rebuild fails, check the Alarms page for the reason. If there was an ECC error on the source disk, you can force the rebuild to continue by checking the Overwrite ECC Error policy on the Controller Settings page in 3DM and then running Rebuild again. This will cause uncorrectable blocks to be rewritten, but the data may be incorrect. It is recommended that you execute a file system check when the rebuild completes. Under Windows, you can do this by right-clicking on the Drive and choosing Properties; then on the Tools tab, click Check Now. Rebuilding a Unit Through 3DM When a drive on a unit becomes defective, you replace it with an available drive and then rebuild the unit. For units on 9550SX, 9590SE, and 9650SE controllers, if Auto Rebuild is enabled and a drive is available, starting the rebuild is optional as it will start automatically. To rebuild a unit through 3DM 1 If necessary, add a new drive to replace the failed drive. (For details, see "Adding a Drive" on page 134.) 2 In 3DM, choose Management > Maintenance. 3 In the Unit Maintenance section of the Maintenance page, select the degraded unit and click the Rebuild Unit button. 4 When a dialog box displays available drives, select the drive you want to replace the failed drive and click OK. Figure 65. Selecting a Drive when Rebuilding 5 If the degraded unit has more than one failed drive (for example, a RAID 10 where both mirrored pairs each have a failed drive), repeat step 3 and step 4 to select another drive. If rebuild scheduling is not enabled on the Scheduling page, the rebuild process begins almost immediately in the background. If rebuild scheduling is enabled, the unit will not start actively rebuilding until the next scheduled time. 156 3ware Serial ATA RAID Controller User Guide
-
 1
1 -
2
-
3
-
4
-
5
-
6
-
7
-
8
-
9
-
10
-
11
-
12
-
13
-
14
-
15
-
16
-
17
-
18
-
19
-
20
-
21
-
22
-
23
-
24
-
25
-
26
-
27
-
28
-
29
-
30
-
31
-
32
-
33
-
34
-
35
-
36
-
37
-
38
-
39
-
40
-
41
-
42
-
43
-
44
-
45
-
46
-
47
-
48
-
49
-
50
-
51
-
52
-
53
-
54
-
55
-
56
-
57
-
58
-
59
-
60
-
61
-
62
-
63
-
64
-
65
-
66
-
67
-
68
-
69
-
70
-
71
-
72
-
73
-
74
-
75
-
76
-
77
-
78
-
79
-
80
-
81
-
82
-
83
-
84
-
85
-
86
-
87
-
88
-
89
-
90
-
91
-
92
-
93
-
94
-
95
-
96
-
97
-
98
-
99
-
100
-
101
-
102
-
103
-
104
-
105
-
106
-
107
-
108
-
109
-
110
-
111
-
112
-
113
-
114
-
115
-
116
-
117
-
118
-
119
-
120
-
121
-
122
-
123
-
124
-
125
-
126
-
127
-
128
-
129
-
130
-
131
-
132
-
133
-
134
-
135
-
136
-
137
-
138
-
139
-
140
-
141
-
142
-
143
-
144
-
145
-
146
-
147
-
148
-
149
-
150
-
151
-
152
-
153
-
154
-
155
-
156
-
157
-
158
-
159
-
160
-
 161
161 -
 162
162 -
 163
163 -
 164
164 -
 165
165 -
 166
166 -
 167
167 -
 168
168 -
 169
169 -
 170
170 -
 171
171 -
172
-
173
-
174
-
175
-
176
-
177
-
178
-
179
-
180
-
181
-
182
-
183
-
184
-
185
-
186
-
187
-
188
-
189
-
190
-
191
-
192
-
193
-
194
-
195
-
196
-
197
-
198
-
199
-
200
-
201
-
202
-
203
-
204
-
205
-
206
-
207
-
208
-
209
-
210
-
211
-
212
-
213
-
214
-
215
-
216
-
217
-
218
-
219
-
220
-
221
-
222
-
223
-
224
-
225
-
226
-
227
-
228
-
229
-
230
-
231
-
232
-
233
-
234
-
235
-
236
-
237
-
238
-
239
-
240
-
241
-
242
-
243
-
244
-
245
-
246
-
247
-
248
-
249
-
250
-
251
-
252
-
253
-
254
-
255
-
256
-
257
-
258
-
259
-
260
-
261
-
262
-
263
-
264
-
265
-
266
-
267
-
268
-
269
-
270
-
271
-
272
 |
 |