AEG L75480WD Product Manual - Page 18
Setting And Starting A Programme
 |
View all AEG L75480WD manuals
Add to My Manuals
Save this manual to your list of manuals |
Page 18 highlights
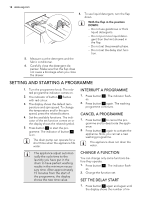
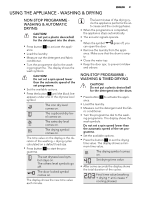
18 www.aeg.com 4. To use liquid detergent, turn the flap down. With the flap in the position DOWN: - Do not use gelatinous or thick liquid detergents. - Do not put more liquid detergent than the limit showed in the flap. - Do not set the prewash phase. - Do not set the delay start function. 5. Measure out the detergent and the fabric conditioner. 6. Carefully close the detergent dispenser. Make sure that the flap does not cause a blockage when you close the drawer. SETTING AND STARTING A PROGRAMME 1. Turn the programme knob. The related programme indicator comes on. 2. The indicator of button 4 flashes with red colour. 3. The display shows the default temperature and spin speed. To change the temperature and/or the spin speed, press the related buttons. 4. Set the available functions. The indicator of the set function comes on or the display shows the related symbol. 5. Press button 4 to start the programme. The indicator of button 4 is on. The drain pump can operate for a short time when the appliance fills water. The appliance adjust automatically the cycle time to the laundry you have put in the drum to have perfect washing results in the minimum necessary time. After approximately 15 minutes from the start of the programme, the display shows the new time value. INTERRUPT A PROGRAMME 1. Press button 4 . The indicator flashes. 2. Press button 4 again. The washing programme continues. CANCEL A PROGRAMME 1. Press button 1 to cancel the programme and to deactivate the appliance. 2. Press button 1 again to activate the appliance. Now, you can set a new washing programme. The appliance does not drain the water. CHANGE A FUNCTION You can change only some functions before they operate. 1. Press button 4 . The indicator flash- es. 2. Change the function set. SET THE DELAY START 1. Press button 5 again and again until the display shows the number of mi-
-
 1
1 -
2
-
3
-
4
-
5
-
6
-
7
-
8
-
9
-
10
-
11
-
12
-
 13
13 -
 14
14 -
 15
15 -
 16
16 -
 17
17 -
 18
18 -
 19
19 -
 20
20 -
 21
21 -
 22
22 -
 23
23 -
24
-
25
-
26
-
27
-
28
-
29
-
30
-
31
-
32
-
33
-
34
-
35
-
36
-
37
-
38
-
39
-
40
 |
 |
