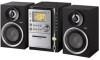
AIWA AWP-ZX7 Operating Instructions
AIWA AWP-ZX7 Manual
 |
View all AIWA AWP-ZX7 manuals
Add to My Manuals
Save this manual to your list of manuals |
AIWA AWP-ZX7 manual content summary:
- AIWA AWP-ZX7 | Operating Instructions - Page 1
4-254-179-12(1) Operating Instructions Owner's Record The model and serial numbers are located on the rear of the unit. Record the serial number in the space provided below. Refer to them whenever you call upon your Aiwa dealer regarding this product. Model No. _____ Serial No. _____ ©2004 Sony - AIWA AWP-ZX7 | Operating Instructions - Page 2
digital device, pursuant to Part 15 of the FCC Rules with the instructions, may cause equipment off and on, the user is encouraged to try to symbol is intended to alert the user to the presence of uninsulated " user to the presence of important operating and maintenance (servicing) instructions - AIWA AWP-ZX7 | Operating Instructions - Page 3
Information Declaration of Conformity Trade name: Model No.: Responsible Party: Address: AIWA AWP-ZX7 Sony Electronics Inc. 16450 W. Bernardo Dr, San Diego, CA 92127 U.S.A. Telephone No.: 858-942-2230 This device complies with Part 15 of the FCC Rules. Operation is subject to the following two - AIWA AWP-ZX7 | Operating Instructions - Page 4
personal computer to the system...25 Installing the driver...26 Listening to audio files on a personal Troubleshooting Problems and remedies...32 Messages...35 Tape - Recording Recording your favorite CD tracks on a tape...18 - CD-TAPE Synchro Recording Recording on a tape manually...19 - Manual - AIWA AWP-ZX7 | Operating Instructions - Page 5
manual mainly explains operations using the remote, but the same operations can also be performed using the buttons on the system having the same or similar names. Discs that this system cannot play • An 8 cm disc • An 8 cm disc converted to a standard disc using an adaptor • CD-ROMs • CD-Rs/CD - AIWA AWP-ZX7 | Operating Instructions - Page 6
instructions for the recording device. • Discs recorded on CD-R/CD-RW drives may not be played back because of scratches, dirt, recording condition or the driver's characteristics. • CD-R and CD-RW discs recorded in multisession that have not ended by "closing the session" are not supported - AIWA AWP-ZX7 | Operating Instructions - Page 7
Getting Started Getting Started Hooking up the system Perform the following procedures 1 to 4 to hook up your system using the supplied cords and accessories. AM loop antenna FM lead antenna Right speaker Left speaker 1 Connect the speakers. Speakers Insert only the stripped portion Connect - AIWA AWP-ZX7 | Operating Instructions - Page 8
2 Connect the FM and AM antennas. Set up the AM loop antenna, then connect it. 3 For models with a voltage selector, set VOLTAGE SELECTOR to the local power line voltage. Refer to the print on your system's VOLTAGE SELECTOR for available settings. Plug type A AM loop antenna AM LOO P 4 Connect - AIWA AWP-ZX7 | Operating Instructions - Page 9
. When carrying this system Perform the following procedure to protect the CD mechanism. The clock starts working. To adjust the clock 1 2 switch the function to CD. Hold down Z CD and then press M on the unit until "STANDBY" appears. After "STANDBY" disappears, then "LOCK" appears. Unplug the - AIWA AWP-ZX7 | Operating Instructions - Page 10
1 Press DISC 1 - 5 to select a disc stocker. If a disc is loaded, press Z CD to remove a disc from the disc slot. "No Disc" appears. 2 Insert a disc in the to push in the disc until "No Disc" appears. • When pressing Z CD and then reinserting the disc that appears in the disc slot, do not - AIWA AWP-ZX7 | Operating Instructions - Page 11
want them to be played (see "Creating your own program" on page 13). CD/MP3 - Play Press . or > repeatedly. Press ALBUM - or + repeatedly - 5 on the unit (Automatic Source Selection). Press DISC 1 - 5, then press Z CD on the unit. ALL DISCS SHUF (Shuffle Play) 1DISC SHUF (Shuffle Play) ALBM SHUF - AIWA AWP-ZX7 | Operating Instructions - Page 12
media used at the time an MP3 audio track is recorded, you may encounter such problems as disabled playback, sound interruptions, and noise. Tip Playing repeatedly - Repeat Play You can is canceled. When disc access takes a long time, set "CD POWER ON" by CD power manage function (page 15). 12GB - AIWA AWP-ZX7 | Operating Instructions - Page 13
tracks from multiple discs, only the tracks contained on the ejected disc are deleted from the program appears when the total CD program time exceeds 100 minutes, or when you select a CD track whose number is 21 or over, or when you select an MP3 audio track. i - Bass Total playing time 5 Press - AIWA AWP-ZX7 | Operating Instructions - Page 14
) repeatedly to select the desired preset number. Press ENTER. Repeat steps 2 through 7 to preset other stations. Press x to stop scanning. Manual tuning preset You can manually tune in and store the radio frequency of the desired stations. The frequency changes as the system scans for a station - AIWA AWP-ZX7 | Operating Instructions - Page 15
POWER OFF" appears. To set CD power on Repeat the procedure above and "CD POWER ON" appears. Notes • When "CD POWER OFF" is selected, disc access time is increased. • You cannot change the setting in Power Saving Mode. Listening to non-preset radio station - Manual Tuning To change the AM tuning - AIWA AWP-ZX7 | Operating Instructions - Page 16
in a station (Automatic Tuning). • To record the radio programs, use manual recording (pages 19 and 22). Using the Radio Data System (RDS) the Radio Data System? Radio Data System (RDS) is a broadcasting service that allows radio stations to send additional information along with the regular program - AIWA AWP-ZX7 | Operating Instructions - Page 17
Tape - Play Playing a tape You can use TYPE I (normal) tape. Loading a tape 1 2 Press Z PUSH on the unit. Load a recorded/recordable tape into the cassette holder. 1 2 Press TAPE (or FUNCTION repeatedly) to switch the function to TAPE. Press DIRECTION on the unit repeatedly to select "g" to play - AIWA AWP-ZX7 | Operating Instructions - Page 18
If you select both sides recording and the tape reaches the end of the front side part-way through a track, the entire track is recorded again from the beginning of the reverse side. 1 2 Load a recordable tape. Load a CD you want to record. If you have already loaded the disc, press DISC 1 - 5 to - AIWA AWP-ZX7 | Operating Instructions - Page 19
on a tape manually - Manual Recording You can record just the portions you like from a CD, tape or CD player. • FM or AM: To record from this system's tuner. • AUX: To record from the optional component connected to the AUX IN jacks. • PC: To record from the personal computer connected to the USB - AIWA AWP-ZX7 | Operating Instructions - Page 20
time) changes cyclically as follows: AUTO* t 90min t 80min t ...t 10min t OFF * The system automatically turns off in 100 minutes or after the current CD or tape finishes playing. 2 Press - or + repeatedly to adjust the level while "BASS" or "TREBLE" appears. Other operations To Press To adjust - AIWA AWP-ZX7 | Operating Instructions - Page 21
timer Start over from step 1. 1 Prepare the sound source you want to play. • CD: Load a disc. To start from a specific track, make a program (see "Creating • You cannot use the optional component connected to AUX IN jacks or USB port as the sound source for Play Timer. Press . or > repeatedly - AIWA AWP-ZX7 | Operating Instructions - Page 22
Timer recording radio programs - Rec Timer You can record a preset radio station from a specified time. To timer record, you must first preset the radio station (see "Presetting radio stations" on page 14) and set the clock (see "Setting the clock" on page 9). Use buttons on the remote for the - AIWA AWP-ZX7 | Operating Instructions - Page 23
current track or that of the disc. Checking the remaining time and titles (CD/MP3) Press DISPLAY during Normal Play. To cancel Power Saving Mode Press DISPLAY the AM tuning interval (except for European models) - changing the CD power manage function Tips Each time you press the button, the - AIWA AWP-ZX7 | Operating Instructions - Page 24
time you press the button, the display changes cyclically as follows: x When a CD/MP3 is in Normal Play mode TOC display1) or total album number of the disc2 label may not be displayed depending on the play mode Notes x When a CD/MP3 is in Program Play mode The last track number of the program - AIWA AWP-ZX7 | Operating Instructions - Page 25
cable. • When the computer has multiple USB ports, connect the USB cable to the port that supports a route hub. (See the operation manual supplied with the computer for the port that supports a route hub.) Optional Personal Computer To the USB port AWP-ZX7 Required system equipment The following - AIWA AWP-ZX7 | Operating Instructions - Page 26
type. Follow the procedures described below. (Also see the operation manual supplied with the computer.) 5 Follow the instructions appearing on the monitor. For Windows 98 Second Edition/Windows Millennium Edition To install the USB driver 1 2 3 4 Start up the computer. Press ?/1 to turn on the - AIWA AWP-ZX7 | Operating Instructions - Page 27
may be required depending on your computer. In this case, follow the instructions and set the CD-ROM in the drive. • Do not disconnect or connect the USB cable during detection. Tip To not install the driver, follow the instructions appearing on the monitor. To verify the status of the installed - AIWA AWP-ZX7 | Operating Instructions - Page 28
Press FUNCTION repeatedly to switch the function to PC. Connect the system to the computer with the USB cable (see page 25). For Mac OS X 10.1 to 10.3 To install the USB driver 1 2 3 4 5 The illustration above shows an example of Windows XP Professional screen. Notes Start up the computer. Press - AIWA AWP-ZX7 | Operating Instructions - Page 29
the unit) to adjust the volume. Notes • When playing back music through the USB port, do not turn off the system or change the sound source. This may cause noise depending on the computer environment. • Also see the operation manuals supplied with the computer and the music playback software. • If - AIWA AWP-ZX7 | Operating Instructions - Page 30
your system, you can connect optional components. Refer to the operating instructions provided with each component. Sub woofer From the USB port on an optional computer A personal computer From the audio output or the type of music being played. For details, consult your nearest Aiwa dealer. 30GB - AIWA AWP-ZX7 | Operating Instructions - Page 31
To place the sub woofer To obtain a better bass reproduction, we recommend you to place the subwoofer on a solid floor where resonance is unlikely to occur. Notes Listening to audio from a connected component 1 2 Connect audio cords. • Always place the subwoofer vertically, keeping it a few - AIWA AWP-ZX7 | Operating Instructions - Page 32
during Rec Timer. • The system is in pause mode. Press N (or CD NX on the unit) to return to normal play mode. There is severe hum problem in the troubleshooting checklist below and take the indicated corrective action. If the problem persists after doing all of the above, consult your nearest Aiwa - AIWA AWP-ZX7 | Operating Instructions - Page 33
connections and placement. CD/MP3 player "LOCKED" appears. • Contact your Aiwa dealer or local authorized Aiwa service facility. The disc does (0 to 9) - Symbols Other characters may not be displayed correctly. Troubleshooting Tuner Severe hum or noise/stations cannot be received. • Set the - AIWA AWP-ZX7 | Operating Instructions - Page 34
cords are connected properly. - if the cord plugs are firmly inserted all the way. • Turn on the connected component. • Refer to the operating instructions supplied with the connected component and start playing. • Press FUNCTION repeatedly to select "AUX" (page 31) or "PC" (page 29). The sound is - AIWA AWP-ZX7 | Operating Instructions - Page 35
the timer function when the Play Timer or Rec Timer are not set. CD/MP3 No Disc There is no disc in the player. Reading The 25 or more tracks (steps). TUNER Complete! The preset operation ended normally. Troubleshooting TAPE No Tab You cannot record the tape because the tab has been removed - AIWA AWP-ZX7 | Operating Instructions - Page 36
condense on the lens inside the CD player. Should this occur, the questions or problems concerning your system, please consult your nearest Aiwa dealer. On must be changed only at the qualified service shop. Notes on discs • Before or label may become attached to parts inside this unit. When this - AIWA AWP-ZX7 | Operating Instructions - Page 37
slack in the tape. Otherwise, the tape may get entangled in the parts of the tape deck and become damaged. When using a tape longer dry-type or wet-type cleaning cassette. For details, refer to the instructions of the cleaning cassette. Additional Information Other models: The following measured - AIWA AWP-ZX7 | Operating Instructions - Page 38
5 cm dia., cone type 6 ohms CD player section System Laser Compact disc and digital models: 70 W Dimensions (w/h/d) incl. projecting parts and controls Amplifier/Tuner/Tape/CD section: Approx. 190 × 277 × 361 × 277 × 188 mm Mass Amplifier/Tuner/Tape/CD section: Approx. 6.2 kg Speakers: Approx. 2.7 - AIWA AWP-ZX7 | Operating Instructions - Page 39
R Name of button/part R Reference page Main unit ALPHABETICAL ORDER A-O P-Z BUTTON DESCRIPTIONS BASS control w; (20) CD SYNC 7 (18) USB port qh (25, 30) VOLUME control qg (29) ?/1 (power) 1 (8, 15, 26, 34) TAPE nN (play) 2 (17, 18, 22) CD NX (play pause) 3 (11) z REC PAUSE/START 9 (18) Z CD - AIWA AWP-ZX7 | Operating Instructions - Page 40
Remote control ALPHABETICAL ORDER A-E F-Z BUTTON DESCRIPTIONS ALBUM + qa (11, 13, 18) ALBUM - qd (11, 13, 18) CD qk (10, 13, 19) CLEAR qg (13) CLOCK/TIMER SELECT 2 (21, 22) CLOCK/TIMER SET 3 (9, 21, 22) DISC SKIP 0 (11, 13) DISPLAY wa (16, 23)
-
 1
1 -
 2
2 -
 3
3 -
 4
4 -
 5
5 -
 6
6 -
 7
7 -
8
-
9
-
10
-
11
-
12
-
13
-
14
-
15
-
16
-
17
-
18
-
19
-
20
-
21
-
22
-
23
-
24
-
25
-
26
-
27
-
28
-
29
-
30
-
31
-
32
-
33
-
34
-
35
-
36
-
37
-
38
-
39
-
40
 |
 |

©2004 Sony Corporation
4-254-179-
12
(1)
Operating Instructions
Owner’s Record
The model and serial numbers are located on the rear of the unit. Record the
serial number in the space provided below. Refer to them whenever you call
upon your Aiwa dealer regarding this product.
Model No. ______________
Serial No. ______________