Aastra Dialog 4220 Dialog 4220 Lite for BusinessPhone, user guide - Page 84
Installation, Dialog 4220 Lite, Install cables, Change cables
 |
View all Aastra Dialog 4220 manuals
Add to My Manuals
Save this manual to your list of manuals |
Page 84 highlights
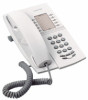
Installation Installation Dialog 4220 Lite Install cables You can put the cable to the handset in the notch underneath the telephone. The cable to the exchange has to be plugged in LINE and the handset cable has to be plugged in HANDSET. Change cables Use a screwdriver to unlock the stop. 84 BusinessPhone - Dialog 4220 Lite / Dialog 3210
-
 1
1 -
2
-
3
-
4
-
5
-
6
-
7
-
8
-
9
-
10
-
11
-
12
-
13
-
14
-
15
-
16
-
17
-
18
-
19
-
20
-
21
-
22
-
23
-
24
-
25
-
26
-
27
-
28
-
29
-
30
-
31
-
32
-
33
-
34
-
35
-
36
-
37
-
38
-
39
-
40
-
41
-
42
-
43
-
44
-
45
-
46
-
47
-
48
-
49
-
50
-
51
-
52
-
53
-
54
-
55
-
56
-
57
-
58
-
59
-
60
-
61
-
62
-
63
-
64
-
65
-
66
-
67
-
68
-
69
-
70
-
71
-
72
-
73
-
74
-
75
-
76
-
77
-
78
-
 79
79 -
 80
80 -
 81
81 -
 82
82 -
 83
83 -
 84
84 -
 85
85 -
 86
86 -
 87
87 -
 88
88 -
 89
89 -
90
-
91
-
92
-
93
-
94
-
95
-
96
-
97
-
98
-
99
-
100
 |
 |

Installation
BusinessPhone – Dialog 4220 Lite / Dialog 3210
84
Installation
Dialog 4220 Lite
Install cables
You can put the cable to the handset in the notch underneath the
telephone. The cable to the exchange has to be plugged in LINE
and the handset cable has to be plugged in HANDSET.
Change cables
Use a screwdriver to unlock the stop.