Acer EI2 User Manual - Page 14
Attaching the monitor on the wall, SCREEN POSITION ADJUSTMENT
 |
View all Acer EI2 manuals
Add to My Manuals
Save this manual to your list of manuals |
Page 14 highlights
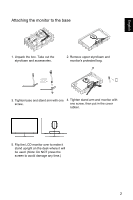
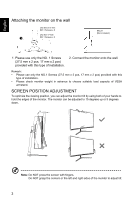
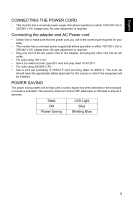
English Attaching the monitor on the wall Use the 27.5 mm NO.1 Screws x 2 Use the 17 mm 1 NO.1 Screws x 2 Mount (Not included) 1. Please use only the NO. 1 Screws (27.5 mm x 2 pcs, 17 mm x 2 pcs) provided with this type of installation. 2. Connect the monitor onto the wall. Remark: • Please use only the NO.1 Screws (27.5 mm x 2 pcs, 17 mm x 2 pcs) provided with this type of installation. • Please check monitor weight in advance to choose suitable load capacity of VESA armstand. SCREEN POSITION ADJUSTMENT To optimize the viewing position, you can adjust the monitor tilt by using both of your hands to hold the edges of the monitor. The monitor can be adjusted to 15 degrees up or 5 degrees down. 15 - Note: Do NOT press the screen with fingers. Do NOT grasp the corners or the left and right sides of the monitor to adjust tilt. 3
-
 1
1 -
2
-
3
-
4
-
5
-
6
-
7
-
8
-
 9
9 -
 10
10 -
 11
11 -
 12
12 -
 13
13 -
 14
14 -
 15
15 -
 16
16 -
 17
17 -
 18
18 -
 19
19 -
20
-
21
-
22
-
23
-
24
-
25
-
26
-
27
-
28
-
29
-
30
-
31
 |
 |
