Acer Veriton M661 Intel Matrix Storage and RAID - Page 18
This will activate the Create RAID Volume from the Existing Hard Drive Wizard. - bios
 |
View all Acer Veriton M661 manuals
Add to My Manuals
Save this manual to your list of manuals |
Page 18 highlights
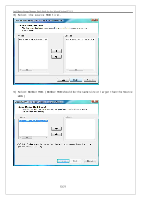
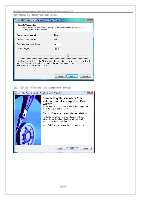
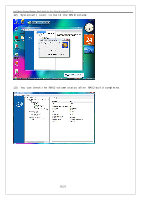
Intel Matrix Storage Manager Quick Guide for Acer Selected Veriton PC V1.1 6. Configuring an existing HDD as a RAID0 or RAID1 volume If you are booting from a single SATA hard drive that contains program or personal data, you may use the migration feature to use this hard drive as the source hard drive for a migration. After the migration is completed, you will have a two-HDD RAID0 volume where data is striped or a two-HDD RAID1 volume where the data is mirrored across the two SATA hard drives. To do this, the ICH9 I/O Controller must be enabled in the BIOS and you must have the Intel Matrix Storage Manager software installed. (Acer systems enable the RAID controller and have the Matrix storage manager software pre-installed by default.) Launch Intel Matrix Storage Manager Console and do the following: 1. Note the serial number of the SATA hard drive that is already installed. You will need this to select it as the source hard drive when initiating the migration. 2. Physically attach the second SATA hard drive to an available SATA port. 3. Boot to Windows, install the Intel Matrix Storage Manager software, if not already installed (it is pre-installed in Acer RAID Ready systems), using the setup package obtained from a CD-ROM or from the Internet. This will install the necessary Intel Matrix Storage Console and start menu links. 4. Open the Intel Matrix Storage Console from the Start Menu. 5. Select Create RAID Volume from Existing Hard Drive from the Actions menu. This will activate the Create RAID Volume from the Existing Hard Drive Wizard. Follow the instructions as prompted. It is important to understand what will occur during the migration process because all data on the destination hard drive will be lost. 6. After the migration is complete, reboot the system. 18/21
-
 1
1 -
2
-
3
-
4
-
5
-
6
-
7
-
8
-
9
-
10
-
11
-
12
-
 13
13 -
 14
14 -
 15
15 -
 16
16 -
 17
17 -
 18
18 -
 19
19 -
 20
20 -
 21
21
 |
 |