Acer Z271U User Manual - Page 12
Removing The Stand Arm For Wall Mount
 |
View all Acer Z271U manuals
Add to My Manuals
Save this manual to your list of manuals |
Page 12 highlights
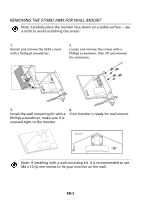
REMOVING THE STAND ARM FOR WALL MOUNT Note: Carefully place the monitor face-down on a stable surface -- use a cloth to avoid scratching the screen. 1. Detach and remove the VESA covers with a flathead screwdriver. 2. Loosen and remove the screws with a Phillips screwdriver, then lift and remove the stand arm. 3. Install the wall mounting kit with a Phillips screwdriver, make sure it is screwed tight to the monitor. 4. Your monitor is ready for wall mount. Note: If installing with a wall mounting kit, it is recommended to use M4 x 10 (L) mm screws to fix your monitor on the wall. EN-3
-
 1
1 -
2
-
3
-
4
-
5
-
6
-
 7
7 -
 8
8 -
 9
9 -
 10
10 -
 11
11 -
 12
12 -
 13
13 -
 14
14 -
 15
15 -
 16
16 -
 17
17 -
18
-
19
-
20
-
21
-
22
-
23
-
24
-
25
-
26
-
27
-
28
-
29
-
30
-
31
-
32
-
33
-
34
-
35
-
36
 |
 |

EN-3
REMOVING THE STAND ARM FOR WALL MOUNT
Note: Carefully place the monitor face-down on a stable surface -- use
a cloth to avoid scratching the screen.
1.
Detach and remove the VESA covers
with a flathead screwdriver.
2.
Loosen and remove the screws with a
Phillips screwdriver, then lift and remove
the stand arm.
3.
Install the wall mounting kit with a
Phillips screwdriver, make sure it is
screwed tight to the monitor.
4.
Your monitor is ready for wall mount.
Note: If installing with a wall mounting kit, it is recommended to use
M4 x 10 (L) mm screws to fix your monitor on the wall.