Adaptec 2200200 Quick Installation Guide - Page 12
Removing the Fan (Optional
 |
View all Adaptec 2200200 manuals
Add to My Manuals
Save this manual to your list of manuals |
Page 12 highlights
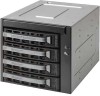
Adaptec Storage Enclosure 335SAS ● 12 3 Hold the drive carrier so that the LEDs are on the right and the lever is fully open. Slide it into the drive slot until you can hook the lever into place and click it closed. 4 Repeat for all disk drives. 5 To remove the fan before installation, see page 12. Otherwise, continue with Installing the Enclosure on page 14. Removing the Fan (Optional) You can remove the enclosure's cooling fan before installation if space inside your server is limited and if your computer will provide sufficient cooling without it. Note: If you don't disable the fan function before removing it, a loud alarm will sound when the enclosure is turned on. To disable the alarm, see Step 2 on page 13. To remove the fan: 1 Turn the enclosure so that the back is facing you. Gently press the tabs on the sides of the fan and pull to remove it from the enclosure (see figure on page 13).
-
 1
1 -
2
-
3
-
4
-
5
-
6
-
 7
7 -
 8
8 -
 9
9 -
 10
10 -
 11
11 -
 12
12 -
 13
13 -
 14
14 -
 15
15 -
 16
16 -
 17
17 -
18
-
19
-
20
-
21
-
22
-
23
 |
 |
