Adobe 25520388 User Guide - Page 89
Disable device control, Capture without device control
 |
UPC - 718659493202
View all Adobe 25520388 manuals
Add to My Manuals
Save this manual to your list of manuals |
Page 89 highlights
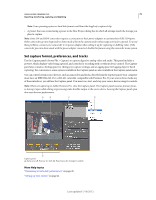
USING ADOBE PREMIERE PRO 84 Importing, transferring, capturing, and digitizing To operate Capture panel controls using the keyboard, see the tool tips in the Capture panel. You can change the shortcuts by choosing Edit > Keyboard Customization. To shuttle a tape quickly to a specific frame type its timecode into the Capture Panel's current timecode field, to the lower left of the monitor. Press Enter (Windows) or Return Mac OS). Disable device control 1 Open the Device Control Preferences dialog box by doing one of the following: • Choose Edit > Preferences > Device Control (Windows) or Premiere Pro > Preferences > Device Control (Mac OS). • In the Capture panel, click Settings. 2 From the Devices menu, choose None. 3 Click OK. Note: When device control is disabled, start playback on the device manually. Capture without device control If you do not have a device that Premiere Pro controls, you can capture video manually. You manually operate both the playback device controls and the Capture panel controls in Premiere Pro. Note: Preview HDV footage on an external TV monitor, or, if the source is a camcorder, on the camcorder viewfinder while shuttling, logging, and capturing on Mac OS. The preview pane in the Capture panel shows the words Previewing On Camera. 1 Make sure that the deck or camcorder is properly connected to your computer. 2 Choose File > Capture. 3 (Mac OS) If a QuickTime Capture Settings dialog box opens, choose video and audio settings appropriate to your project. These settings are preserved for the project, but you can set them again for each new project. 4 In the Setup area of the Logging pane, choose your media type from the Capture menu. 5 Use the controls on the deck or camcorder to move the videotape to a point several seconds before the frame where you want to begin capturing. 6 Press the Play button on the deck or camcorder, and then click the red Record button in the Capture panel. 7 Record a few seconds beyond the end of the footage you need, to provide room for editing. Press the Esc key to stop recording. When the Save Captured File dialog box appears, enter logging data and click OK. The new file is listed in the Project panel and is saved to the disk location specified in the Settings pane of the Capture panel. Capture with device control After a device and the project are set up properly, you can begin capturing clips using device control. You can capture an entire tape or you can mark In and Out points for each clip, and then capture the clip. You can log In and Out points for any number of clips and have Premiere Pro capture as many as you like in a batch. Premiere Pro supports FireWire device control, but supports serial device control by third-party drivers only. Note: On Mac OS, preview HDV footage on an external TV monitor, or, if the source is a camcorder, on the camcorder viewfinder while shuttling, logging, and capturing. The preview pane in the Capture panel shows the words Previewing On Camera. Last updated 1/16/2012
-
 1
1 -
2
-
3
-
4
-
5
-
6
-
7
-
8
-
9
-
10
-
11
-
12
-
13
-
14
-
15
-
16
-
17
-
18
-
19
-
20
-
21
-
22
-
23
-
24
-
25
-
26
-
27
-
28
-
29
-
30
-
31
-
32
-
33
-
34
-
35
-
36
-
37
-
38
-
39
-
40
-
41
-
42
-
43
-
44
-
45
-
46
-
47
-
48
-
49
-
50
-
51
-
52
-
53
-
54
-
55
-
56
-
57
-
58
-
59
-
60
-
61
-
62
-
63
-
64
-
65
-
66
-
67
-
68
-
69
-
70
-
71
-
72
-
73
-
74
-
75
-
76
-
77
-
78
-
79
-
80
-
81
-
82
-
83
-
 84
84 -
 85
85 -
 86
86 -
 87
87 -
 88
88 -
 89
89 -
 90
90 -
 91
91 -
 92
92 -
 93
93 -
 94
94 -
95
-
96
-
97
-
98
-
99
-
100
-
101
-
102
-
103
-
104
-
105
-
106
-
107
-
108
-
109
-
110
-
111
-
112
-
113
-
114
-
115
-
116
-
117
-
118
-
119
-
120
-
121
-
122
-
123
-
124
-
125
-
126
-
127
-
128
-
129
-
130
-
131
-
132
-
133
-
134
-
135
-
136
-
137
-
138
-
139
-
140
-
141
-
142
-
143
-
144
-
145
-
146
-
147
-
148
-
149
-
150
-
151
-
152
-
153
-
154
-
155
-
156
-
157
-
158
-
159
-
160
-
161
-
162
-
163
-
164
-
165
-
166
-
167
-
168
-
169
-
170
-
171
-
172
-
173
-
174
-
175
-
176
-
177
-
178
-
179
-
180
-
181
-
182
-
183
-
184
-
185
-
186
-
187
-
188
-
189
-
190
-
191
-
192
-
193
-
194
-
195
-
196
-
197
-
198
-
199
-
200
-
201
-
202
-
203
-
204
-
205
-
206
-
207
-
208
-
209
-
210
-
211
-
212
-
213
-
214
-
215
-
216
-
217
-
218
-
219
-
220
-
221
-
222
-
223
-
224
-
225
-
226
-
227
-
228
-
229
-
230
-
231
-
232
-
233
-
234
-
235
-
236
-
237
-
238
-
239
-
240
-
241
-
242
-
243
-
244
-
245
-
246
-
247
-
248
-
249
-
250
-
251
-
252
-
253
-
254
-
255
-
256
-
257
-
258
-
259
-
260
-
261
-
262
-
263
-
264
-
265
-
266
-
267
-
268
-
269
-
270
-
271
-
272
-
273
-
274
-
275
-
276
-
277
-
278
-
279
-
280
-
281
-
282
-
283
-
284
-
285
-
286
-
287
-
288
-
289
-
290
-
291
-
292
-
293
-
294
-
295
-
296
-
297
-
298
-
299
-
300
-
301
-
302
-
303
-
304
-
305
-
306
-
307
-
308
-
309
-
310
-
311
-
312
-
313
-
314
-
315
-
316
-
317
-
318
-
319
-
320
-
321
-
322
-
323
-
324
-
325
-
326
-
327
-
328
-
329
-
330
-
331
-
332
-
333
-
334
-
335
-
336
-
337
-
338
-
339
-
340
-
341
-
342
-
343
-
344
-
345
-
346
-
347
-
348
-
349
-
350
-
351
-
352
-
353
-
354
-
355
-
356
-
357
-
358
-
359
-
360
-
361
-
362
-
363
-
364
-
365
-
366
-
367
-
368
-
369
-
370
-
371
-
372
-
373
-
374
-
375
-
376
-
377
-
378
-
379
-
380
-
381
-
382
-
383
-
384
-
385
-
386
-
387
-
388
-
389
-
390
-
391
-
392
-
393
-
394
-
395
-
396
-
397
-
398
-
399
-
400
-
401
-
402
-
403
-
404
-
405
-
406
-
407
-
408
-
409
-
410
-
411
-
412
-
413
-
414
-
415
-
416
-
417
-
418
-
419
-
420
-
421
-
422
-
423
-
424
-
425
-
426
-
427
-
428
-
429
-
430
-
431
-
432
-
433
-
434
-
435
-
436
-
437
-
438
-
439
-
440
-
441
-
442
-
443
-
444
-
445
-
446
-
447
-
448
-
449
-
450
-
451
-
452
-
453
-
454
-
455
-
456
-
457
-
458
-
459
-
460
-
461
-
462
-
463
-
464
 |
 |
