Adobe 65021048 User Guide - Page 123
Drag a clip to a sequence
 |
UPC - 883919163222
View all Adobe 65021048 manuals
Add to My Manuals
Save this manual to your list of manuals |
Page 123 highlights
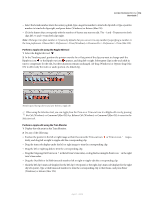
ADOBE PREMIERE PRO CS3 117 User Guide Targeting a track by clicking the track If you overlay a clip, only the targeted track is affected, whether you drag the clip or use a Source Monitor's Overlay button. If you insert a clip, the clip goes into the targeted track, and clips in any unlocked tracks shift to accommodate the insertion. To insert a clip and not shift clips in other tracks, Ctrl-Alt-drag (Windows) or Command-Option-drag (Mac OS) the clip into the track. You can drag video clips to any video track; however, you can drag audio clips only to a compatible audio track. Audio clips can't be added to the master audio track or submix tracks, and they can be placed only on audio tracks of the matching channel type: mono, stereo, or 5.1 (see "About audio tracks in a sequence" on page 182). Clips with linked video and audio can be dragged to either a video or an audio track, but the clip's video and audio components appear separately, in the appropriate corresponding tracks. Note: You can drag a clip to any unlocked, compatible track in a sequence, no matter which tracks are currently targeted. You can't target a locked track. Locking a target track deselects it as the target. Drag a clip to a sequence The video and audio components of linked clips appear in corresponding tracks in a sequence (for example, Video 1 and Audio 1), unless the audio channel type of the clip is incompatible with the target track. In this case, the linked audio appears in the next compatible track, or a compatible track is created automatically. Note: An audio clip dragged to an incompatible track automatically shifts to the next compatible track, even if the track is occupied by another audio clip. Therefore, take care not to disturb clips already in the sequence. The Program Monitor can help you determine where to position a clip you're adding to a sequence. During an overlay edit, it displays the frames in the sequence adjacent to the new clip's head and tail. During an insert edit, it displays the frames adjacent to the insertion point. 1 Open a clip in the Source Monitor, and mark its In and Out points. (See "Working with In and Out points" on page 106.) If you don't want to set In and Out points, you can drag the clip directly from a bin or the preview thumbnail in the Project panel. 2 Specify the source tracks you want to include (video, audio, or video and audio) by clicking the Take Video/Take Audio button in the Source Monitor until its icon indicates the tracks you want to use. (See "Specify source tracks to add to a sequence" on page 121.) 3 To make clip edges align when you drag them, make sure that the Snap button is active in the Timeline panel. April 1, 2008
-
 1
1 -
2
-
3
-
4
-
5
-
6
-
7
-
8
-
9
-
10
-
11
-
12
-
13
-
14
-
15
-
16
-
17
-
18
-
19
-
20
-
21
-
22
-
23
-
24
-
25
-
26
-
27
-
28
-
29
-
30
-
31
-
32
-
33
-
34
-
35
-
36
-
37
-
38
-
39
-
40
-
41
-
42
-
43
-
44
-
45
-
46
-
47
-
48
-
49
-
50
-
51
-
52
-
53
-
54
-
55
-
56
-
57
-
58
-
59
-
60
-
61
-
62
-
63
-
64
-
65
-
66
-
67
-
68
-
69
-
70
-
71
-
72
-
73
-
74
-
75
-
76
-
77
-
78
-
79
-
80
-
81
-
82
-
83
-
84
-
85
-
86
-
87
-
88
-
89
-
90
-
91
-
92
-
93
-
94
-
95
-
96
-
97
-
98
-
99
-
100
-
101
-
102
-
103
-
104
-
105
-
106
-
107
-
108
-
109
-
110
-
111
-
112
-
113
-
114
-
115
-
116
-
117
-
 118
118 -
 119
119 -
 120
120 -
 121
121 -
 122
122 -
 123
123 -
 124
124 -
 125
125 -
 126
126 -
 127
127 -
 128
128 -
129
-
130
-
131
-
132
-
133
-
134
-
135
-
136
-
137
-
138
-
139
-
140
-
141
-
142
-
143
-
144
-
145
-
146
-
147
-
148
-
149
-
150
-
151
-
152
-
153
-
154
-
155
-
156
-
157
-
158
-
159
-
160
-
161
-
162
-
163
-
164
-
165
-
166
-
167
-
168
-
169
-
170
-
171
-
172
-
173
-
174
-
175
-
176
-
177
-
178
-
179
-
180
-
181
-
182
-
183
-
184
-
185
-
186
-
187
-
188
-
189
-
190
-
191
-
192
-
193
-
194
-
195
-
196
-
197
-
198
-
199
-
200
-
201
-
202
-
203
-
204
-
205
-
206
-
207
-
208
-
209
-
210
-
211
-
212
-
213
-
214
-
215
-
216
-
217
-
218
-
219
-
220
-
221
-
222
-
223
-
224
-
225
-
226
-
227
-
228
-
229
-
230
-
231
-
232
-
233
-
234
-
235
-
236
-
237
-
238
-
239
-
240
-
241
-
242
-
243
-
244
-
245
-
246
-
247
-
248
-
249
-
250
-
251
-
252
-
253
-
254
-
255
-
256
-
257
-
258
-
259
-
260
-
261
-
262
-
263
-
264
-
265
-
266
-
267
-
268
-
269
-
270
-
271
-
272
-
273
-
274
-
275
-
276
-
277
-
278
-
279
-
280
-
281
-
282
-
283
-
284
-
285
-
286
-
287
-
288
-
289
-
290
-
291
-
292
-
293
-
294
-
295
-
296
-
297
-
298
-
299
-
300
-
301
-
302
-
303
-
304
-
305
-
306
-
307
-
308
-
309
-
310
-
311
-
312
-
313
-
314
-
315
-
316
-
317
-
318
-
319
-
320
-
321
-
322
-
323
-
324
-
325
-
326
-
327
-
328
-
329
-
330
-
331
-
332
-
333
-
334
-
335
-
336
-
337
-
338
-
339
-
340
-
341
-
342
-
343
-
344
-
345
-
346
-
347
-
348
-
349
-
350
-
351
-
352
-
353
-
354
-
355
-
356
-
357
-
358
-
359
-
360
-
361
-
362
-
363
-
364
-
365
-
366
-
367
-
368
-
369
-
370
-
371
-
372
-
373
-
374
-
375
-
376
-
377
-
378
-
379
-
380
-
381
-
382
-
383
-
384
-
385
-
386
-
387
-
388
-
389
-
390
-
391
-
392
-
393
-
394
-
395
-
396
-
397
-
398
-
399
-
400
-
401
-
402
-
403
-
404
-
405
-
406
-
407
-
408
-
409
-
410
-
411
-
412
-
413
-
414
-
415
-
416
-
417
-
418
-
419
-
420
-
421
-
422
-
423
-
424
-
425
-
426
-
427
-
428
-
429
-
430
-
431
-
432
-
433
-
434
-
435
-
436
-
437
-
438
-
439
-
440
-
441
-
442
-
443
-
444
-
445
-
446
-
447
-
448
-
449
-
450
-
451
-
452
-
453
-
454
-
455
 |
 |
