Adobe 65021048 User Guide - Page 56
Specify scratch disks to improve system performance
 |
UPC - 883919163222
View all Adobe 65021048 manuals
Add to My Manuals
Save this manual to your list of manuals |
Page 56 highlights
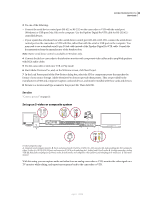
ADOBE PREMIERE PRO CS3 50 User Guide To convert the analog source signal to a digital one the computer can use, this setup requires an analog/digital (A/D) converter, or digitizer, either installed in the computer or attached to it, or a digital camcorder or VTR capable of digitizing an incoming analog signal. 1 Connect the analog camcorder or VTR to the computer or its interface, such as a breakout box, A/D converter, digital camcorder or VTR, using S-video or RCA video cables. Run video cables from the video outputs of the computer or its interface to the video inputs of the device. Also run video cables from the video outputs of the device to the video inputs of the computer or its interface. 2 Connect the analog camcorder or VTR to the computer or its interface, such as a breakout box, A/D converter, digital camcorder or VTR, using XLR or RCA audio cables. Run audio cables from the audio outputs of the computer or its interface to the audio inputs of the device. Also run audio cables from the audio outputs of the device to the audio inputs of the computer or its interface. 3 (Optional) On Windows machines, if the analog camcorder or VTR has an RS-422 or RS-232 port, connect the serial device control port on the camcorder or VTR with the serial port (Windows) on the computer using the Pipeline Digital ProVTR cable. Note: Native serial device control is available on Windows only. 4 Connect the analog camcorder or VTR, or the breakout box, A/D converter, digital camcorder or VTR, to the television monitor with an S-video or RCA video cable, and RCA audio cables. 5 Put the analog camcorder or deck into VTR or Play mode. 6 Start Adobe Premiere Pro, and, on the Welcome screen, click New Project. 7 In the Load Preset panel of the New Project dialog box, select the preset that matches the format of your A/D converter, not that of the source footage. For example, if you use a DV camcorder or A/D converter to convert the analog signal, choose a DV preset. 8 Browse to a location and type a name for the project file. Then click OK. Specify scratch disks to improve system performance When you edit a project, Adobe Premiere Pro uses disk space to store files required by your project, such as captured video and audio, conformed audio, and preview files that you create manually or that are created automatically when exporting to certain formats. Adobe Premiere Pro uses conformed audio files and preview files to optimize performance, allowing real-time editing, 32-bit floating-point quality, and efficient output. All scratch disk files are preserved across work sessions. If you delete preview files or conformed audio files, Adobe Premiere Pro automatically recreates them. By default, scratch disk files are stored where you save the project. The scratch disk space required increases as sequences become longer or more complex. For best performance, it is recommended that you dedicate a hard drive or drives strictly to your media assets. Specify these dedicated disks as your scratch disks. If your system has multiple disks, you can use the Edit > Preferences > Scratch Disks (Windows) or Premiere Pro > Preferences > Scratch Disks (Mac OS) command to specify which disks Adobe Premiere Pro uses for media files. This is best done when you set up a new project. In terms of performance, it's usually best to dedicate a different disk to each asset type, but you can also specify folders on the same disk. You can specify unique scratch disk locations for the following types of file: Captured Video Video files that you create using File > Capture. Captured Audio Audio files that you create using File > Capture. April 1, 2008
-
 1
1 -
2
-
3
-
4
-
5
-
6
-
7
-
8
-
9
-
10
-
11
-
12
-
13
-
14
-
15
-
16
-
17
-
18
-
19
-
20
-
21
-
22
-
23
-
24
-
25
-
26
-
27
-
28
-
29
-
30
-
31
-
32
-
33
-
34
-
35
-
36
-
37
-
38
-
39
-
40
-
41
-
42
-
43
-
44
-
45
-
46
-
47
-
48
-
49
-
50
-
 51
51 -
 52
52 -
 53
53 -
 54
54 -
 55
55 -
 56
56 -
 57
57 -
 58
58 -
 59
59 -
 60
60 -
 61
61 -
62
-
63
-
64
-
65
-
66
-
67
-
68
-
69
-
70
-
71
-
72
-
73
-
74
-
75
-
76
-
77
-
78
-
79
-
80
-
81
-
82
-
83
-
84
-
85
-
86
-
87
-
88
-
89
-
90
-
91
-
92
-
93
-
94
-
95
-
96
-
97
-
98
-
99
-
100
-
101
-
102
-
103
-
104
-
105
-
106
-
107
-
108
-
109
-
110
-
111
-
112
-
113
-
114
-
115
-
116
-
117
-
118
-
119
-
120
-
121
-
122
-
123
-
124
-
125
-
126
-
127
-
128
-
129
-
130
-
131
-
132
-
133
-
134
-
135
-
136
-
137
-
138
-
139
-
140
-
141
-
142
-
143
-
144
-
145
-
146
-
147
-
148
-
149
-
150
-
151
-
152
-
153
-
154
-
155
-
156
-
157
-
158
-
159
-
160
-
161
-
162
-
163
-
164
-
165
-
166
-
167
-
168
-
169
-
170
-
171
-
172
-
173
-
174
-
175
-
176
-
177
-
178
-
179
-
180
-
181
-
182
-
183
-
184
-
185
-
186
-
187
-
188
-
189
-
190
-
191
-
192
-
193
-
194
-
195
-
196
-
197
-
198
-
199
-
200
-
201
-
202
-
203
-
204
-
205
-
206
-
207
-
208
-
209
-
210
-
211
-
212
-
213
-
214
-
215
-
216
-
217
-
218
-
219
-
220
-
221
-
222
-
223
-
224
-
225
-
226
-
227
-
228
-
229
-
230
-
231
-
232
-
233
-
234
-
235
-
236
-
237
-
238
-
239
-
240
-
241
-
242
-
243
-
244
-
245
-
246
-
247
-
248
-
249
-
250
-
251
-
252
-
253
-
254
-
255
-
256
-
257
-
258
-
259
-
260
-
261
-
262
-
263
-
264
-
265
-
266
-
267
-
268
-
269
-
270
-
271
-
272
-
273
-
274
-
275
-
276
-
277
-
278
-
279
-
280
-
281
-
282
-
283
-
284
-
285
-
286
-
287
-
288
-
289
-
290
-
291
-
292
-
293
-
294
-
295
-
296
-
297
-
298
-
299
-
300
-
301
-
302
-
303
-
304
-
305
-
306
-
307
-
308
-
309
-
310
-
311
-
312
-
313
-
314
-
315
-
316
-
317
-
318
-
319
-
320
-
321
-
322
-
323
-
324
-
325
-
326
-
327
-
328
-
329
-
330
-
331
-
332
-
333
-
334
-
335
-
336
-
337
-
338
-
339
-
340
-
341
-
342
-
343
-
344
-
345
-
346
-
347
-
348
-
349
-
350
-
351
-
352
-
353
-
354
-
355
-
356
-
357
-
358
-
359
-
360
-
361
-
362
-
363
-
364
-
365
-
366
-
367
-
368
-
369
-
370
-
371
-
372
-
373
-
374
-
375
-
376
-
377
-
378
-
379
-
380
-
381
-
382
-
383
-
384
-
385
-
386
-
387
-
388
-
389
-
390
-
391
-
392
-
393
-
394
-
395
-
396
-
397
-
398
-
399
-
400
-
401
-
402
-
403
-
404
-
405
-
406
-
407
-
408
-
409
-
410
-
411
-
412
-
413
-
414
-
415
-
416
-
417
-
418
-
419
-
420
-
421
-
422
-
423
-
424
-
425
-
426
-
427
-
428
-
429
-
430
-
431
-
432
-
433
-
434
-
435
-
436
-
437
-
438
-
439
-
440
-
441
-
442
-
443
-
444
-
445
-
446
-
447
-
448
-
449
-
450
-
451
-
452
-
453
-
454
-
455
 |
 |