Akai MPC1000 Operation Manual - Page 10
For more information, see the Punch In/Punch Out - samplers
 |
View all Akai MPC1000 manuals
Add to My Manuals
Save this manual to your list of manuals |
Page 10 highlights
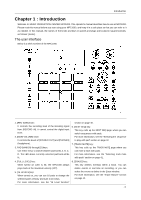
Introduction 9. [TAP TEMPO/NOTE REPEAT] key: You can set a tempo by tapping this key to the desired tempo (TAP TEMPO feature). Also, by holding a pad while pressing this key, you can repeat a note according to the setting in T.C. (NOTE REPEAT feature). For more information, see the "Tap Tempo feature" section on page 16, and the "Note Repeat feature" section on page 15. 10. [DATA] wheel: This changes the value of the currently selected field. 11. [NUMERIC] key: If you press this key in any field, allowing you to enter numbers, the LED will blink and you can enter numbers using pads. 12. [MODE] key: When you press this key (LED will blink), you can switch modes with pads. 13. [CURSOR] key: You can move the highlighted cursor up and down on the screen to select a field. In the value field, you can switch digits by pressing keys, holding [SHIFT] key. 14. [MAIN] key: Pressing this key displays MAIN mode, regardless the current mode. 15. [WINDOW] key: Pressing this key, when the LED is lit, displays a pop up window where you can make a detailed setting of the field. 16. [UNDO SEQ] key: When you record a sequence, the LED of this key will light up. Pressing this key, when the LED is lit, resets the system to its status before recording, and LED will be turned off. 17. [SHIFT] key: You can use various features with a combination of another key. 18. [BAR] key: You can move sequences by bar. When you press keys holding the [SHIFT] key, you can step through sequences according to the value of the timing correct setting. 19. [PLAY START] key: Plays a sequence from the start if LOOP:OFF. If LOOP:ON plays sequence from loop start. Press [SHIFT] + [PLAY START] to go to start of sequence. 20. [REC] key: Pressing the [PLAY START] key or the [PLAY] key holding this key starts recording to a sequence. Any event that is already recorded on the track will be replaced with new events. You can punch in by pressing the [PLAY] + [REC] key while playing back a sequence, and punch out by pressing the [REC] key during recording. For more information, see the "Punch In/Punch Out feature" section on page 15. 21. [OVER DUB] key: This key is basically the same as the [REC] key, but it adds new events to the current events (over dub). You can punch in by pressing the [PLAY] + [OVER DUB] keys while playing back a sequence, and punch out by pressing the [OVER DUB] key while over dubbing. 22. [STOP] key: This key stops the play back/recording of a sequence. If you hit this key 3 times quickly, you can stop all sound playing back. 23. [PLAY] key: This key starts the play back of a sequence from its current position. Pressing the [SHIFT] + [PLAY] keys moves to the end of the sequence. 24. Display: This is the LCD (Liquid Crystal Display) with backlight. 25. [F1] through [F6] keys: These keys are used to call up pages to the bottom of the display, or to execute the feature assigned to the key. The available feature depends on the currently displayed screen. 26. [PAD1] through [PAD16]: These are the drum pads to play the internal sampler. The pressure/strength you use to hit the pad controls the level of the sound. In TRACK MUTE mode, you can select a track and, in NEXT SEQ mode, you can select a sequence with a pad. You can also use these pads to select modes or to enter letters. 27. [AFTER] key: When you turn on this key, the information of the Q-Link slider recorded on a track replaces the current value of the slider. For more information, see page 44. 28. [Q1] and [Q2] sliders These sliders control the sound according to the setting in the SLIDER mode. For more information, see the "Q-Link slider" section on page 44. -2-
-
 1
1 -
2
-
3
-
4
-
 5
5 -
 6
6 -
 7
7 -
 8
8 -
 9
9 -
 10
10 -
 11
11 -
 12
12 -
 13
13 -
 14
14 -
 15
15 -
16
-
17
-
18
-
19
-
20
-
21
-
22
-
23
-
24
-
25
-
26
-
27
-
28
-
29
-
30
-
31
-
32
-
33
-
34
-
35
-
36
-
37
-
38
-
39
-
40
-
41
-
42
-
43
-
44
-
45
-
46
-
47
-
48
-
49
-
50
-
51
-
52
-
53
-
54
-
55
-
56
-
57
-
58
-
59
-
60
-
61
-
62
-
63
-
64
-
65
-
66
-
67
-
68
-
69
-
70
-
71
-
72
-
73
-
74
-
75
-
76
-
77
-
78
-
79
-
80
-
81
-
82
-
83
-
84
-
85
-
86
-
87
-
88
-
89
-
90
-
91
-
92
-
93
-
94
-
95
-
96
-
97
-
98
-
99
-
100
-
101
-
102
-
103
-
104
 |
 |