Akai MPC1000 Operation Manual - Page 20
Other useful features for recording sequences, Undo Sequence feature, Erase feature - parts
 |
View all Akai MPC1000 manuals
Add to My Manuals
Save this manual to your list of manuals |
Page 20 highlights
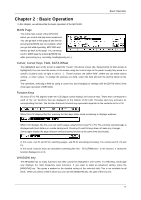
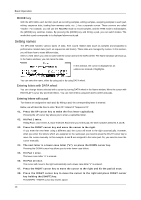
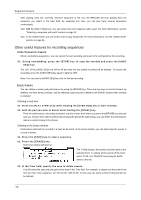
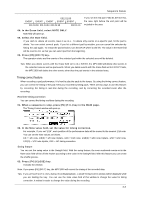
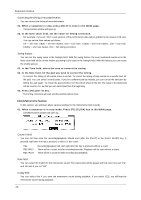
Sequence feature After playing back the currently selected sequence to the end, the MPC1000 will start playing back the sequence you select in the Next field. By repeating this step, you can play back several sequences continuously. Tips: With the [NEXT SEQ] key, you can select the next sequence with a pad. For more information, see the "Selecting a sequence with pads" section on page 42. Tips: In the SONG mode, you can set the order to play sequences. For more information, see the "SONG mode" section on page 36. Other useful features for recording sequences Undo Sequence feature When overdubbing sequences, you can cancel the last recording and reset to the setting before the recording. 01. During overdubbing, press the [STOP] key to stop the overdub and press the [UNDO SEQ] key. The LED of the [UNDO SEQ] key will be off and only the last added recording will be deleted. To restore the recording, press the [UNDO SEQ] key again to light the LED. Note: You can use the [UNDO SEQ] key only for the last recording. Erase feature You can delete a certain pad performance by using the [ERASE] key. There are two ways to use this feature: by deleting real-time during overdub, and by selecting a pad and part to delete in the ERASE window when overdub is stopped. Deleting in real time 01. Press the [PLAY START] key while holding the [OVER DUB] key to start overdub. 02. Hold the pad you wish to delete while holding the [ERASE] key. From the performance data being recorded, only the section from where you press the [ERASE] key and pad and you release them will be deleted. By pressing the pad at the right timing, you can delete the performance data at a certain timing in the phrase. Deleting in the Erase window Performance data will be recorded in a track as an event. In the Erase window, you can select specific events in a track to delete. 01. Press the [STOP] key to stop a sequence. 02. Press the [ERASE] key. The Erase window will open up. The Tr field displays the number and the name of the selected track. To delete all the events of the track, select "Tr:00- ALL TRACKS" by turning the DATA wheel to the left. 03. In the Time field, specify the area to delete events. You will select the start and end point of the area in the Time field. For example, to delete only the event in the first bar from 2-bar sequence, set "001.01.00 - 002.01.00". In this case, the event at 002.01.00 point will not be deleted. -12-
-
 1
1 -
2
-
3
-
4
-
5
-
6
-
7
-
8
-
9
-
10
-
11
-
12
-
13
-
14
-
 15
15 -
 16
16 -
 17
17 -
 18
18 -
 19
19 -
 20
20 -
 21
21 -
 22
22 -
 23
23 -
 24
24 -
 25
25 -
26
-
27
-
28
-
29
-
30
-
31
-
32
-
33
-
34
-
35
-
36
-
37
-
38
-
39
-
40
-
41
-
42
-
43
-
44
-
45
-
46
-
47
-
48
-
49
-
50
-
51
-
52
-
53
-
54
-
55
-
56
-
57
-
58
-
59
-
60
-
61
-
62
-
63
-
64
-
65
-
66
-
67
-
68
-
69
-
70
-
71
-
72
-
73
-
74
-
75
-
76
-
77
-
78
-
79
-
80
-
81
-
82
-
83
-
84
-
85
-
86
-
87
-
88
-
89
-
90
-
91
-
92
-
93
-
94
-
95
-
96
-
97
-
98
-
99
-
100
-
101
-
102
-
103
-
104
 |
 |
