Alesis TransActive Drummer Quick Start Guide - Page 3
Diagram And Parts Description, Specifications - weight
 |
View all Alesis TransActive Drummer manuals
Add to My Manuals
Save this manual to your list of manuals |
Page 3 highlights
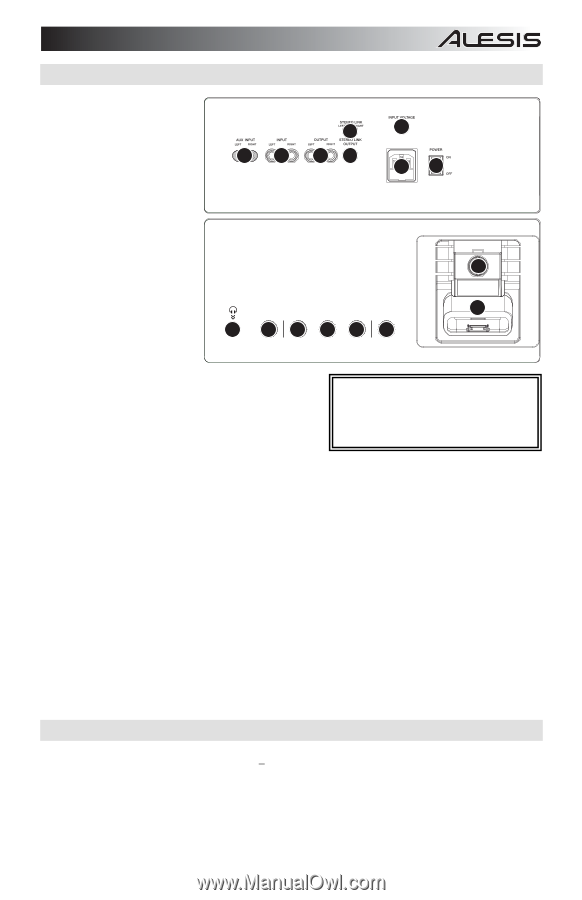
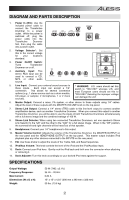
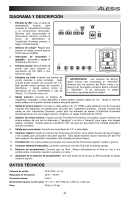
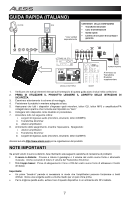
DIAGRAM AND PARTS DESCRIPTION 1. Power In (IEC): Use the included power cable to connect the TransActive Drummer to a power outlet. While the power is switched off, plug the power cable into the TransActive Drummer first, then plug the cable into a power outlet. AUX INPUT LEFT RIGHT 4 INPUT LEFT (MONO) RIGHT 5 STEREO LINK 8 LEFT OFF RIGHT OUTPUT STEREO LINK LEFT RIGHT OUTPUT 67 INPUT VOLTAGE 2 POWER 13 2. Voltage Selector*: Set this to the correct voltage for your location's standard. 3. Power On/Off Switch: Turns TransActive Drummer on or off. 4. Auxiliary Input: This stereo RCA input can be used to connect a CD, MP3, or other audio source. 9 HEADPHONES 10 MIN MAX MASTER VOLUME 11 -15 +15 BASS 11 -15 +15 MID 11 -15 +15 TREBLE 12 MIN MAX iPod / AUX VOLUME ADJUSTABLE iPod SUPPORT 14 13 iPod DOCK 5. Line Input: Connect your external sound sources to these inputs. Each input can accept a 1/4" connection. This allows for several connection options (e.g., 1 stereo source such as a drum module, CD player, or sampler, 2 microphones, 1 or 2 mono sources). * WARNING: U.S. users should set this switch to "100-120V" whereas U.K. and most European users should set this to "220-240V."Selecting the improper voltage can damage the unit. 6. Master Output: Connect a mixer, PA system, or other device to these outputs using 1/4" cables. Adjust the level of these outputs with the MASTER VOLUME knob on the top panel. 7. Stereo Link Output: Connect a 1/4" stereo (TRS) cable to this line-level output to connect another amplification device, such as another TransActive Drummer. When you connect this output to another TransActive Drummer, you will be able to use the inputs of both TransActive Drummers simultaneously with a full stereo image and the combined wattage of 100 W. 8. Stereo Link Selector: When using two connected TransActive Drummers, set one speaker's Stereo Link Selector to the "left" and the other to the "right" for a full stereo image. When in the "Off" position, the summed left and right channels will be heard out of that speaker. 9. Headphones: Connect your 1/4" headphones to this output. 10. Master Volume Control: Adjusts the volume of the TransActive Drummer, the MASTER OUTPUT on the rear panel and the HEADPHONE OUTPUT on the top panel. This master output includes iPod playback plus any other devices connected to the INPUTS on the rear panel. 11. EQ: Use these knobs to adjust the levels of the Treble, Mid, and Bass frequencies. 12. iPod/Aux Volume: This knob controls the level of the iPod and the iPod/Auxiliary Input. 13. Dock: Connect your iPod here. Gently rock the iPod back and forth over the connector when attaching or removing it. 14. Dock Adjuster: Turn this knob accordingly so your docked iPod rests against the support. SPECIFICATIONS Output Wattage: Frequency Response: Max Current: Dimensions (W x D x H): Weight: 50 W (THD:
-
 1
1 -
 2
2 -
 3
3 -
 4
4 -
 5
5 -
 6
6 -
 7
7 -
 8
8 -
 9
9 -
10
-
11
-
12
 |
 |