Alpine PXA-H800 User Manual - Page 20
From a PC
 |
View all Alpine PXA-H800 manuals
Add to My Manuals
Save this manual to your list of manuals |
Page 20 highlights
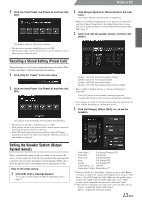
From a PC 12 Move the microphone to a spot specified in the screen and position it firmly. 16 When measurement is complete, click [Result]. The result screen will be displayed. The adjustment result when the Target Curve is "REFERENCE" will be displayed. If you want to select another target curve, go to Step 17. If you want to save the adjustment result, go to Step 19. 17 Click [Target Curve Select]. • The microphone should be placed at shoulder height. 13 Click [Measure]. When the measurement start screen appears, click [START]. Countdown will start. The name of the curve currently selected. The Target Curve Selection screen will be displayed. 18 Select and click the target curve you want. Then, click [OK]. During the 10 second countdown, go outside the vehicle and close the door. A test signal will be output from the speakers to measure the acoustic characteristics of the cabin. Do not open any doors until the finish message appears on the screen. If external noise interferes with the measurement, click the [Measure] again to re-measure. • Measurement takes approximately 5 to 15 minutes. • If you want to stop measurement, click [CANCEL]. 14 Click [OK] when a completed message appears. 15 When measurement for Position 1 is completed, move the microphone to the next measuring position and secure it following the guidance on the screen. When the microphone is properly located, repeat Step 13 following the guidance on the screen. • You can perform measurement from up to 6 listening positions. • We recommend that you should take measurements from at least 2 listening positions. • To close measurement, go to Step 16. • For more accurate measurement, you can make measurements from 6 listening positions. However, it takes approximately 70 minutes to complete the entire procedure. Therefore, be sure to charge the vehicle battery while taking measurements. • If no microphone is connected, a confirmation message will be displayed and measurement will not be carried out. Click [OK] to cancel the indication. • If you want to re-measure from the same position, click [Reset]. The adjustment result for the selected Target Curve will be displayed. REFERENCE: Enjoy the rhythm and balance of music to the best acoustic effect, suitable for the vehicle interior. Reference With Mid-range Comp.: Select this if the tweeter and midrange speakers are installed in the dashboard, and mid or high range harshness is apparent. LINEAR: A linear (flat) acoustic effect is actualized. This setting recreates the balanced sound of a studio listening room. USERS: You can select this only when you have adjusted the curve. Refer to "Adjusting and Saving the Target Curve" (page 19). • If you are not satisfied with the measurement result, click [ReMeasure] to perform measurement again. 19 Click [Send Filter]. The Memory selection screen will be displayed. 18-EN
-
 1
1 -
2
-
3
-
4
-
5
-
6
-
7
-
8
-
9
-
10
-
11
-
12
-
13
-
14
-
 15
15 -
 16
16 -
 17
17 -
 18
18 -
 19
19 -
 20
20 -
 21
21 -
 22
22 -
 23
23 -
 24
24 -
 25
25 -
26
-
27
-
28
-
29
-
30
-
31
-
32
-
33
-
34
-
35
-
36
-
37
-
38
-
39
-
40
-
41
-
42
-
43
-
44
-
45
-
46
-
47
-
48
-
49
-
50
-
51
-
52
-
53
-
54
-
55
-
56
-
57
-
58
-
59
-
60
-
61
-
62
-
63
-
64
-
65
-
66
-
67
 |
 |
