Alpine iXA-W407 Owners Manual - Page 9

Getting Started - installation

Page 9 highlights

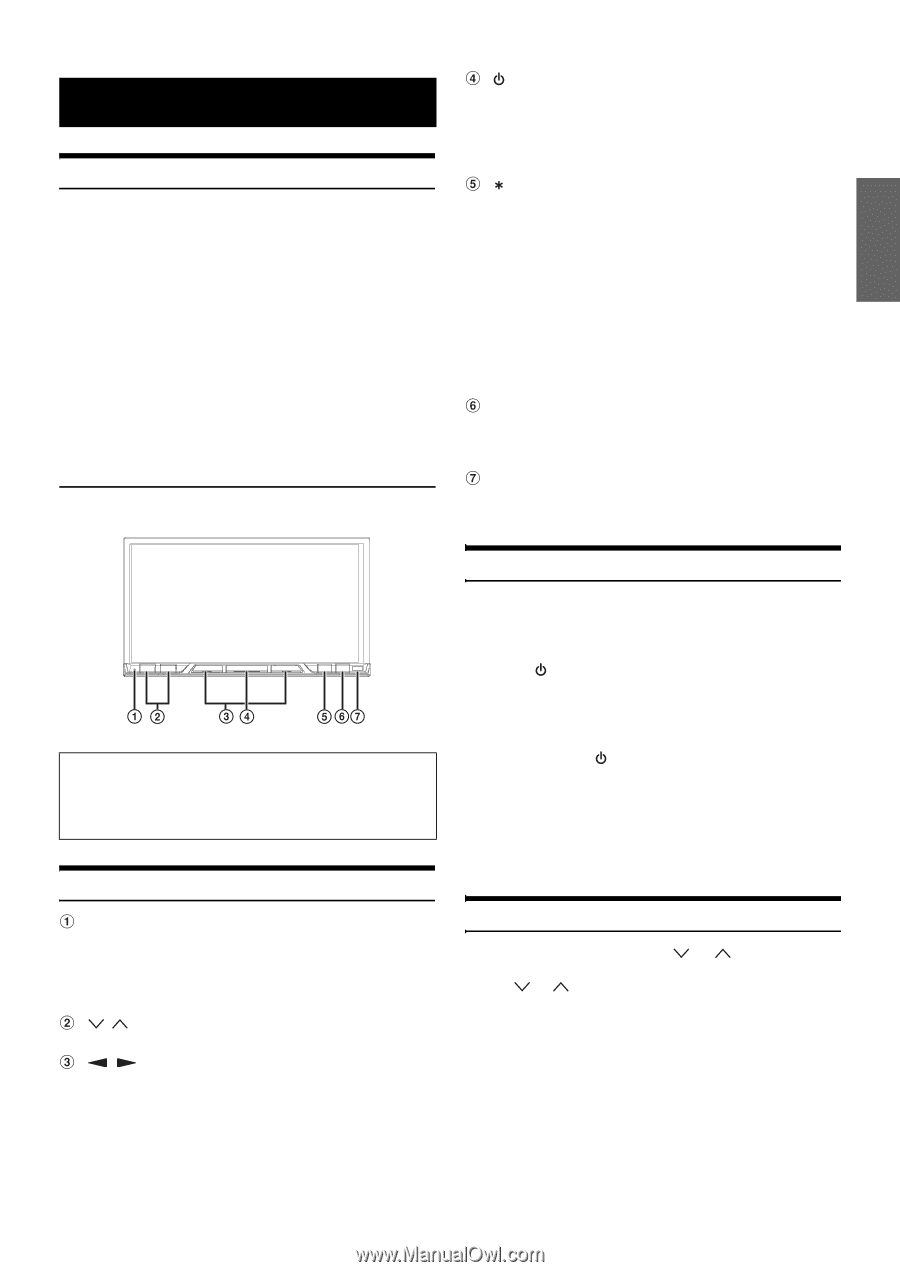
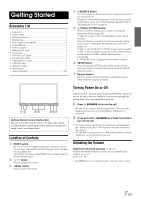
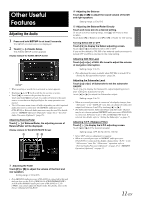
Getting Started Accessory List • Head unit 1 • Power cable 1 • Mounting sleeve 1 • Bracket key 2 • Flush Head Screw (M5x8 6 • Screw (M5×8 8 • Remote control 1 • Battery (AAA size 2 • Face plate 1 • AUX Pre OUT Cable 1 • AV extension cable 1 • USB extension cable 1 • USB 30P cable 1 • REMOTE Cable 1 • Microphone 1 • Owner's Manual 1 set SOURCE button Turns the power on. Press and hold for at least 3 seconds to turn the power off. Recalls the mode switching screen, changes the source of Audio/Visual mode, etc. For the detailed operation, refer to "Recalling the Source" (page 8). /VISUAL (OPTION) button Press to recall the setting which is set in "Setting the Navigation Mode" (page 20). If "NAV. IN" is set to "ON", the Navigation screen will be recalled. Press and hold for at least 2 seconds to recall the setting which is set in "Setting the OPTION Button on the Unit" (page 21). If "TEL" is set, the BLUETOOTH TEL screen will be recalled. If "SAT" is set, the weather channel or traffic channel will be recalled (when the XM or SIRIUS Receiver Box is connected). If "TAGGING" is set, Tagging function may be recalled. SETUP button Press to recall the SETUP screen of the current source. Press and hold for at least 2 seconds to recall the SETUP selection screen. Remote Sensor Point the remote control transmitter towards the remote sensor within a range of 2 meters. Optional Remote Control Interface Box This unit is operable using the vehicle's secondary radio controls. An Alpine Remote Control Interface Box (optional) is required. For details, contact your Alpine dealer. Location of Controls RESET switch Be sure to press the RESET switch when using the unit for the first time, after installing the CD changer, after changing the car battery, etc. Turn off the unit power, press RESET with a ballpoint pen or similar pointed object. / button Press to adjust the volume. / button Press to switch the mode. Turning Power On or Off Some of this unit's functions cannot be performed while the vehicle is in motion. Be sure to stop your vehicle in a safe location and apply the parking brake, before attempting these operations. 1 Press SOURCE to turn on the unit. • The unit can be turned on by pressing any button. The unit is also automatically turned on if an iPhone/iPod or USB memory is connected. 2 Press and hold SOURCE for at least 3 seconds to turn off the unit. • The monitor may be dim during low temperature and immediately after turning on the power. The brightness will return to normal as time elapses. • The iXA-W407 is a precision device. With gentle handling, its unique capabilities can be enjoyed for a long time. Adjusting the Volume Adjust the volume by pressing or . Volume decreases/increases continuously by pressing and holding or . Volume: 0 - 35 • The MUTE function can be performed by using the remote control. 7-EN

  • 1
  • 2
  • 3
  • 4
  • 5
  • 6
  • 7
  • 8
  • 9
  • 10
  • 11
  • 12
  • 13
  • 14
  • 15
  • 16
  • 17
  • 18
  • 19
  • 20
  • 21
  • 22
  • 23
  • 24
  • 25
  • 26
  • 27
  • 28
  • 29
  • 30
  • 31
  • 32
  • 33
  • 34
  • 35
  • 36
  • 37
  • 38
  • 39
  • 40
  • 41
  • 42
  • 43
  • 44
  • 45
  • 46
  • 47
  • 48
  • 49
  • 50
  • 51
  • 52
  • 53
  • 54
  • 55
  • 56
  • 57
  • 58
  • 59
  • 60
  • 61
  • 62
  • 63
  • 64
  • 65
  • 66
  • 67
  • 68
  • 69
  • 70
  • 71
  • 72
  • 73
  • 74
  • 75
  • 76

7
-EN
Accessory List
Head unit
.............................................................................
1
Power cable
.........................................................................
1
Mounting sleeve
..................................................................
1
Bracket key
..........................................................................
2
Flush Head Screw (M5x8)
...................................................
6
Screw (M5×8)
......................................................................
8
Remote control
....................................................................
1
Battery (AAA size)
...............................................................
2
Face plate
............................................................................
1
AUX Pre OUT Cable
............................................................
1
AV extension cable
..............................................................
1
USB extension cable
...........................................................
1
USB 30P cable
....................................................................
1
REMOTE Cable
....................................................................
1
Microphone
..........................................................................
1
Owner’s Manual
.............................................................
1 set
Location of Controls
RESET switch
Be sure to press the RESET switch when using the unit for
the first time, after installing the CD changer, after changing
the car battery, etc.
Turn off the unit power, press RESET with a ballpoint pen or
similar pointed object.
/
button
Press to adjust the volume.
/
button
Press to switch the mode.
SOURCE button
Turns the power on. Press and hold for at least 3 seconds to
turn the power off.
Recalls the mode switching screen, changes the source of
Audio/Visual mode, etc. For the detailed operation, refer to
“Recalling the Source” (page 8).
/VISUAL (OPTION) button
Press to recall the setting which is set in “Setting the
Navigation Mode” (page 20).
If “NAV. IN” is set to “ON”, the Navigation screen will be
recalled.
Press and hold for at least 2 seconds to recall the setting
which is set in “Setting the OPTION Button on the Unit”
(page 21).
If “TEL” is set, the BLUETOOTH TEL screen will be recalled.
If “SAT” is set, the weather channel or traffic channel will be
recalled (when the XM or SIRIUS Receiver Box is
connected).
If “TAGGING” is set, Tagging function may be recalled.
SETUP button
Press to recall the SETUP screen of the current source.
Press and hold for at least 2 seconds to recall the SETUP
selection screen.
Remote Sensor
Point the remote control transmitter towards the remote
sensor within a range of 2 meters.
Turning Power On or Off
Some of this unit’s functions cannot be performed while the vehicle is in
motion. Be sure to stop your vehicle in a safe location and apply the
parking brake, before attempting these operations.
1
Press
SOURCE
to turn on the unit.
The unit can be turned on by pressing any button. The unit is also
automatically turned on if an iPhone/iPod or USB memory is
connected.
2
Press and hold
SOURCE
for at least 3 seconds to
turn off the unit.
The monitor may be dim during low temperature and immediately
after turning on the power. The brightness will return to normal as
time elapses.
The iXA-W407 is a precision device. With gentle handling, its unique
capabilities can be enjoyed for a long time.
Adjusting the Volume
Adjust the volume by pressing
or
Volume decreases/increases continuously by pressing and
holding
or
.
Volume: 0 - 35
The MUTE function can be performed by using the remote control.
Getting Started
Optional Remote Control Interface Box
This unit is operable using the vehicle’s secondary radio controls.
An Alpine Remote Control Interface Box (optional) is required. For
details, contact your Alpine dealer.