Apple MA409LL/A Setup Guide - Page 12
Remove the Protective Shipping Materials, Step 1
 |
UPC - 885909098316
View all Apple MA409LL/A manuals
Add to My Manuals
Save this manual to your list of manuals |
Page 12 highlights
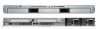
Step 1: Remove the Protective Shipping Materials 1 Remove the Xserve from its box and place it on a flat surface. 2 Remove the protective faceplate by unscrewing the thumbscrews on each side of the faceplate and lifting it off. Protective faceplate 3 Remove any plastic film covering the front or top of the Xserve. Note: Do not remove the small plastic protector in the optical drive slot. Leave this protector in place until the Xserve is secured in the rack. Keep the protector and return it to the drive slot whenever you move the Xserve or pack it for shipping. 12 Chapter 1 Installing the Xserve
-
 1
1 -
2
-
3
-
4
-
5
-
6
-
 7
7 -
 8
8 -
 9
9 -
 10
10 -
 11
11 -
 12
12 -
 13
13 -
 14
14 -
 15
15 -
 16
16 -
 17
17 -
18
-
19
-
20
-
21
-
22
-
23
-
24
-
25
-
26
-
27
-
28
-
29
-
30
-
31
-
32
-
33
-
34
-
35
-
36
-
37
-
38
-
39
-
40
-
41
-
42
-
43
-
44
-
45
-
46
-
47
-
48
-
49
-
50
-
51
-
52
-
53
-
54
-
55
-
56
-
57
-
58
-
59
-
60
 |
 |

12
Chapter 1
Installing the Xserve
Step 1:
Remove the Protective Shipping Materials
1
Remove the Xserve from its box and place it on a flat surface.
2
Remove the protective faceplate by unscrewing the thumbscrews on each side of the
faceplate and lifting it off.
3
Remove any plastic film covering the front or top of the Xserve.
Note:
Do not remove the small plastic protector in the optical drive slot. Leave this
protector in place until the Xserve is secured in the rack. Keep the protector and return
it to the drive slot whenever you move the Xserve or pack it for shipping.
Protective faceplate