Apple MA409LL/A Setup Guide - Page 18
Connect the Cables, Step 6
 |
UPC - 885909098316
View all Apple MA409LL/A manuals
Add to My Manuals
Save this manual to your list of manuals |
Page 18 highlights
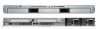
Step 6: Connect the Cables 1 Connect a power cord to the power supply and secure it with the wire clip. Note: The fan in the power supply and some system status lights come on when you connect the power cord, before you turn on the Xserve. 2 Connect the network cables. Note: If you're using only one Ethernet cable, connect it to port 1. Serial console port Display port Ethernet port 2 Ethernet port 1 USB 2.0 ports (2) System identifier button/light System information tag (pullout tab) FireWire 800 Power supply Power supply ports (2) bay 1 bay 2 18 Chapter 1 Installing the Xserve
-
 1
1 -
2
-
3
-
4
-
5
-
6
-
7
-
8
-
9
-
10
-
11
-
12
-
 13
13 -
 14
14 -
 15
15 -
 16
16 -
 17
17 -
 18
18 -
 19
19 -
 20
20 -
 21
21 -
 22
22 -
 23
23 -
24
-
25
-
26
-
27
-
28
-
29
-
30
-
31
-
32
-
33
-
34
-
35
-
36
-
37
-
38
-
39
-
40
-
41
-
42
-
43
-
44
-
45
-
46
-
47
-
48
-
49
-
50
-
51
-
52
-
53
-
54
-
55
-
56
-
57
-
58
-
59
-
60
 |
 |

18
Chapter 1
Installing the Xserve
Step 6:
Connect the Cables
1
Connect a power cord to the power supply and secure it with the wire clip.
Note:
The fan in the power supply and some system status lights come on when you
connect the power cord, before you turn on the Xserve.
2
Connect the network cables.
Note:
If you’re using only one Ethernet cable, connect it to port 1.
Serial console port
Display port
Ethernet port 2
Ethernet port 1
System identifier
button/light
FireWire 800
ports (2)
USB 2.0 ports (2)
Power supply
bay 2
Power supply
bay 1
System information tag
(pullout tab)