Apple MA409LL/A Setup Guide - Page 17
Slide the Xserve into the Rails, Step 5
 |
UPC - 885909098316
View all Apple MA409LL/A manuals
Add to My Manuals
Save this manual to your list of manuals |
Page 17 highlights
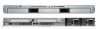
Step 5: Slide the Xserve into the Rails 1 Guide the slides on the Xserve into the channels on the rails. Important: Make sure both the left and right slides on the Xserve go inside the rail channels. If you have difficulty, set aside the Xserve and use the alignment guide to check the spacing between the rails. Optical drive protector Thumbscrews 2 Slide the Xserve into the rack until it stops. 3 Tighten the thumbscrews at each end of the front panel to secure the Xserve in the rack. 4 Remove the plastic optical drive protector. Note: Keep the protector and return it to the drive slot whenever you move the Xserve to another location or pack it for shipping. Chapter 1 Installing the Xserve 17
-
 1
1 -
2
-
3
-
4
-
5
-
6
-
7
-
8
-
9
-
10
-
11
-
 12
12 -
 13
13 -
 14
14 -
 15
15 -
 16
16 -
 17
17 -
 18
18 -
 19
19 -
 20
20 -
 21
21 -
 22
22 -
23
-
24
-
25
-
26
-
27
-
28
-
29
-
30
-
31
-
32
-
33
-
34
-
35
-
36
-
37
-
38
-
39
-
40
-
41
-
42
-
43
-
44
-
45
-
46
-
47
-
48
-
49
-
50
-
51
-
52
-
53
-
54
-
55
-
56
-
57
-
58
-
59
-
60
 |
 |

Chapter 1
Installing the Xserve
17
Step 5:
Slide the Xserve into the Rails
1
Guide the slides on the Xserve into the channels on the rails.
Important:
Make sure both the left and right slides on the Xserve go inside the rail
channels. If you have difficulty, set aside the Xserve and use the alignment guide to
check the spacing between the rails.
2
Slide the Xserve into the rack until it stops.
3
Tighten the thumbscrews at each end of the front panel to secure the Xserve in the
rack.
4
Remove the plastic optical drive protector.
Note:
Keep the protector and return it to the drive slot whenever you move the Xserve
to another location or pack it for shipping.
Thumbscrews
Optical drive protector