Asus A7V133 A7V133 User Manual - Page 87
Installing the Hard Disks, Enter FastTrak100 BIOS and FastBuild Utility
 |
View all Asus A7V133 manuals
Add to My Manuals
Save this manual to your list of manuals |
Page 87 highlights
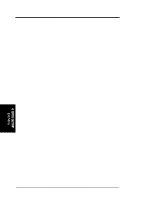
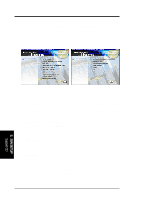
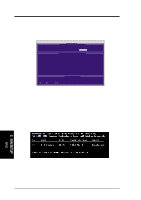
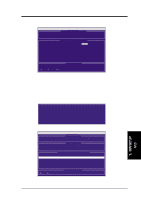
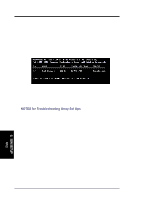
5. SOFTWARE SETUP 5.4.1 Installing the Hard Disks The RAID 0 setting allows users to reformat two hard disks with the same new OS simultaneously. RAID 1 arrays can use a pre-existing hard disk along with a blank hard disk, or two new hard disks. 1. Install the first and second hard disk into the hard disk bays of your system. Connect each hard disk drive with a separate UltraDMA/100 cable, one to the Primary ATA-100 IDE connector, and the other to the Secondary ATA-100 IDE connector onboard the A7V133. 2. Ensure that Jumpers 13 and 14 are set for RAID 0 or 1: Jumper 13: [1-2] and Jumper 14; [2-3] (See Section 3.4.5, Hardware Setup: Motherboard Settings) 3. Connect the power cables to the hard disks. 5.4.2 Enter FastTrak100 BIOS and FastBuild Utility 1. Boot-up your computer. If this is the first time you have booted with two hard disks correctly installed, then FastTrak100™ "Lite" BIOS scans the IDE drives and displays this screen: 5. S/W SETUP RAID 2. Press keys to display the FastBuild™ Utility Main Menu: FastBuild (tm) Utility 1.31 (c) 1996-2000 Promise Technology, Inc. [ Main Menu ] Auto Setup 1 ] View Drive Assignments . . . . [ 2 ] View Array 3 ] Delete Array 4 ] Rebuild Array 5 ] Controller Configuration . . . [ 6 ] [ Keys Available ] Press 1..6 to select Option [ESC] Exit ASUS A7V133 User's Manual 87
-
 1
1 -
2
-
3
-
4
-
5
-
6
-
7
-
8
-
9
-
10
-
11
-
12
-
13
-
14
-
15
-
16
-
17
-
18
-
19
-
20
-
21
-
22
-
23
-
24
-
25
-
26
-
27
-
28
-
29
-
30
-
31
-
32
-
33
-
34
-
35
-
36
-
37
-
38
-
39
-
40
-
41
-
42
-
43
-
44
-
45
-
46
-
47
-
48
-
49
-
50
-
51
-
52
-
53
-
54
-
55
-
56
-
57
-
58
-
59
-
60
-
61
-
62
-
63
-
64
-
65
-
66
-
67
-
68
-
69
-
70
-
71
-
72
-
73
-
74
-
75
-
76
-
77
-
78
-
79
-
80
-
81
-
 82
82 -
 83
83 -
 84
84 -
 85
85 -
 86
86 -
 87
87 -
 88
88 -
 89
89 -
 90
90 -
 91
91 -
 92
92 -
93
-
94
-
95
-
96
-
97
-
98
-
99
-
100
-
101
-
102
 |
 |