Asus M3A78 Motherboard Installation Guide - Page 10
Bottom Panel
 |
UPC - 610839163151
View all Asus M3A78 manuals
Add to My Manuals
Save this manual to your list of manuals |
Page 10 highlights
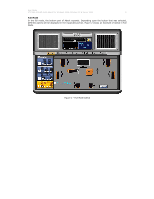
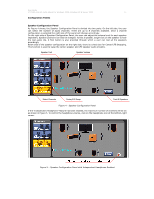
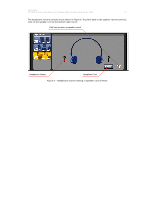
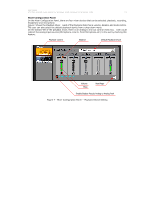
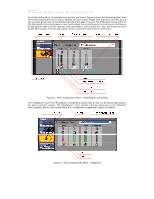
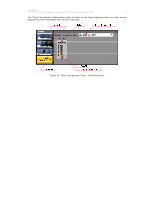
User Guide VT1708A VIA HD Audio Adeck For Windows 2000, Windows XP & Server 2003 10 Bottom Panel The Bottom Panel is beneath the top panel. The contents of the Bottom Panel are dependent upon the button that activated to it. Even if the Bottom Panel is already expanded, the contents can still be changed by selecting another button from the bottom of the Top Panel. Speaker Configuration Panel: As Figure 4 shows, it contains the channel configuration and output volume control. To test a speaker to see if it is connected, single-click on the desired speaker. To test all speakers, just click the Test button. Mixer Configuration Panel: As Figure 7 shows, it contains the basic Playback Mixer and Recording Mixer volume controls. Additionally, the user can select which playback or recording device to be active. Effects Configuration Panel: As Figure 11 shows, there are two sound enhancement functions that can be selected: "Equalizer" or "Bass Management". Jack Configuration Panel: As Figure 15 shows, the user can re-task every jack's usage and active jack detection. The user can also configure the headphone to receive the same audio signals as the front speakers. S/PDIF Configuration Panel: As Figure 19 shows, the user can configure the S/PDIF related control. System Information Panel: As Figure 21 shows, the user can view the system information and set the preferred language. Additionally, the user can program the hot keys.
-
 1
1 -
2
-
3
-
4
-
 5
5 -
 6
6 -
 7
7 -
 8
8 -
 9
9 -
 10
10 -
 11
11 -
 12
12 -
 13
13 -
 14
14 -
 15
15 -
16
-
17
-
18
-
19
-
20
-
21
-
22
-
23
-
24
-
25
-
26
-
27
-
28
 |
 |