Asus P3W P3W User Manual - Page 120
Using the ASUS S370 Series CPU Card, S370 Series CPU Card Jumper Settings
 |
View all Asus P3W manuals
Add to My Manuals
Save this manual to your list of manuals |
Page 120 highlights
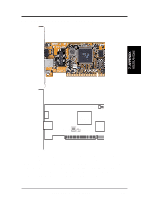
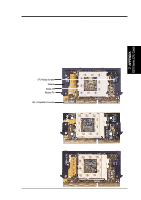
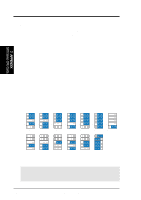
7. APPENDIX S370 Series CPU Cards 7. APPENDIX 7.2.1 Using the ASUS S370 Series CPU Card The general procedure for using the ASUS S370 Series CPU Card is as follows: 1. Check the voltage setting for your socket 370 processor using the jumpers on the card if necessary. For current socket 370 processors, the default setting should be used. See the reverse side of the ASUS S370 Series CPU Card or this page for voltage settings. 2. Install the socket 370 processor. Installation of socket 370 processors is exactly like socket 7 processors. Lift the brown lever to 90° to install the processor and lower the brown lever to lock the processor. 3. Insert the ASUS S370 Series CPU Card into Slot 1 on the motherboard. The retainer fin on each side of the ASUS S370 Series CPU Card must catch on the retention mechanism so that it locks in place. 4. Connect the socket 370 processor's fan connector to the motherboard. 5. Make sure that no wires or objects come in contact with the fan. 7.2.2 S370 Series CPU Card Jumper Settings The only set of jumpers on the ASUS S370 Series CPU Card is used for setting the voltage sent to the CPU. Setting the CPU voltage is not necessary for current socket 370 processors. If required, your socket 370 processor should have its voltage requirement printed on its surface or documentation. If no voltage is indicated or you are not sure, use the "CPU Def." setting as shown below. 123 123 123 123 123 123 123 JP5 JP5 JP5 JP5 JP5 JP5 JP5 JP4 JP4 JP4 JP4 JP4 JP4 JP4 JP3 JP3 JP3 JP3 JP3 JP3 JP3 JP2 JP2 JP2 JP2 JP2 JP2 JP2 JP1 JP1 JP1 JP1 JP1 JP1 JP1 1.80Volts 1.85Volts 1.90Volts 1.95Volts 2.00Volts 2.05Volts 2.10Volts 123 123 123 123 123 123 123 JP5 JP5 JP5 JP5 JP5 JP5 JP5 JP4 JP4 JP4 JP4 JP4 JP4 JP4 JP3 JP3 JP3 JP3 JP3 JP3 JP3 JP2 JP2 JP2 JP2 JP2 JP2 JP2 JP1 JP1 JP1 JP1 JP1 JP1 JP1 2.20Volts 2.30Volts 2.40Volts 2.50Volts 2.60Volts CPU Def. Reserved Socket 370 CPU Voltage WARNING! Exceeding your socket 370 processor's required voltage can damage your processor permanently! Make sure that the jumpers are as shown for "CPU Def." unless otherwise specified before powering ON your motherboard. 120 ASUS P3W User's Manual
-
 1
1 -
2
-
3
-
4
-
5
-
6
-
7
-
8
-
9
-
10
-
11
-
12
-
13
-
14
-
15
-
16
-
17
-
18
-
19
-
20
-
21
-
22
-
23
-
24
-
25
-
26
-
27
-
28
-
29
-
30
-
31
-
32
-
33
-
34
-
35
-
36
-
37
-
38
-
39
-
40
-
41
-
42
-
43
-
44
-
45
-
46
-
47
-
48
-
49
-
50
-
51
-
52
-
53
-
54
-
55
-
56
-
57
-
58
-
59
-
60
-
61
-
62
-
63
-
64
-
65
-
66
-
67
-
68
-
69
-
70
-
71
-
72
-
73
-
74
-
75
-
76
-
77
-
78
-
79
-
80
-
81
-
82
-
83
-
84
-
85
-
86
-
87
-
88
-
89
-
90
-
91
-
92
-
93
-
94
-
95
-
96
-
97
-
98
-
99
-
100
-
101
-
102
-
103
-
104
-
105
-
106
-
107
-
108
-
109
-
110
-
111
-
112
-
113
-
114
-
 115
115 -
 116
116 -
 117
117 -
 118
118 -
 119
119 -
 120
120 -
 121
121 -
 122
122 -
 123
123 -
 124
124 -
 125
125 -
126
-
127
-
128
 |
 |
