Asus P5N64 WS Professional User Guide - Page 167
RAID > Delete array, Delete array
 |
View all Asus P5N64 WS Professional manuals
Add to My Manuals
Save this manual to your list of manuals |
Page 167 highlights
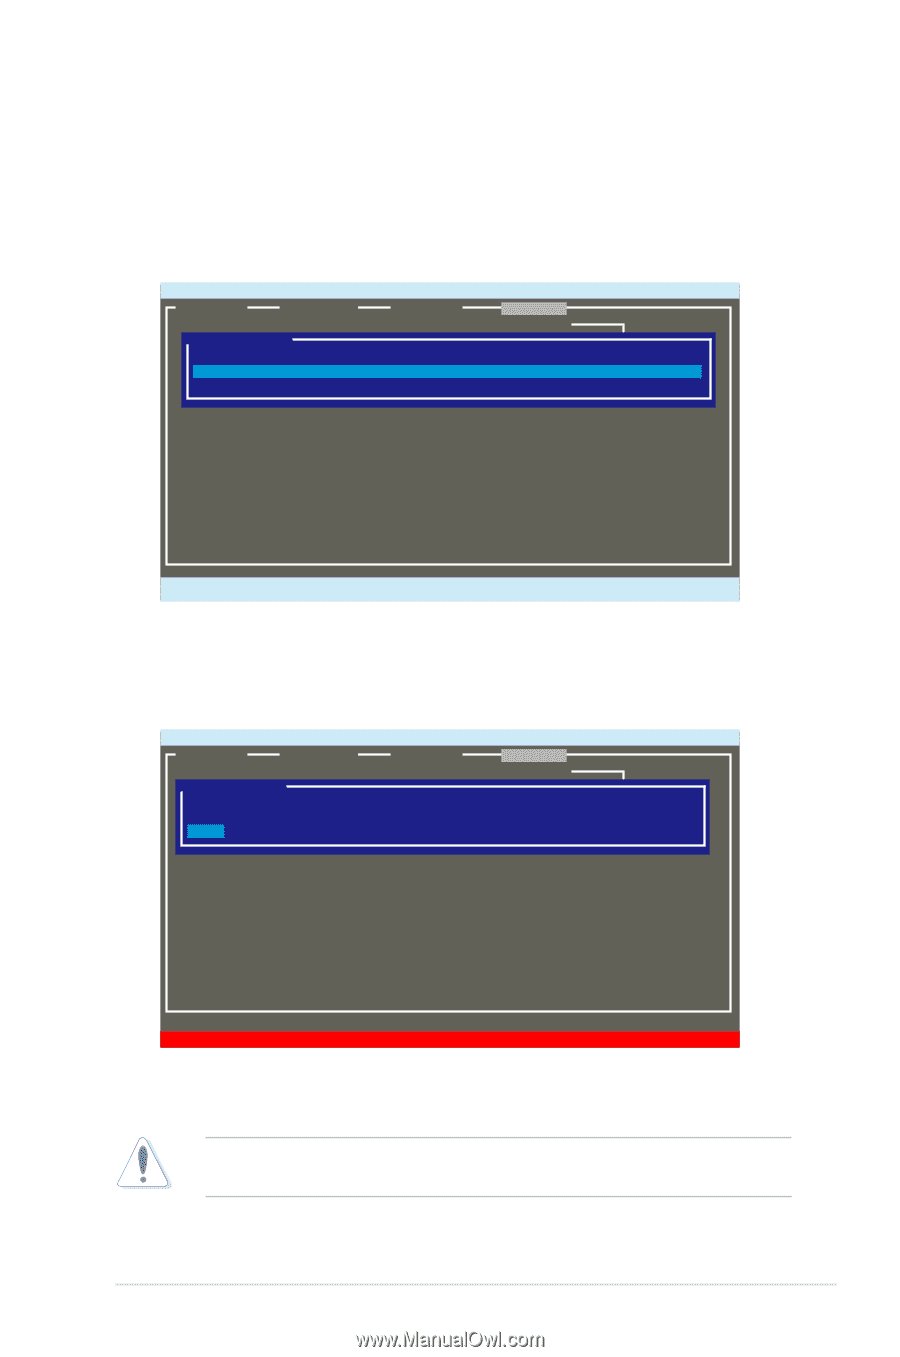
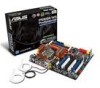
Deleting an array To delete a RAID set 1. From the utility menu bar, select RAID > Delete array, and then press . The Delete array screen appears. Marvell BIOS Setup (c) 2007 Marvell Technology Group Ltd. [Selection] [Controller] [ Devices ] [ RAID ] Delete array RAID Config ID Name 0 NEXT Size Level Status Stripe CacheMode Members 73.2GB RAID0 ONLINE 64KB WriteBack 0,1 ENTER/SPACE:Select, ESC:Back/Exit 2. Select a desired array to delete and select NEXT. Press after the confirmation screen appears. Marvell BIOS Setup (c) 2007 Marvell Technology Group Ltd. [Selection] [Controller] [ Devices ] [ RAID ] Delete array RAID Config ID Name *0 NEXT Size Level Status Stripe CacheMode Members 73.2GB RAID0 ONLINE 64KB WriteBack 0,1, Delete the array?[Y] 3. Press again to confirm and delete the selected array. You cannot recover lost data if you delete an array. Make sure you back up important data before deleting an array. ASUS P5N64 WS Professional 5-59
-
 1
1 -
2
-
3
-
4
-
5
-
6
-
7
-
8
-
9
-
10
-
11
-
12
-
13
-
14
-
15
-
16
-
17
-
18
-
19
-
20
-
21
-
22
-
23
-
24
-
25
-
26
-
27
-
28
-
29
-
30
-
31
-
32
-
33
-
34
-
35
-
36
-
37
-
38
-
39
-
40
-
41
-
42
-
43
-
44
-
45
-
46
-
47
-
48
-
49
-
50
-
51
-
52
-
53
-
54
-
55
-
56
-
57
-
58
-
59
-
60
-
61
-
62
-
63
-
64
-
65
-
66
-
67
-
68
-
69
-
70
-
71
-
72
-
73
-
74
-
75
-
76
-
77
-
78
-
79
-
80
-
81
-
82
-
83
-
84
-
85
-
86
-
87
-
88
-
89
-
90
-
91
-
92
-
93
-
94
-
95
-
96
-
97
-
98
-
99
-
100
-
101
-
102
-
103
-
104
-
105
-
106
-
107
-
108
-
109
-
110
-
111
-
112
-
113
-
114
-
115
-
116
-
117
-
118
-
119
-
120
-
121
-
122
-
123
-
124
-
125
-
126
-
127
-
128
-
129
-
130
-
131
-
132
-
133
-
134
-
135
-
136
-
137
-
138
-
139
-
140
-
141
-
142
-
143
-
144
-
145
-
146
-
147
-
148
-
149
-
150
-
151
-
152
-
153
-
154
-
155
-
156
-
157
-
158
-
159
-
160
-
161
-
 162
162 -
 163
163 -
 164
164 -
 165
165 -
 166
166 -
 167
167 -
 168
168 -
 169
169 -
 170
170 -
 171
171 -
 172
172 -
173
-
174
-
175
-
176
-
177
-
178
-
179
-
180
-
181
-
182
-
183
-
184
-
185
-
186
-
187
-
188
 |
 |