Asus P5N64 WS Professional User Guide - Page 87
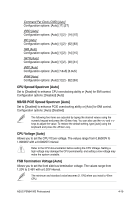
CPU Spread Spectrum [Auto], NB/SB PCIE Spread Spectrum [Auto], CPU Voltage [Auto], FSB Termination
 |
View all Asus P5N64 WS Professional manuals
Add to My Manuals
Save this manual to your list of manuals |
Page 87 highlights
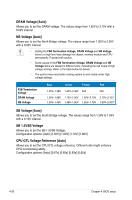
Command Per Clock (CMD) [Auto] Configuration options: [Auto] [1T] [2T] tRRD [Auto] Configuration options: [Auto] [1] [2] - [14] [15] tRC [Auto] Configuration options: [Auto] [1] [2] - [62] [63] tWR [Auto] Configuration options: [Auto] [1] [2] - [14] [15] tWTR [Auto] Configuration options: [Auto] [1] [2] - [30] [31] tREF [Auto] Configuration options: [Auto] [7.8uS] [3.9uS] tFAW [Auto] Configuration options: [Auto] [1] [2] - [62] [63] CPU Spread Spectrum [Auto] Set to [Disabled] to enhance CPU overclocking ability or [Auto] for EMI control. Configuration options: [Disabled] [Auto] NB/SB PCIE Spread Spectrum [Auto] Set to [Disabled] to enhance PCIE overclocking ability or [Auto] for EMI control. Configuration options: [Auto] [Disabled] The following five items are adjusted by typing the desired values using the numeric keypad and press the key. You can also use the and keys to adjust the value. To restore the default setting, type [auto] using the keyboard and press the key. CPU Voltage [Auto] Allows you to set the CPU VCore voltage. The values range from 0.85000V to 1.80000V with a 0.00625V interval. Refer to the CPU documentation before setting the CPU Voltage. Setting a high voltage may damage the CPU permanently, and setting a low voltage may make the system unstable. FSB Termination Voltage [Auto] Allows you to set the front side bus termination voltage. The values range from 1.20V to 2.46V with a 0.02V interval. The minimum and standard value becomes [1.10V] when you install a 45nm CPU. ASUS P5N64 WS Professional 4-19
-
 1
1 -
2
-
3
-
4
-
5
-
6
-
7
-
8
-
9
-
10
-
11
-
12
-
13
-
14
-
15
-
16
-
17
-
18
-
19
-
20
-
21
-
22
-
23
-
24
-
25
-
26
-
27
-
28
-
29
-
30
-
31
-
32
-
33
-
34
-
35
-
36
-
37
-
38
-
39
-
40
-
41
-
42
-
43
-
44
-
45
-
46
-
47
-
48
-
49
-
50
-
51
-
52
-
53
-
54
-
55
-
56
-
57
-
58
-
59
-
60
-
61
-
62
-
63
-
64
-
65
-
66
-
67
-
68
-
69
-
70
-
71
-
72
-
73
-
74
-
75
-
76
-
77
-
78
-
79
-
80
-
81
-
 82
82 -
 83
83 -
 84
84 -
 85
85 -
 86
86 -
 87
87 -
 88
88 -
 89
89 -
 90
90 -
 91
91 -
 92
92 -
93
-
94
-
95
-
96
-
97
-
98
-
99
-
100
-
101
-
102
-
103
-
104
-
105
-
106
-
107
-
108
-
109
-
110
-
111
-
112
-
113
-
114
-
115
-
116
-
117
-
118
-
119
-
120
-
121
-
122
-
123
-
124
-
125
-
126
-
127
-
128
-
129
-
130
-
131
-
132
-
133
-
134
-
135
-
136
-
137
-
138
-
139
-
140
-
141
-
142
-
143
-
144
-
145
-
146
-
147
-
148
-
149
-
150
-
151
-
152
-
153
-
154
-
155
-
156
-
157
-
158
-
159
-
160
-
161
-
162
-
163
-
164
-
165
-
166
-
167
-
168
-
169
-
170
-
171
-
172
-
173
-
174
-
175
-
176
-
177
-
178
-
179
-
180
-
181
-
182
-
183
-
184
-
185
-
186
-
187
-
188
 |
 |
