Asus P7P55D LE User Manual - Page 42
BIOS setup program, Main menu - test
 |
View all Asus P7P55D LE manuals
Add to My Manuals
Save this manual to your list of manuals |
Page 42 highlights
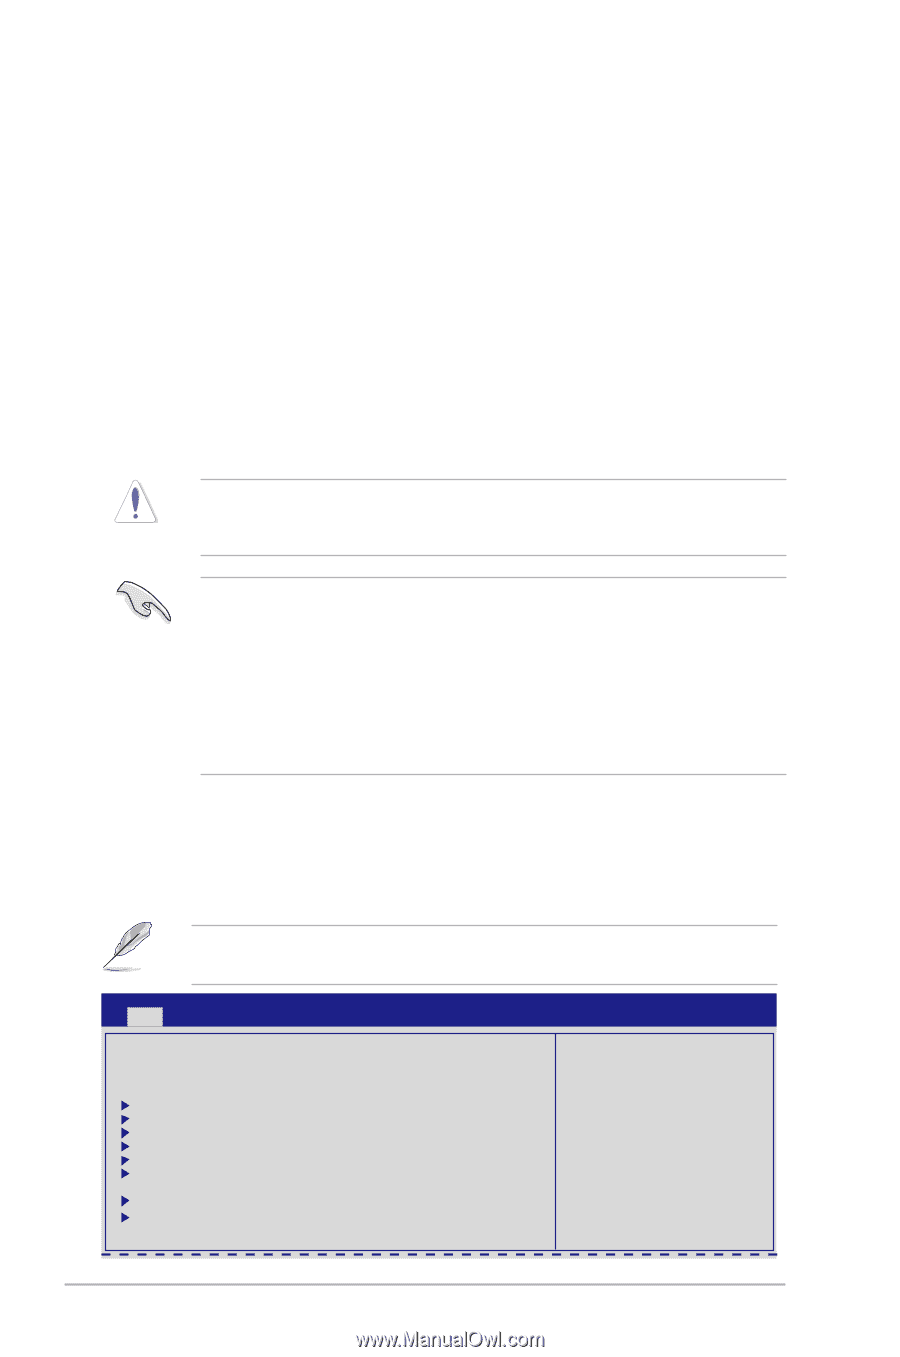
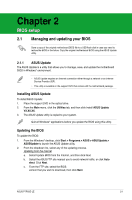
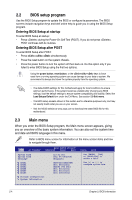
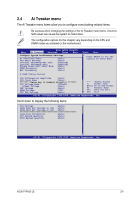
2.2 BIOS setup program Use the BIOS Setup program to update the BIOS or configure its parameters. The BIOS screens include navigation keys and brief online help to guide you in using the BIOS Setup program. Entering BIOS Setup at startup To enter BIOS Setup at startup: • Press during the Power-On Self Test (POST). If you do not press , POST continues with its routines. Entering BIOS Setup after POST To enter BIOS Setup after POST: • Press ++ simultaneously. • Press the reset button on the system chassis. • Press the power button to turn the system off then back on. Do this option only if you failed to enter BIOS Setup using the first two options. Using the power button, reset button, or the ++ keys to force reset from a running operating system can cause damage to your data or system. We recommend to always shut down the system properly from the operating system. • The default BIOS settings for this motherboard apply for most conditions to ensure optimum performance. If the system becomes unstable after changing any BIOS settings, load the default settings to ensure system compatibility and stability. Select the Load Setups Default item under the Exit Menu. See section 2.9 Exit menu. • The BIOS setup screens shown in this section are for reference purposes only, and may not exactly match what you see on your screen. • Visit the ASUS website at www.asus.com to download the latest BIOS file for this motherboard. 2.3 Main menu When you enter the BIOS Setup program, the Main menu screen appears, giving you an overview of the basic system information. You can also set the system time and date and BIOS language in this menu. Refer to BIOS menu screen for information on the menu screen items and how to navigate through them. Main Ai Tweaker BIOS SETUP UTILITY Advanced Power Boot System Time [13:51:25] System Date [Thu 07/09/2009] Language [English] SATA1 SATA2 SATA3 SATA4 SATA5 SATA6 Storage Configuration System Information [HDT722516DLA380] [Not Detected] [ATAPI DVD DH1] [Not Detected] [Not Detected] [Not Detected] Tools Exit Use [ENTER], [TAB] or [SHIFT-TAB] to select a field. Use [+] or [-] to configure system Date. 2-4 Chapter 2: BIOS information
-
 1
1 -
2
-
3
-
4
-
5
-
6
-
7
-
8
-
9
-
10
-
11
-
12
-
13
-
14
-
15
-
16
-
17
-
18
-
19
-
20
-
21
-
22
-
23
-
24
-
25
-
26
-
27
-
28
-
29
-
30
-
31
-
32
-
33
-
34
-
35
-
36
-
 37
37 -
 38
38 -
 39
39 -
 40
40 -
 41
41 -
 42
42 -
 43
43 -
 44
44 -
 45
45 -
 46
46 -
 47
47 -
48
-
49
-
50
-
51
-
52
-
53
-
54
-
55
-
56
-
57
-
58
-
59
-
60
-
61
-
62
-
63
-
64
-
65
-
66
-
67
-
68
 |
 |