Asus R752LA User's Manual for English Edition - Page 37
Using the optical drive, Inserting an optical disc
 |
View all Asus R752LA manuals
Add to My Manuals
Save this manual to your list of manuals |
Page 37 highlights
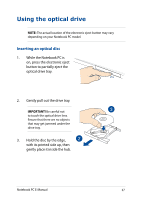
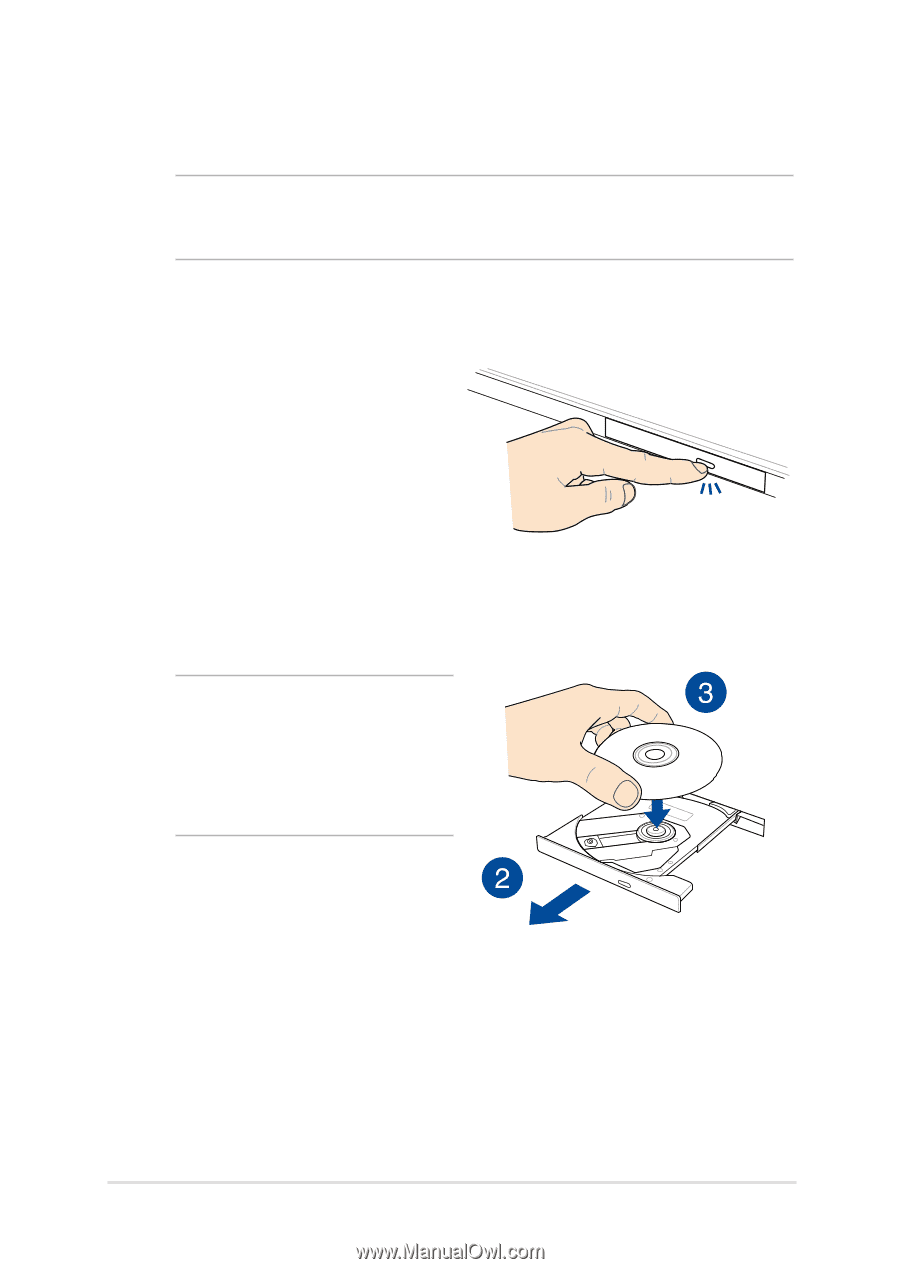
Using the optical drive NOTE: The actual location of the electronic eject button may vary depending on your Notebook PC model. Inserting an optical disc 1. While the Notebook PC is on, press the electronic eject button to partially eject the optical drive tray. 2. Gently pull out the drive tray. IMPORTANT! Be careful not to touch the optical drive lens. Ensure that there are no objects that may get jammed under the drive tray. 3. Hold the disc by the edge, with its printed side up, then gently place it inside the hub. Notebook PC E-Manual 37
-
 1
1 -
2
-
3
-
4
-
5
-
6
-
7
-
8
-
9
-
10
-
11
-
12
-
13
-
14
-
15
-
16
-
17
-
18
-
19
-
20
-
21
-
22
-
23
-
24
-
25
-
26
-
27
-
28
-
29
-
30
-
31
-
 32
32 -
 33
33 -
 34
34 -
 35
35 -
 36
36 -
 37
37 -
 38
38 -
 39
39 -
 40
40 -
 41
41 -
 42
42 -
43
-
44
-
45
-
46
-
47
-
48
-
49
-
50
-
51
-
52
-
53
-
54
-
55
-
56
-
57
-
58
-
59
-
60
-
61
-
62
-
63
-
64
-
65
-
66
-
67
-
68
-
69
-
70
-
71
-
72
-
73
-
74
-
75
-
76
-
77
-
78
-
79
-
80
-
81
-
82
-
83
-
84
-
85
-
86
-
87
-
88
-
89
-
90
-
91
-
92
-
93
-
94
-
95
-
96
-
97
-
98
-
99
-
100
-
101
-
102
-
103
-
104
 |
 |
Notebook PC E-Manual
3µ
Using the optical drive
NOTE:
The actual location of the electronic eject button may vary
depending on your Notebook PC model.
Inserting an optical disc
1.
While the Notebook PC is
on, press the electronic eject
button to partially eject the
optical drive tray.
±.
Gently pull out the drive tray.
IMPORTANT!
Be careful not
to touch the optical drive lens.
Ensure that there are no objects
that may get jammed under the
drive tray.
3.
Hold the disc by the edge,
with its printed side up, then
gently place it inside the hub.