Asus ROG CROSSHAIR X670E HERO Users Manual English - Page 49
M.2 installation, Completely loosen the screws on the heatsinks., Lift and remove the heatsink.
 |
View all Asus ROG CROSSHAIR X670E HERO manuals
Add to My Manuals
Save this manual to your list of manuals |
Page 49 highlights
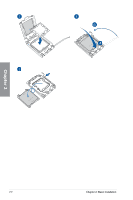
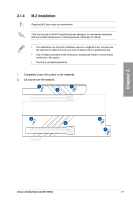
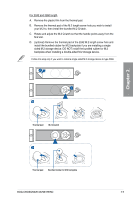
Chapter 2 2.1.4 M.2 installation Supported M.2 type varies per motherboard. If the thermal pad on the M.2 heatsink becomes damaged, we recommend replacing it with the bundled thermal pad or a thermal pad with a thickness of 1.25mm. • The illustrations only show the installation steps for a single M.2 slot, the steps are the same for the other M.2 slots if you wish to install an M.2 to another M.2 slot. • Use a Phillips screwdriver when removing or installing the screws or screw stands mentioned in this section. • The M.2 is purchased separately. 1. Completely loosen the screws on the heatsinks. 2. Lift and remove the heatsink. 1 1 2 1 1 2 1 ROG CROSSHAIR X670E HERO 2-7
-
 1
1 -
2
-
3
-
4
-
5
-
6
-
7
-
8
-
9
-
10
-
11
-
12
-
13
-
14
-
15
-
16
-
17
-
18
-
19
-
20
-
21
-
22
-
23
-
24
-
25
-
26
-
27
-
28
-
29
-
30
-
31
-
32
-
33
-
34
-
35
-
36
-
37
-
38
-
39
-
40
-
41
-
42
-
43
-
 44
44 -
 45
45 -
 46
46 -
 47
47 -
 48
48 -
 49
49 -
 50
50 -
 51
51 -
 52
52 -
 53
53 -
 54
54 -
55
-
56
-
57
-
58
-
59
-
60
-
61
-
62
-
63
-
64
-
65
-
66
-
67
-
68
-
69
-
70
-
71
-
72
-
73
-
74
-
75
-
76
-
77
-
78
-
79
-
80
-
81
-
82
-
83
-
84
-
85
-
86
-
87
-
88
-
89
-
90
-
91
-
92
-
93
-
94
-
95
-
96
 |
 |

ROG CROSSHAIR X670E HERO
2-7
Chapter 2
2.1.4
M.2 installation
Supported M.2 type varies per motherboard.
If the thermal pad on the M.2 heatsink becomes damaged, we recommend replacing it
with the bundled thermal pad or a thermal pad with a thickness of 1.25mm.
•
The illustrations only show the installation steps for a single M.2 slot, the steps are
the same for the other M.2 slots if you wish to install an M.2 to another M.2 slot.
•
Use a Phillips screwdriver when removing or installing the screws or screw stands
mentioned in this section.
•
The M.2 is purchased separately.
1.
Completely loosen the screws on the heatsinks.
2.
Lift and remove the heatsink.
2
2
1
1
1
1
1