Asus T3-P5G43 User Manual - Page 104
Insert, Multiple driver folder, IntelR ICH10R SATA AHCI Controller, Create Image, Finish
 |
View all Asus T3-P5G43 manuals
Add to My Manuals
Save this manual to your list of manuals |
Page 104 highlights
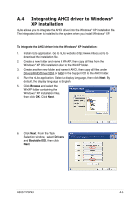
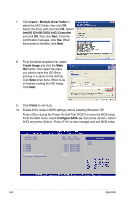
7. Click Insert > Multiple driver folder to select the AHCI folder, then click OK. Select the driver path and click OK. Select Intel(R) ICH10R SATA AHCI Controller and click OK, then click Next. From the confirmation message, click Yes. When the process is finished, click Next. 8. From the Mode dropdown list, select Create Image and click the Make ISO button, then select the place you what to save this ISO file to and key in a name for the ISO file. Click Save when done. When nLite is finished creating the ISO image. Click Next. 9. Click Finish to exit nLite. 10. Enable AHCI mode in BIOS settings, before installing Windows® XP. Press during the Power-On Self-Test (POST) to enter the BIOS setup. From the Main menu, select Configure SATA as, then press . Select AHCI and press . Press to save changes and exit BIOS setup. System Time System Date SATA1 SATA2 SATA3 SATA4 Configure SATA as System Information [04: 49 : 02] [Wed 07/09/2008] : [Not Detected] : [Not Detected] : [Not Detected] : [Not Detected] [AHCI] IDE AHCI Options A-6 Appendix
-
 1
1 -
2
-
3
-
4
-
5
-
6
-
7
-
8
-
9
-
10
-
11
-
12
-
13
-
14
-
15
-
16
-
17
-
18
-
19
-
20
-
21
-
22
-
23
-
24
-
25
-
26
-
27
-
28
-
29
-
30
-
31
-
32
-
33
-
34
-
35
-
36
-
37
-
38
-
39
-
40
-
41
-
42
-
43
-
44
-
45
-
46
-
47
-
48
-
49
-
50
-
51
-
52
-
53
-
54
-
55
-
56
-
57
-
58
-
59
-
60
-
61
-
62
-
63
-
64
-
65
-
66
-
67
-
68
-
69
-
70
-
71
-
72
-
73
-
74
-
75
-
76
-
77
-
78
-
79
-
80
-
81
-
82
-
83
-
84
-
85
-
86
-
87
-
88
-
89
-
90
-
91
-
92
-
93
-
94
-
95
-
96
-
97
-
98
-
 99
99 -
 100
100 -
 101
101 -
 102
102 -
 103
103 -
 104
104
 |
 |
