Asus T3-P5G43 User Manual - Page 13
Secure Digital™/MultimediaCard/Memory Stick MS slot - black
 |
View all Asus T3-P5G43 manuals
Add to My Manuals
Save this manual to your list of manuals |
Page 13 highlights
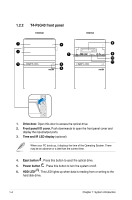
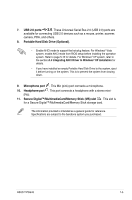
1. Drive door. Open this door to access the optical drive. 2. Power button . Press this button to turn the system on/off. 3. HDD LED . This LED lights up when data is reading from or writing to the hard disk drive. (for Black Bezel) 4. HDD LED . This LED lights up when data is reading from or writing to the hard disk drive. (for Silver Bezel) 5. Front panel I/O cover. Push downwards to open the front panel cover and display the input/output ports. 6. USB 2.0 ports 2.0. These Universal Serial Bus 2.0 (USB 2.0) ports are available for connecting USB 2.0 devices such as a mouse, printer, scanner, camera, PDA, and others. 7. Portable Hard Disk Drive (Optional). • Enable AHCI mode to support the hot-plug feature. For Windows® Vista system, enable AHCI mode from BIOS setup before installing the operation system. Refer to page 5-16 for details. For Windows® XP system, refer to the section A.4 Integrating AHCI Driver to Windows® XP installation for details. • If you have installed an empty Portable Hard Disk Drive to the system, eject it before turning on the system. This is to prevent the system from slowing down. 8. Eject button . Press this button to eject the optical drive. 9. Microphone port . This Mic (pink) port connects a microphone. 10. Headphone port . This port connects a headphone with a stereo mini- plug. 11. Secure Digital™/MultimediaCard/Memory Stick (MS) slot . This slot is for a Secure Digital™/MultimediaCard/Memory Stick storage card. The information provided is intended as a general guide for reference. Specifications depend on the barebone system you purchased. ASUS T-P5G43 1-3
-
 1
1 -
2
-
3
-
4
-
5
-
6
-
7
-
 8
8 -
 9
9 -
 10
10 -
 11
11 -
 12
12 -
 13
13 -
 14
14 -
 15
15 -
 16
16 -
 17
17 -
 18
18 -
19
-
20
-
21
-
22
-
23
-
24
-
25
-
26
-
27
-
28
-
29
-
30
-
31
-
32
-
33
-
34
-
35
-
36
-
37
-
38
-
39
-
40
-
41
-
42
-
43
-
44
-
45
-
46
-
47
-
48
-
49
-
50
-
51
-
52
-
53
-
54
-
55
-
56
-
57
-
58
-
59
-
60
-
61
-
62
-
63
-
64
-
65
-
66
-
67
-
68
-
69
-
70
-
71
-
72
-
73
-
74
-
75
-
76
-
77
-
78
-
79
-
80
-
81
-
82
-
83
-
84
-
85
-
86
-
87
-
88
-
89
-
90
-
91
-
92
-
93
-
94
-
95
-
96
-
97
-
98
-
99
-
100
-
101
-
102
-
103
-
104
 |
 |