Axis Communications Q1765-LE Q1765-LE - User Manual - Page 7
Hardware Overview, LED Indicators
 |
View all Axis Communications Q1765-LE manuals
Add to My Manuals
Save this manual to your list of manuals |
Page 7 highlights
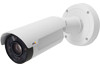
AXIS Q1765-LE Network Camera Hardware Overview • Audio equipment • Input/Output (I/O) devices When connecting external equipment, a multi-connector cable (available from Axis) is required in order to maintain the product's IP rating. For more information, see Multi-Connector Cable (sold separately), on page 55. Power Connector Terminal connector for connecting AC/DC power supply. SD Card Slot A microSD card (not included) can be used for local recording with removable storage. For more information, see Technical Specifications, on page 61. NOTICE To prevent corruption of recordings, the SD card should be unmounted before removal. To unmount, go to Setup > System Options > Storage > SD Card and click Unmount. Control Button The control button is used for: • Resetting the product to factory default settings. See page 53. • Connecting to an AXIS Video Hosting System service. See page 46. To connect, press and hold the button for about 1 second until the Status LED flashes green. • Connecting to AXIS Internet Dynamic DNS Service. See page 46. To connect, press and hold the button for about 3 seconds. LED Indicators LED Status Color Unlit Amber Amber/red Red Green Indication Connection and normal operation Steady during startup. Flashes during firmware upgrade. Flashes amber/red if network connection is unavailable or lost. Flashes red for firmware upgrade failure. Shows steady green for 10 seconds for normal operation after restart. Note • The Status LED can be configured to be unlit during normal operation. To configure, go to Setup > System Options > Ports & Devices > LED. See the online help for more information. • The Status LED can be configured to flash while an event is active. • The Status LED can be configured to flash for identifying the unit. Go to Setup > System Options > Maintenance . 7
-
 1
1 -
 2
2 -
 3
3 -
 4
4 -
 5
5 -
 6
6 -
 7
7 -
 8
8 -
 9
9 -
 10
10 -
 11
11 -
 12
12 -
13
-
14
-
15
-
16
-
17
-
18
-
19
-
20
-
21
-
22
-
23
-
24
-
25
-
26
-
27
-
28
-
29
-
30
-
31
-
32
-
33
-
34
-
35
-
36
-
37
-
38
-
39
-
40
-
41
-
42
-
43
-
44
-
45
-
46
-
47
-
48
-
49
-
50
-
51
-
52
-
53
-
54
-
55
-
56
-
57
-
58
-
59
-
60
-
61
-
62
-
63
-
64
 |
 |
