Behringer FBQ1000 Manual - Page 8
Operating Modes of the FBQ1000, 7. Working with Presets, Priming the FBQ1000 for P.A. - specification
 |
View all Behringer FBQ1000 manuals
Add to My Manuals
Save this manual to your list of manuals |
Page 8 highlights
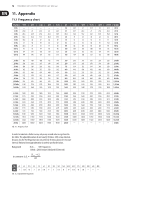
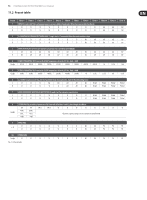
8 FEEDBACK DESTROYER FBQ1000 User Manual The three remaining filters (all set to Auto mode "AU", see chapter 6.3) are used to detect and suppress new feedback frequencies, which can be produced, e.g. when the singer moves around the stage with the vocal mic in his/her hand. Since the FBQ1000 can by no means "know" whether or not the risk of feedback has been eliminated (e.g. when the singer moves to another position), the first AU filter of the unit locks to the detected frequency, while the remaining two AU filters are used to suppress any new trouble frequencies that may occur. Only when all AU filters have been used, will the first AU filter used (here: 10) be unlocked, so as to be able to detect new feedback frequencies. Basically, all active filters (both in "AU" or "SI" mode) are represented by flashing LEDs in the STATUS INDICATOR (2). When feedback has been detected and is being suppressed, the associated filter LED lights up constantly. Filters set to Parametric EQ mode (see chapter 6.2) also have constantly lit LEDs. ◊ Please read the detailed description of all operating modes (chapter 6)! 5.1 "Priming" the FBQ1000 for P.A. and monitor applications With the FBQ1000 you can improve the protection against feedback even before the show begins, by "tuning in" your sound reinforcement system. We already dealt with this in chapter 3. But now it's not about using a preset, but about how to determine in which modes the filters are used: Set some of the filters to Single-Shot mode (see (7)). First, let's take a look at the monitor path: Open all microphone channels, turn up the Aux Send controls on all channels you wish to route to the monitor mix, then slowly move up the monitor master faders. For the front mix do as follows: Slowly move up the channel and master faders. In both cases, the first feedback frequencies can be heard after some time. Without the FEEDBACK DESTROYER you could not increase the volume level of your system any further. With the FBQ1000, however, you can considerably enhance the system headroom! Let the Single-Shot filters on the FBQ1000 suppress feedback as it occurs. Then cut back the volume to the level required for the show. In this way, you can be sure that there is enough system headroom should it become necessary to raise the volume level during the concert. Experience has shown that musicians want to have the volume of their instrument increased on the monitor as the concert goes on. With the FEEDBACK DESTROYER you can turn up the volume without having to fear feedback problems. When the show begins you should set several filters to Auto mode, in order to suppress feedback produced by "moving" (vocal) microphones. More information on Auto mode can be found in chapters 5 and 6.3. 6. Operating Modes of the FBQ1000 The individual filters on the BEHRINGER FEEDBACK DESTROYER can operate in four different modes (see (7)). An additional mode called "Locked" mode will be described specifically. Basically, each of the 2 x 12 filters on the FBQ1000 can be set to any of the four operating modes. To meet more complex requirements with regard to flexible signal processing, these modes can be combined in a program and stored in a preset. 6.1 Off mode "OF" In Off mode, the corresponding filter is deactivated and can be activated by selecting one of the modes described below. 6.2 Manual filters ("PA") / Parametric equalizer To raise or lower specific frequencies in level, you can select these frequencies directly by setting the manual filters to Parametric EQ mode. Each filter has the functionality of a fully parametric EQ, i.e. you can set the center frequency (FREQUENCY key (10)), the bandwidth (BANDWIDTH key (12)) and the amount of boost/cut (in dB) using the GAIN key (13). 6.3 Automatic filters ("SI" and "AU") Automatic filters operate in two modes: Single-Shot (SI) and Auto mode (AU). In order to find a feedback frequency, the FEEDBACK DESTROYER divides the entire frequency band into 1/60 octave steps (20 Hz to 20 kHz) and determines the respective level of these individual bands. The unit then compares this value to the level of the entire signal. The difference between these levels determines whether a filter is set or not. The FEEDBACK DESTROYER gives you the unique possibility of adapting this parameter according to your own needs. You can edit the feedback sensitivity (i.e. the difference value) within a range from -3 to -9 dB, in 1-dB steps: Simultaneously press the FILTER MODE and GAIN keys, then use the JOG WHEEL to select a value. The standard value for this parameter is -6 dB, which provides for an optimum detection of feedback in most applications. Example: During a pure speech transmission, the feedback sensitivity can be lowered to -9 dB. In this way, the algorithm would recognize and suppress feedback even faster. On the other hand, a higher setting, e.g. -3 dB, allows you to leave those signals unaffected which you don't want to suppress (e.g. guitar or keyboard signals). Filters in Single-Shot mode automatically analyze the music signal to detect feedback frequencies. Having detected such a frequency, the filter automatically configures its parameters to suppress feedback as efficiently as possible. As the filter is locked to the detected frequency, this mode is ideally suited to suppress feedback of constant frequency. Possible applications are "fixed-position" microphones (e.g. on the drums). After the filter has adjusted itself automatically, it enters a special Locked mode (see chapter 6.4), which means that although the frequency remains fixed, the width and depth of the filter are still being adapted to the feedback frequency, i.e. the width is increased as soon as the feedback frequency begins to shift, and the gain is cut if feedback prevails. The gain is not reduced to prevent feedback from recurring. All microphones that are moved during a performance (e.g. vocal mics) very often have varying feedback frequencies. This type of feedback should be suppressed in Auto mode. As in Single-Shot mode, the filter automatically selects an ideal setting for feedback suppression. However, in Auto mode the first AU filter set is unlocked to suppress new feedback. The optimum frequency is selected automatically and the filter is set to narrow-band mode, so as to influence the music signal as little as possible. If your music contains wanted feedback elements (e.g. guitar feedback), it is highly probable that these will be suppressed too in Auto mode, because it is impossible from a physical point of view to distinguish "wanted" from "unwanted" feedback. Please read chapter 2.3 to find some information on how to work around this situation. 6.4 Locked mode ("LO") When the FBQ1000 detects a feedback frequency in Single-Shot mode (see chapter 6.3), it automatically enters Locked mode, i.e. the filter locks to the trouble frequency and "keeps an eye" on it. To unlock such a filter, you need to switch it back to Single-Shot mode (see (7) and chapter 7.2). 7. Working with Presets In order to store your favorite settings, the FBQ1000 has ten user presets and one default preset. All operating parameters can be stored, so that your programs are recalled in full detail. Owing to state-of-the-art circuitry, no internal battery is needed, hence the memory contents will not get lost. In the default preset (Display: "--"), which serves as a starting point for your own programs, all filters remain in Parametric EQ mode, with bandwidth set to 1 octave, frequency to 500 Hz and 0 dB gain.
-
 1
1 -
2
-
 3
3 -
 4
4 -
 5
5 -
 6
6 -
 7
7 -
 8
8 -
 9
9 -
 10
10 -
 11
11 -
 12
12 -
 13
13 -
14
-
15
-
16
-
17
 |
 |