Behringer RD-8 MKII User Manual - Page 10
Auto Save, Sweep Erase, Pattern Copy, Auto Fill, How to use Auto Fill, Pattern length
 |
View all Behringer RD-8 MKII manuals
Add to My Manuals
Save this manual to your list of manuals |
Page 10 highlights
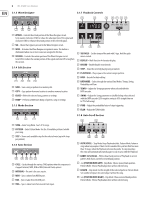
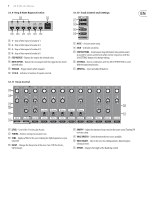
10 RD-8 MKII User Manual Auto Save The Auto Save function allows certain functions to be automatically stored as listed. All the below pattern changes will now be auto saved with STEP RECORD on: 1. Step on/off by pressing STEP button 2. Press TRIGGER to set step on when playing 3. Note repeat live record 4. Set step on/off in RAND setting menu 5. Press STEP in pattern length setting 6. Sweep erase by Hold + VOICE button 7. Erasing all steps of selected voice by ERASE + VOICE button 8. Step copy 1-16 to 17-32 etc To activate Auto Save enter STEP mode, hold TAP/HOLD then press RECORD to set pattern auto save on or off. When STEP RECORD is enabled, the display shows "auto" or "manu" for 1 second to indicate the save mode. To recall a stored pattern hold TAP/HOLD + STEP button of the pattern you wish to restore. This only works when you are in Pattern mode and set to manu (manual) save mode. Sweep Erase The sweep erase function can be used while playing in STEP PLAY or RECORD mode, by holding TAP/HOLD and then pressing the voice button to remove the selected voices steps from pattern while playing. The voice will be deleted before it is played. In RECORD this is permanent, in PLAY mode the notes will be restored as the play head moves past steps. Pattern Copy How to copy a pattern: 1. Press COPY. 2. Next select the source song with the pattern you wish to copy. 3. Then press PATTERN. 4. Next select the pattern you wish to copy from the source song via the step keys. 5. Press COPY. 6. Select destination pattern to copy to via step keys, this copies the source into this pattern in the current song. 7. Press COPY to execute the operation. How to quick copy a pattern to other pattern locations: 1. In PATTERN mode, hold copy while pressing the step key you wish to copy to. How to copy pages in step mode, copy page 1 (1-16), page 2 (17-32), page 3 (33-48) or page 4 (49-64) to other pages: 1. In STEP mode, press LENGTH to enter pattern length setting. 2. Select a page using the arrows and press COPY. 3. Select the page you wish to copy to with the arrows then press SAVE. How to erase a pattern: 1. Press ERASE. 2. The SONG and PATTERN buttons will flash. Press PATTERN. 3. Select the pattern you wish to delete via one of the 16 step keys. 4. Press the now flashing ERASE button to execute the delete process. This is a permanent process and can't be undone. How to dump a pattern: The DUMP control works in the same way as the SAVE control. Instead of saving, the DUMP control will output the selection as a SysEx message. This action sends the pattern/song data as SysEx. This information can be saved and loaded by a third-party program or sent to another RD-8 MKII. Auto Fill The Auto Fill function is used to insert fill rhythms into the live play mode of the RD-8 MKII. Fills are created in the same way a pattern is created and stored. The difference between Auto Fill and normal pattern playback is that once an Auto Fill has finished playing, the function will return you to the previously played pattern unless you have selected a different pattern while the Auto Fill function is active. If a different pattern is selected, the new pattern will play after the Auto Fill pattern has ended. The SYNTHTRIBE app is an easy way to save song and pattern data. Patterns and Songs can be imported and exported quickly. How to use Auto Fill Once you have programmed patterns, use any of them by pressing the AUTO FILL button in pattern mode and selecting any step key. Tip: 4 or 8 steps are recommended for drum fills, but any size can be used up to 64 steps. Pattern length Pattern length can be changed from 1 to 64 steps on a pattern by pattern basis. This adjustable length can be used to create different time signatures. For example, selecting a pattern length of 12 steps with a step size using 1/16th will create a 3/4 (waltz style) time signature. To change the number of steps in a pattern: 1. Press the STEP and RECORD buttons. 2. Press LENGTH. 3. Use the keys either side of the LENGTH button to choose either 16, 32, 48 or 64 range as the starting point. 4. Press keys to change to the desired pattern length. For example, if length 64 is selected, choosing step key 12 will make the pattern 60 steps long. If you are recording a pattern with more than 16 steps, press the Autoscroll button in Step Record to alternate between blocks. For example, when recording a 24 step pattern you will alternate between block one (LED above 16 is lit) with 16 steps and block two (LED above 32 is let) with 8 steps Pattern Range 16 16 16 16 16 16 16 16 16 16 16 16 16 16 16 16 32 32 32 32 32 Step Number 1 2 3 4 5 6 7 8 9 10 11 12 13 14 15 16 1 2 3 4 5 Pattern Length 1 2 3 4 5 6 7 8 9 10 11 12 13 14 15 16 17 18 19 20 21 Pattern Range 48 48 48 48 48 48 48 48 48 48 48 48 48 48 48 48 64 64 64 64 64 Step Number 1 2 3 4 5 6 7 8 9 10 11 12 13 14 15 16 1 2 3 4 5 Pattern Length 33 34 35 36 37 38 39 40 41 42 43 44 45 46 47 48 49 50 51 52 53
-
 1
1 -
2
-
3
-
4
-
 5
5 -
 6
6 -
 7
7 -
 8
8 -
 9
9 -
 10
10 -
 11
11 -
 12
12 -
 13
13 -
 14
14 -
 15
15 -
16
-
17
-
18
-
19
-
20
-
21
-
22
-
23
-
24
-
25
-
26
-
27
-
28
-
29
-
30
 |
 |