Beltronics RX55 Owner's Manual - Page 4
Quick Reference Guide - review
 |
View all Beltronics RX55 manuals
Add to My Manuals
Save this manual to your list of manuals |
Page 4 highlights
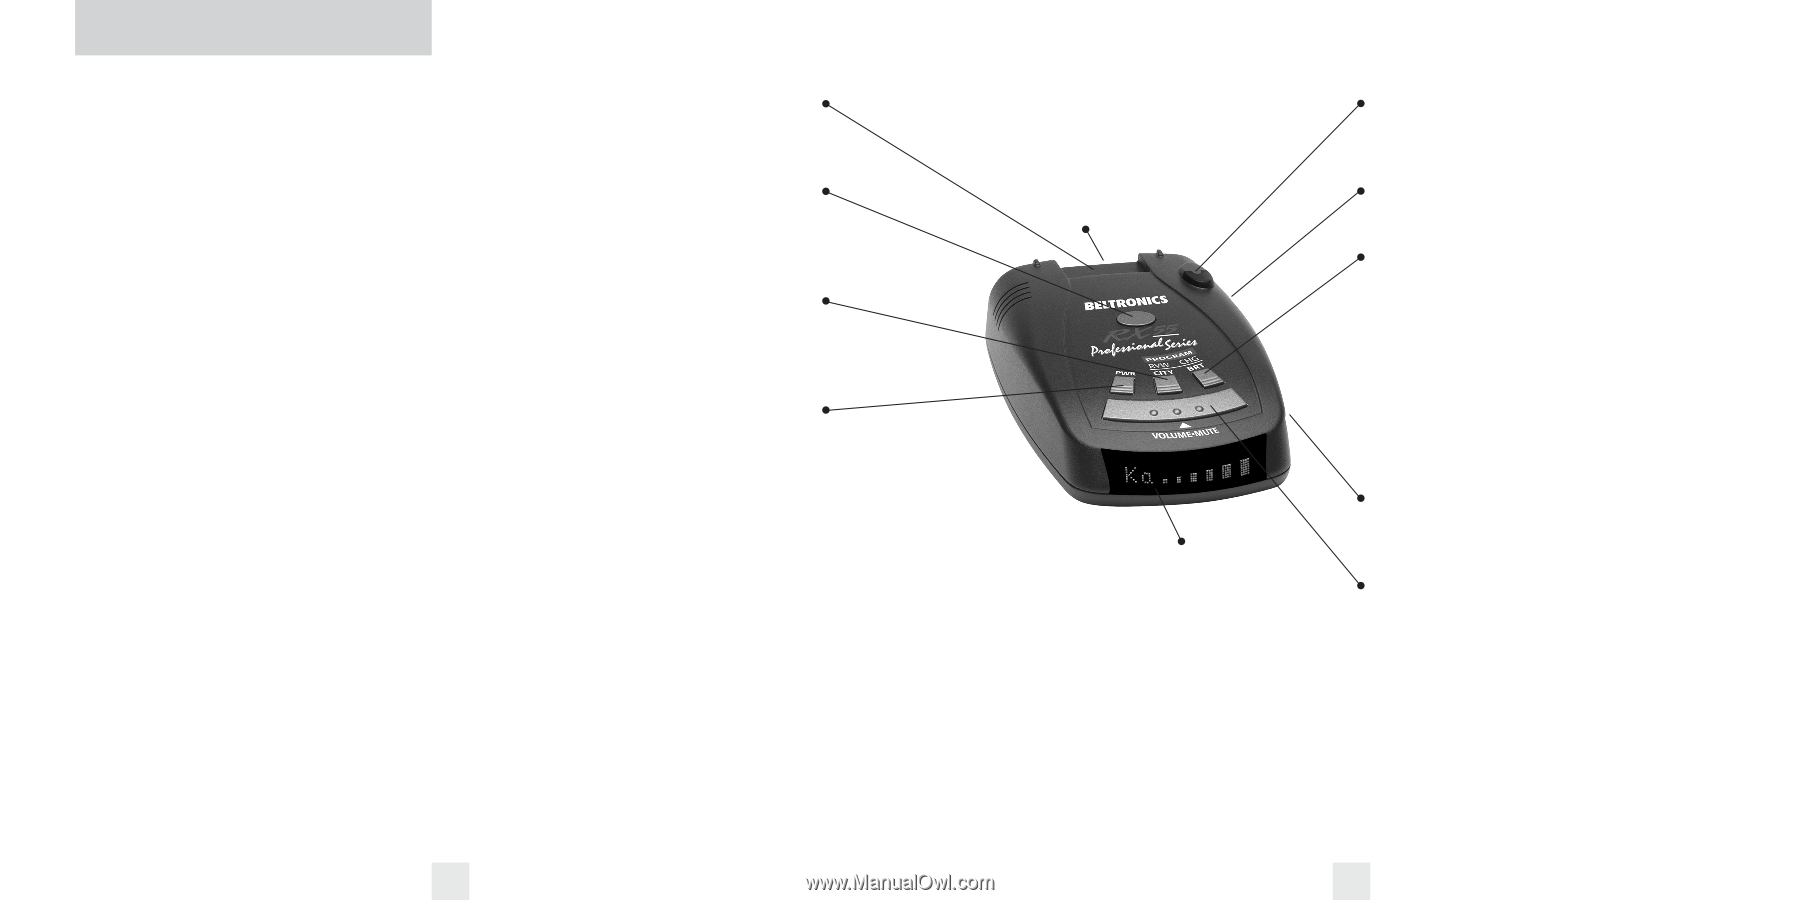
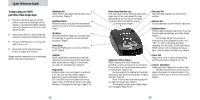
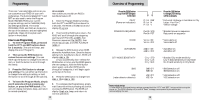
Quick Reference Guide To begin using your RX55, just follow these simple steps 1 Plug the telephone jack end of the power cord into the side jack of the detector, and plug the lighter adapter end of the power cord into your car's lighter socket. 2 Mount your RX55 on the windshield using the supplied windshield mount. 3 Press the PWR button on the top left side to turn it on. 4 Press and hold the Mute/Volume button to adjust the volume. Please read the manual to fully understand RX55's operation and features. QuickMount Slot Insert RX55's adjustable Windshield mount into this slot. Page 6-7 QuickMount Button Press the button, and slide the Windshield mount into one of its four locking positions. Page 7 City Button Switches between Highway, AutoScan and City settings. In general, we recommend AutoScan. Page 8 Power Button Press the PWR button to turn the RX55 on or off. Page 8 AutoMute RX55's patented AutoMute automatically reduces the volume level of the audio alert after a brief period. Page 8. If you prefer, you can turn AutoMute off. Page 12 Programming RX55 is ready to go, just plug it in and turn it on. But you can also easily change 7 features for your preferences. Press the CITY and BRT buttons located on the top case to enter the Program Mode, then easily Review or Change your settings. Page 12-16 4 Radar Antenna and Laser Lens The rear panel of your RX55 should have a clear view of the road ahead. For best performance, do not mount the RX55 directly behind windshield wipers or tinted areas. Page 6 Alphanumeric Matrix Display RX55's display will show Highway, AutoScan, or City as its power-on indication. If you prefer, you can choose other poweron indications. Page 12-14 During an alert, the display will indicate radar band, and a precise bar graph of signal strength. Page 10 Note: In the Dark Mode the display will not light during an alert. Page 9 The display can also show Safety Radar text messages. Page 22-23 Rear Laser Port Receives laser signals from behind the vehicle. Earphone Jack Accepts standard 3.5mm MONO earphone. Brightness Button Press to adjust display brightness. There are three brightness settings, plus Dark Mode. Page 9 In the Dark Mode, the power-on indication will be changed to a dim "AD," "HD," or "CD" (indicating AutoScan, Highway, or City Dark). In the Dark Mode, RX55's meter will not display during an alert, only the audio will alert you. Page 9 Power Jack Plug power cord or optional SmartPlug into this connector. Pages 6, 10, 29 Volume / Mute Button Press and hold to adjust the volume level. Briefly press this button (top front) to silence the audio for a specific alert. (The audio will alert you to the next encounter.) Page 8 5
-
 1
1 -
 2
2 -
 3
3 -
 4
4 -
 5
5 -
 6
6 -
 7
7 -
 8
8 -
 9
9 -
 10
10 -
11
-
12
-
13
-
14
-
15
-
16
 |
 |