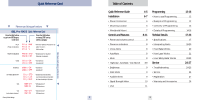
Beltronics RX55 Owner's Manual - Page 5
Installation - manual
 |
View all Beltronics RX55 manuals
Add to My Manuals
Save this manual to your list of manuals |
Page 5 highlights
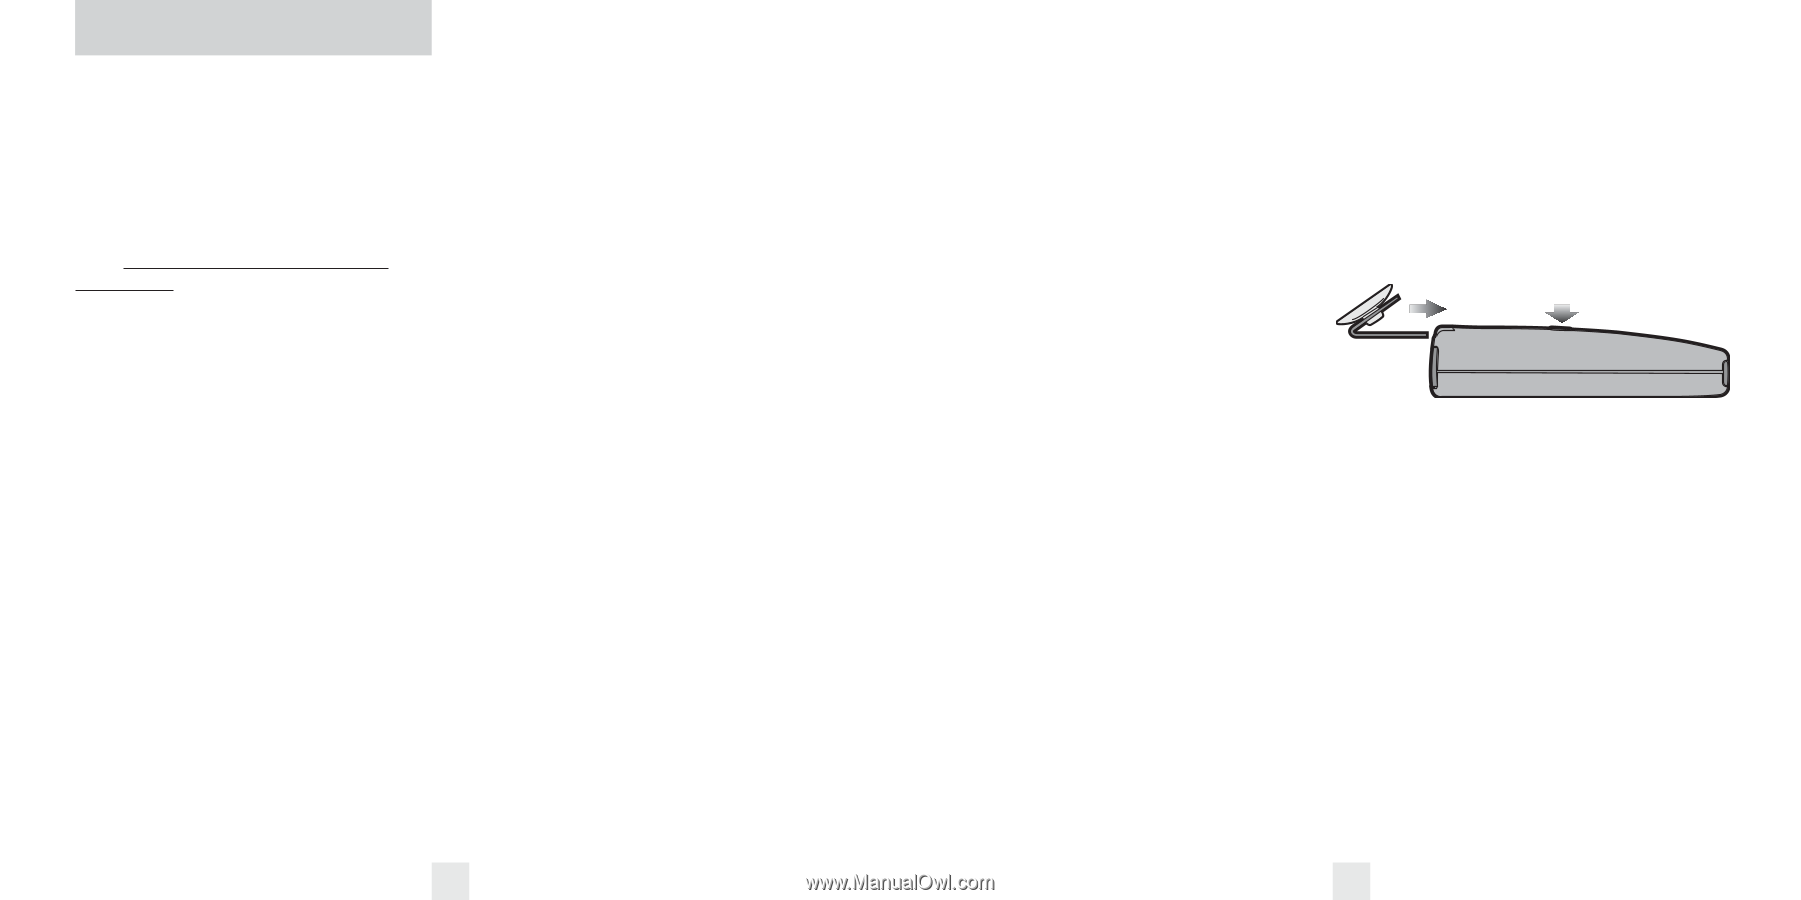
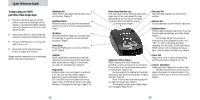
Installation Power Connection To power the RX55, plug the small end of the supplied coiled power cord into the telephone-type power jack on RX55's right side, and plug the lighter adapter into your vehicle's lighter socket or accessory socket. RX55 operates on 12 volts DC negative ground only. The lighter plug provided is standard size and will work in most vehicles. Of course, your lighter socket must be clean and properly connected for proper operation. Note: depending on your vehicle, the lighter socket power may either be continuously on, or it may be switched on and off with your ignition switch. RX55's standard lighter adapter has an integral fuseholder. If it is ever necessary to replace the fuse, simply unscrew the tip of the lighter plug and replace the fuse with an identical 2 amp fuse. Optional power cords See the Accessories section for details on our optional SmartPlug. Mounting Location WARNING: BELTRONICS cannot anticipate the many ways the RX55 can be mounted. It is important that you mount RX55 where it will not impair your view nor present a hazard in case of an accident. Where to mount RX55 For optimum detection performance, we recommend the following: • Using the Windshield Mount, mount your RX55 level, a few inches above the dashboard, and high enough on your front windshield to provide a clear view of the road from the front and rear. • Mount RX55 away from windshield wipers, other solid objects, and heavily tinted areas that might obstruct the radar antenna or laser lens. Windshield Mount RX55's QuickMount windshield bracket is designed for unobtrusive and hassle-free mounting. 1 Depress the QuickMount button on the top of RX55 (by the word BELTRONICS) and slide the QuickMount bracket into the slot until it is locked into the position which best fits the angle of your windshield (there are four settings available). For extremely horizontal or extremely sloped windshields, the QuickMount bracket can be bent. To ensure that the suction cups adhere to the windshield firmly, be sure to keep both your windshield and the suction cups clean. 2 To adjust RX55 on your windshield, use the QuickMount button located on the top of the RX55, and slide RX55 forward or backward to obtain a level horizontal position. When installed and adjusted properly, the back top edge of the RX55 should rest solidly against your windshield. Caution! A few vehicles (including some Porsches) have windshields with a soft anti-lacerative coating on the inside surface. Use of suction cups will permanently mar this coating. Consult your dealership or the vehicle owner's manual to determine if your windshield has this coating. User's Tip You can leave the QuickMount bracket in place on your windshield, and easily remove the RX55 by pressing the adjustment button and sliding it off the mount. Again, be sure to position the bracket where it won't present a hazard in the event of an accident. Additional mounts are available. 6 7
-
 1
1 -
 2
2 -
 3
3 -
 4
4 -
 5
5 -
 6
6 -
 7
7 -
 8
8 -
 9
9 -
 10
10 -
 11
11 -
12
-
13
-
14
-
15
-
16
 |
 |