BenQ HT5550 User Manual - Page 10
Controls and functions, Projector & Remote control
 |
View all BenQ HT5550 manuals
Add to My Manuals
Save this manual to your list of manuals |
Page 10 highlights
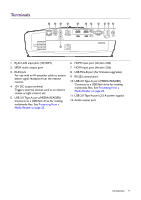
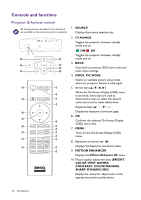
Controls and functions Projector & Remote control All the key presses described in this document 1. SOURCE are available on the remote control or projector. Displays the source selection bar. 2. POWER Toggles the projector between standby mode and on. ON/ Off Toggles the projector between standby 1 4 mode and on. 3. BACK 2 5 6 Goes back to previous OSD menu, exits and 3 7 saves menu settings. 4. MODE, PIC MODE Selects an available picture setup mode when the projector detects a valid signal. 2 2 5. Arrow keys ( , , , ) When the On-Screen Display (OSD) menu 11 is activated, these keys are used as 8 12 directional arrows to select the desired menu items and to make adjustments. 13 Keystone keys ( / , / ) 5 Display the keystone correction page. 6. OK 6 7 Confirms the selected On-Screen Display (OSD) menu item. 3 1 14 7. MENU 9 15 Turns on the On-Screen Display (OSD) 16 menu. 4 17 8. Keystone correction key 10 18 Displays the Keystone correction menu. 19 9. MOTION ENHANCER Displays the Motion Enhancer 4K menu. 10. Picture quality adjustment keys (BRIGHT, COLOR TEMP, GAMMA, CONTRAST, COLOR MANAGE, SHARP, DYNAMIC IRIS) Display the menus for adjustments of the appropriate picture quality values. 10 Introduction
-
 1
1 -
2
-
3
-
4
-
 5
5 -
 6
6 -
 7
7 -
 8
8 -
 9
9 -
 10
10 -
 11
11 -
 12
12 -
 13
13 -
 14
14 -
 15
15 -
16
-
17
-
18
-
19
-
20
-
21
-
22
-
23
-
24
-
25
-
26
-
27
-
28
-
29
-
30
-
31
-
32
-
33
-
34
-
35
-
36
-
37
-
38
-
39
-
40
-
41
-
42
-
43
-
44
-
45
-
46
-
47
-
48
-
49
 |
 |
