BenQ HT5550 User Manual - Page 20
Using the menus, on the projector or remote control to move through the menu items.
 |
View all BenQ HT5550 manuals
Add to My Manuals
Save this manual to your list of manuals |
Page 20 highlights
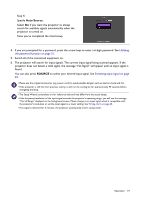
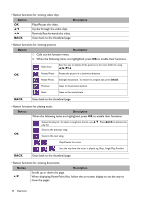
Using the menus The projector is equipped with On-Screen Display (OSD) menus for making various adjustments and settings. The OSD screenshots below are for reference only, and may differ from the actual design. Below is the overview of the OSD menu. 1 Main menu icon 1 2 PICTURE Picture Mode User Mode Management Brightness Contrast 3 Color Tint Sharpness Advanced Reset Current Picture Mode 4 Media Reader 2 Main menu 3 Sub-menu 5 4 Current input signal 5 Status Exit 6 Press BACK to go to the previous 6 page or to exit. To access the OSD menu, press MENU on the projector or remote control. • Use the arrow keys ( / / / ) on the projector or remote control to move through the menu items. • Use OK on the projector or remote control to confirm the selected menu item. 20 Operation
-
 1
1 -
2
-
3
-
4
-
5
-
6
-
7
-
8
-
9
-
10
-
11
-
12
-
13
-
14
-
 15
15 -
 16
16 -
 17
17 -
 18
18 -
 19
19 -
 20
20 -
 21
21 -
 22
22 -
 23
23 -
 24
24 -
 25
25 -
26
-
27
-
28
-
29
-
30
-
31
-
32
-
33
-
34
-
35
-
36
-
37
-
38
-
39
-
40
-
41
-
42
-
43
-
44
-
45
-
46
-
47
-
48
-
49
 |
 |
