Bernina 1260 Manual - Page 39
Fully, automatic, standard, buttonholes
 |
View all Bernina 1260 manuals
Add to My Manuals
Save this manual to your list of manuals |
Page 39 highlights
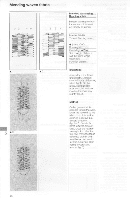
Fully automatic standard buttonholes with gimp cord Fully outomatic standard buttonhole Needle: 80-90 Thread: Darning/Sewing tIvead Feed-dog: tett*. • Smith: No. 14 Presser foot: 3A Preparation Thread Me lower tread through the linger of the bobbn case. Sewing the buttonholes I Sdoct the buttonhole type. file machine is ready to sew the fist bead. insen the noetle into the buttonhole begin and lower the PrOSSCr feet. Sow the fist bead forwards and sled at the and of the bead marking. Fully automatic standard buttonhole with gimp cord °imp coed strengthris the buttonnoto and gives a perfect fnish. Use pate yarn nO. 8, strockg handSevang thread or fire crochet thread. The loop of the cord should be at the end of the buttonhole most subpet to wear. Piece fabric under the loot. Positioning the cord It Is easier to positnn the cord once the needle is inserted n the fabric. InSerl Iho noodle into the booming of the bAlco. hole. Do not lower the pressor toot yet. Goode the cons to the nght tinder the buttenlvle loot and hook it Over tie prcoo at the had< (big. 1). From the left bring it round the front and under the foot. Pull to cord ends into the retaining SiO1S Iii. wico SewIna teat It nedessery adust the stitch width and length to sus the fabric. - Bead density wrth the stitch length did. - Bead (buttonhole) width with the stitch width dial. 2. Press the button. 1.1machine switches tr. auto made and cooider es the first button- hole Oul0Matitally. TO sew the atsequent buttonholes lust assert the needle into trio buttonhole neon and the machine we sew them auternatkdey. To: Always test sew On the fabric and Inlednhg you mend to use. 5 • 1 Marking buttonholes: Mark Just one buttonhole The length is Programmed adoinaticaly alter sewing the first buttonhoe. Simply mark the boginnng point of al subsequent buttonholes. SET •2 BI RNn as
-
 1
1 -
2
-
3
-
4
-
5
-
6
-
7
-
8
-
9
-
10
-
11
-
12
-
13
-
14
-
15
-
16
-
17
-
18
-
19
-
20
-
21
-
22
-
23
-
24
-
25
-
26
-
27
-
28
-
29
-
30
-
31
-
32
-
33
-
 34
34 -
 35
35 -
 36
36 -
 37
37 -
 38
38 -
 39
39 -
 40
40 -
 41
41 -
 42
42 -
 43
43 -
 44
44 -
45
-
46
-
47
-
48
-
49
-
50
-
51
-
52
-
53
-
54
 |
 |