Bosch HBL5056AUC Use and Care Manual - Page 6
Command buttons, Display, Oven Control Panel, Knobs, Other Features
 |
UPC - 825225838326
View all Bosch HBL5056AUC manuals
Add to My Manuals
Save this manual to your list of manuals |
Page 6 highlights
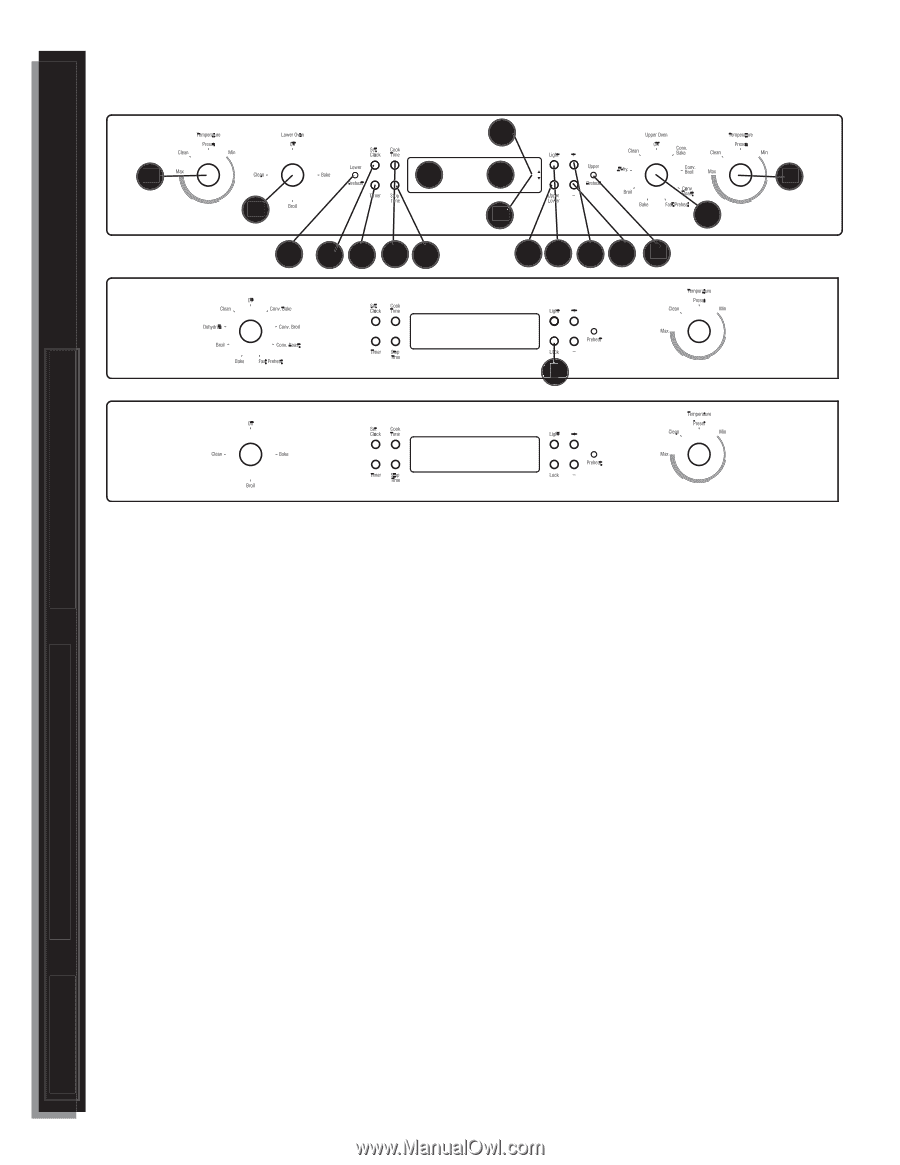
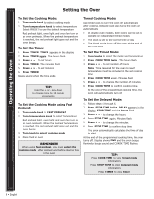
Self Help Care and Maintenance Operating the Oven Getting Started Oven Control Panel °F Getting Started 13 17 11 16 Figure 2: All Double Ovens 10 1 2 3 4 12 14 16 5 6 7 8 10 °F °F 17 Figure 3: HBL504 and HBN54 Model Single Ovens 9 °F Figure 4: HBL503 Model Single Ovens Command buttons 1. SET CLOCK: Press to set or change the time of day. 2. TIMER: Press to set or clear the timer. 3. COOK TIME: Press to set a timed cook mode. 4. STOP TIME: Press to set the stop time in a delayed cook mode. 5. UPPER LOWER (Double ovens only): Press to select upper or lower oven before setting lights, etc. 6. LIGHT: Press to turn oven lights on or off. 7. +: Press to increase the time in one of the above functions by one minute at a time. Press and hold to increase by 10 minutes at a time 8. - : Press to decrease the time in one of the above functions by one minute at a time. Press and hold to increase by 10 minutes at a time. 9. LOCK: For single ovens, press and hold lock and + buttons at same time to turn safety lock on or off. For double ovens, press and hold + and - buttons to turn safety lock on or off (use Upper Lower button to select oven first). This function locks the oven door for safety purposes. Display 10. PREHEAT LIGHT (one for each oven): Lights up when oven is preheating 11. TIME: Green digits to left of display. Displays time of day and timer. 12. TEMPERATURE: Red digits to right of display. Displays the chosen temperature for the oven. 4 • English 13. BOX ICONS (double ovens only): Green icon shows which oven is active. 14. LOCK ICONS: Red icons display inside box icons. Indicates that door is locked. 15. DISPLAY TEXT: Indicates active functions (steady) and functions awaiting user input (blinking). Knobs 16. MODE (one for each oven): turn to choose cooking mode. 17. TEMPERATURE (one for each oven): turn to change oven temperature. When PRESET is selected, the default temperature is used. Other Features 18. BEEPS: One beep signals that the entry is accepted, two beeps signals that the entry is invalid. 19. F NUMBER CODES: Appear in display when the control detects a problem in the oven or its electronics. See Self Help section, page 19, for more information. 20. DEFAULT TEMPERATURES: Each cooking mode has a default temperature that appears when the temperature knob is turned to PRESET. The default is the most common temperature for the mode. 21. SABBATH MODE: When activated, oven bakes for 72 hours before shutting off automatically. The mode is Sabbath compliant for religious faiths with "no work" requirements on the Sabbath.
-
 1
1 -
 2
2 -
 3
3 -
 4
4 -
 5
5 -
 6
6 -
 7
7 -
 8
8 -
 9
9 -
 10
10 -
 11
11 -
 12
12 -
13
-
14
-
15
-
16
-
17
-
18
-
19
-
20
-
21
-
22
-
23
-
24
-
25
-
26
-
27
-
28
-
29
-
30
-
31
-
32
-
33
-
34
-
35
-
36
-
37
-
38
-
39
-
40
-
41
-
42
-
43
-
44
-
45
-
46
-
47
-
48
-
49
-
50
-
51
-
52
-
53
-
54
-
55
-
56
-
57
-
58
-
59
-
60
-
61
-
62
-
63
-
64
 |
 |