Bosch HBL8753UC Installation Instructions - Page 13
Continue to Connecting the Speed Oven Electrical
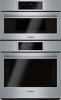 |
View all Bosch HBL8753UC manuals
Add to My Manuals
Save this manual to your list of manuals |
Page 13 highlights
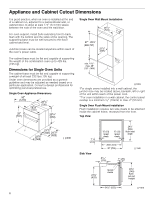
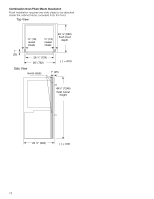
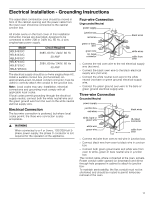
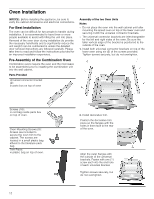
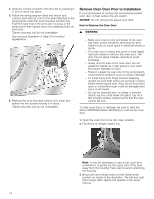
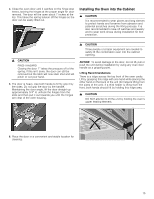
3. Place the speed oven on top of the universal connector brackets and fasten in place using three (3) screws per side. Tighten the screw securely, but do not overtighten. Note: The existing screws in the speed oven base help with alignment. When lowering the speed oven into place on the universal connector brackets, allow these screw heads to slide into the slots as shown in the illustration below. The screw nearest the front of the speed oven should slide into the base of the slope at the front of the bracket. Connecting Speed Oven Electrical Conduit to Lower Oven Note: When installing the combination unit, the power cable must be properly attached to the oven-mounted junction box. This must be done prior to supplying electrical power to the oven unit. 9 WARNING Check to be sure that no electrical power has yet been supplied to the oven. 1. Remove the oven-mounted junction box cover located on the top rear of the oven. (See image below). 4. Continue to "Connecting the Speed Oven Electrical Conduit to the Lower Oven". 2. Remove the cap from the conduit access hole in the side of the oven-mounted junction box. 3. Guide the wires from the conduit cable coming from the speed oven through the hole in the oven-mounted junction box. There are four wires coming from the speed oven. 13
-
 1
1 -
2
-
3
-
4
-
5
-
6
-
7
-
 8
8 -
 9
9 -
 10
10 -
 11
11 -
 12
12 -
 13
13 -
 14
14 -
 15
15 -
 16
16 -
 17
17 -
 18
18 -
19
-
20
-
21
-
22
-
23
-
24
-
25
-
26
-
27
-
28
-
29
-
30
-
31
-
32
-
33
-
34
-
35
-
36
-
37
-
38
-
39
-
40
-
41
-
42
-
43
-
44
-
45
-
46
-
47
-
48
-
49
-
50
-
51
-
52
 |
 |
