Boss Audio BV7330 User Manual in English - Page 17
Dvd Operation - how to connect parking brake wire
 |
View all Boss Audio BV7330 manuals
Add to My Manuals
Save this manual to your list of manuals |
Page 17 highlights
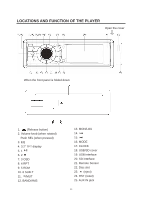
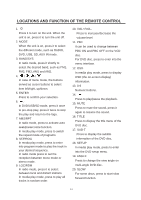
OPERATION displayed on the screen. Pressing MUT button on the front panel or MUTE button on the remote control will mute the sound. Press it again will resume the sound. ƹ Mode selection Press MODE button on the front panel or MODE on the remote control to select the desired mode to enjoy. Such as DVD, radio, USB, SD, AUX mode. ƹ Loudness Press and hold MON/LOU button on the front panel for several seconds to switch loudness function on, and "LOUD" will appear on the LCD. Press it for several seconds again to release this function, and "LOUD" will disappear. ƹ Clock set Press CLOCK button shortly on the front panel to display the clock. Then press and hold CLOCK button for several seconds, the hour will be selected, then rotate the volume knob on the front panel to change the value and press volume button to confirm. The cursor will resume to the minute. Then use the volume knob on the front panel to change the value of the minute and press volume button to confirm. ƹ Equalization In radio mode, press AUDIO button on the remote control or EQ button on the front panel to turn on equalization function and to select desired audio mode, such as POP, CLAS, ROCK and OFF. In DVD mode, press and hold the button is EQ function. ƹ Brake function If the brake wire (pink wire) isn't connected to the ground (when driving), the picture will not be shown on the screen in DVD/AUX mode for safety purpose. Only the audio will be heard. Note: Only when parking, the DVD/AUX picture can be seen on the screen. When driving, the warning information will be displayed. ƹ Rearview function On the back of the unit, there is a yellow jack for rearview video in. When backing a car, the picture of the screen will switch to rearview picture automatically and the unit will play the video information that inputted from the yellow rearview video in jack. DVD OPERATION ƹ Loading/ejecting a disc When the front panel folding down, you will see the disc slot and (eject) button on the housing of the unit. When there is not any disc on the slot, insert the disc with printed side facing up into the disc slot. Then let the front panel up to normal position. The player will start playback automatically. Press button to eject the disc. ƹ Stopping playback Press button on the front panel or on the remote control for one time to pre-stop the playback. When button on the front panel or on the remote control is pressed, normal playback will continue. Press or button twice to stop the playback completely. 16
-
 1
1 -
2
-
3
-
4
-
5
-
6
-
7
-
8
-
9
-
10
-
11
-
 12
12 -
 13
13 -
 14
14 -
 15
15 -
 16
16 -
 17
17 -
 18
18 -
 19
19 -
 20
20 -
 21
21 -
 22
22 -
23
-
24
-
25
-
26
-
27
 |
 |